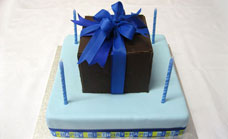
Chocolate box birthday cake
Ingredients
Chocolate cake:
This can be made up to a month in advance and kept in the freezer.
- 500ml water
- 660g sugar
- 250g butter
- 40g cocoa
- 2 tsp bi-carb soda
- 450g self-raising flour, sifted
- 4 eggs, lightly beaten
Ganache:
Use a good quality dark chocolate to achieve a smooth and silky ganache.
- 200g thickened cream
- 200g chocolate, dark
Decorations:
700g readymade white icing (also called fondant icing)
- Icing sugar, extra to prevent white icing from sticking to the bench when rolling
- Food colouring ÛÒ black and blue
- 650g dark cooking chocolate
- 40cm square cake board
- 4m blue ribbon
- 1m Happy Birthday ribbon
- Pins to secure ribbon
- Tissue paper and cellophane to wrap letters in box
- Paper to print word game
- Candles
Equipment and other items needed:
- 28 x 28 cm cake tin
- Greaseproof paper
- Pallet knife
Method
1. Cover cake with ganache and then roll the fondant icing out and drape over the cake 2. Trim the edge of the icing around the cake and wrap with ribbon and fix in place 3. Roll out fondant icing and measure and cut into tiles
4. Cut out letters with stamps and fix onto tiles with a little water 5 Cut chocolate into even sized tiles and glue together with melted chocolate 6. Prepare ribbon to wrap around chocolate box
7. Add ribon and chocolate box to the top of the cake 8. Place letters inside the box 9. Seal the top of the box before tying the ribbon.
Chocolate cake
Preheat oven to 180å¡C.
Line tin with greaseproof paper.
Place water and sugar in a saucepan, heat until sugar dissolves.
Add butter and cocoa, bring to the boil and simmer for 1 minute. Be careful not to boil too rapidly as the mix will boil over.
Remove from heat and add bi-carb soda. Allow to cool for 5 minutes before adding flour and eggs. Mix well.
Bake in oven until the mix springs back when gently pressed or when a skewer comes out clean ÛÒ approximately 40 minutes.
Keep the cake in the tin for approx 5 minutes before turning onto a wire rack ÛÒ keep the bottom side up at all times to avoid making lines as this will be the presentation side up. You can freeze your sponge at this point, tightly in cling film.
When the cake is totally cooled (best if you can keep it in the fridge to chill right down before going any further) you will need to flatten the Û÷bottomÛª (which was the top.) of the sponge. Place a sheet of greaseproof paper on the presentation side and turn over. Use a serrated knife and cut the top of the cake so itÛªs as flat as possible. I usually cut a little at a time so that I donÛªt accidently cut away too much cake!
Position on cooling rack to begin coating with ganache.
Ganache
This layer of melted chocolate and cream will give the cake a smoother edge before putting on the fondant icing. You could also use butter cream ÛÒ the key is to make it as smooth and straight as possible as each bump will be highlighted once the fondant icing is put on.
Place the cream and chocolate in a microwave bowl, heat for 1 minute, remove and stir until all is combined and the mix is smooth
When the ganache is warm, sit the cake on a cooling rack and pour over until all is evenly covered. Smooth the edges and top if necessary with a flat knife (if you warm the knife it will make it easier but make sure no water comes in contact with the ganache)
Allow to set in fridge for 5 minutes before transferring onto the cake board.
Readymade white icing
This is also known as Û÷fondant icingÛª and can be found in larger quantities in cake specialty shops ÛÒ they also sell them already coloured if you donÛªt wish to do that yourself.åÊ It will keep for a long time if stored in a cool place and if itÛªs wrapped very well (I usually use a few layers of cling film before placing in an airtight container in the freezer)
Usually the icing is quite firm to touch when you open the packet. Break it into small pieces with your fingers and begin to Û÷workÛª or Û÷massageÛª it until you notice it becomes smoother and softer.åÊ At this point, bring the icing together and knead as you would a dough until it is soft and smooth (the smoothness reminds me of my kidsÛª baby bottoms!) Once itÛªs smooth and soft you are ready to add the colour.
Flatten a little, press some Û÷creatorsÛª into the dough and add a few drops of blue colour. Going slowly but steady is better than adding too much at once until you have achieved the strength of colour you are after. To work the colour into the icing, continue kneading as you would a dough. If the icing starts to stick to the bench use icing sugar, as you would flour to dough.
Once the fondant icing is smooth and the colour even throughout it is ready to use.
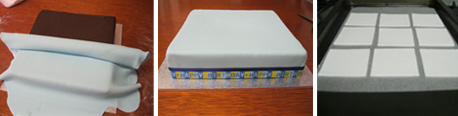
Roll out the fondant icing in a square shape, using your baking tin as a guide, allowing enough to overlap the edges. It should be around 1/2cm thick.
Using your rolling pin, and starting closest to your body, loosely roll the icing into the rolling pin. Û÷UnravelÛª the icing over the cake, making sure you allow enough icing to fall over the edges.åÊ This is a tricky part so the less kiddies around at this stage will probably make things easier. DonÛªt stress if it looks a mess, icing can be smoothed over and the ribbon and decorations will work their magic to hide the bits you donÛªt want anyone to see. Also use the natural curves of your hand and fingers to manipulate the icing so that it sits smoothly on the cake. Also try to touch the icing to the cake gently ÛÒ if you press to hard you will make finger holes in the cake.
Use kitchen scissors or a pallet knife to trim away the excess from the edges and gently tuck under to give a straight edge. DonÛªt worry too much about the bottom edges as they will be covered with ribbon later, as long as there is no icing sticking out, this job is done.
Word tiles
These need to be made at least a week prior to allow the fondant to dry and become hard.
Roll out 200g of the white fondant to approximately 1/2cm thickness. It can be easier to roll it out on greaseproof paper ÛÒ donÛªt forget to use icing sugar if it starts to stick. Using your rolling pin, gently turn the icing regularly so that the bottom wonÛªt stick.
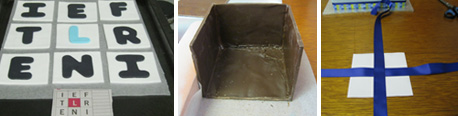
Using a paper stencil cut out nine tiles and place on a tray with greaseproof paper.
Colour 70g of fondant black and 10g blue, roll and cut out the letters. Using a little water, stick onto each tile.
Keep the tray in a dry place to allow the fondant icing to dry.
Chocolate box
Place chocolate in a bowl and microwave on high for one minute. Remove and stir until all chocolate is melted. You may need to heat for a further 30 seconds, just be careful not to overheat or the chocolate will burn.
Pour onto a large sheet of greaseproof paper and either spread with a pallet knife or pick up an edge and use the same method you use when you are trying to flick the creases from your sheets when you are folding them up (but gentler with this!). The chocolate shouldnÛªt be any thicker than 1cm. If itÛªs not right, allow the chocolate to set before re-melting (not so much mess) and try again.
Just before it is fully set, use a sharp knife to cut blocks. You will need two blocks which are 13cm x 13cm for the top and bottom and four blocks which are 13cm x 10cm for the sides.
Melt 50g of chocolate and pour into a small piping bag, using it to glue the walls together. Allow each join to set before starting on another side. Use books or straight edges to prop the chocolate and keep it upright.
Finishing the cake
Measure enough blue ribbon to wrap around base of cake, cut and secure with pins.
Repeat this process with the Happy Birthday ribbon.
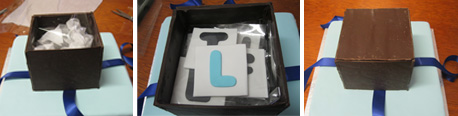
Cut the remaining blue ribbon in half and lay each piece on the cake, in the centre, in a cross. Place the chocolate box on top of the ribbon so it is sitting in the centre of the ribbon and cake.
Lay bottom of the box with tissue paper before filling with letter tiles. Lay a sheet of cellophane between each tile.
Print off the word game and answers and lay in the box before putting on the lid and tying up the ribbon.
Finish with candles.
Notes:
- Make the letter tiles ahead of time to allow the fondant icing to dry so it is hard enough to sit in the chocolate box.
- You could use white chocolate for the box and pink icing if blue does not suit.
- If you have any leftover ganache, use it as a delicious chocolate sauce!
- This recipe was created by Sonia Anthony.
From Chef Sonia
Although I am a qualified chef, IÛªve had no formal cake making training.åÊ What I have learned is through trial and many errors. I hope that by sharing my knowledge, you can become as confident and as excited about cake making as I am! (without the mistakes!) I think the most important thing is to Û÷give it a go,Ûª youÛªll be producing amazing cakes before you know it!
Please feel free to contact me for any questions at info@chefsoniaandyou.com or at Chef Sonia & You .åÊ
Serving Suggestions
Note


Leave A Comment
You must be logged in to post a comment.