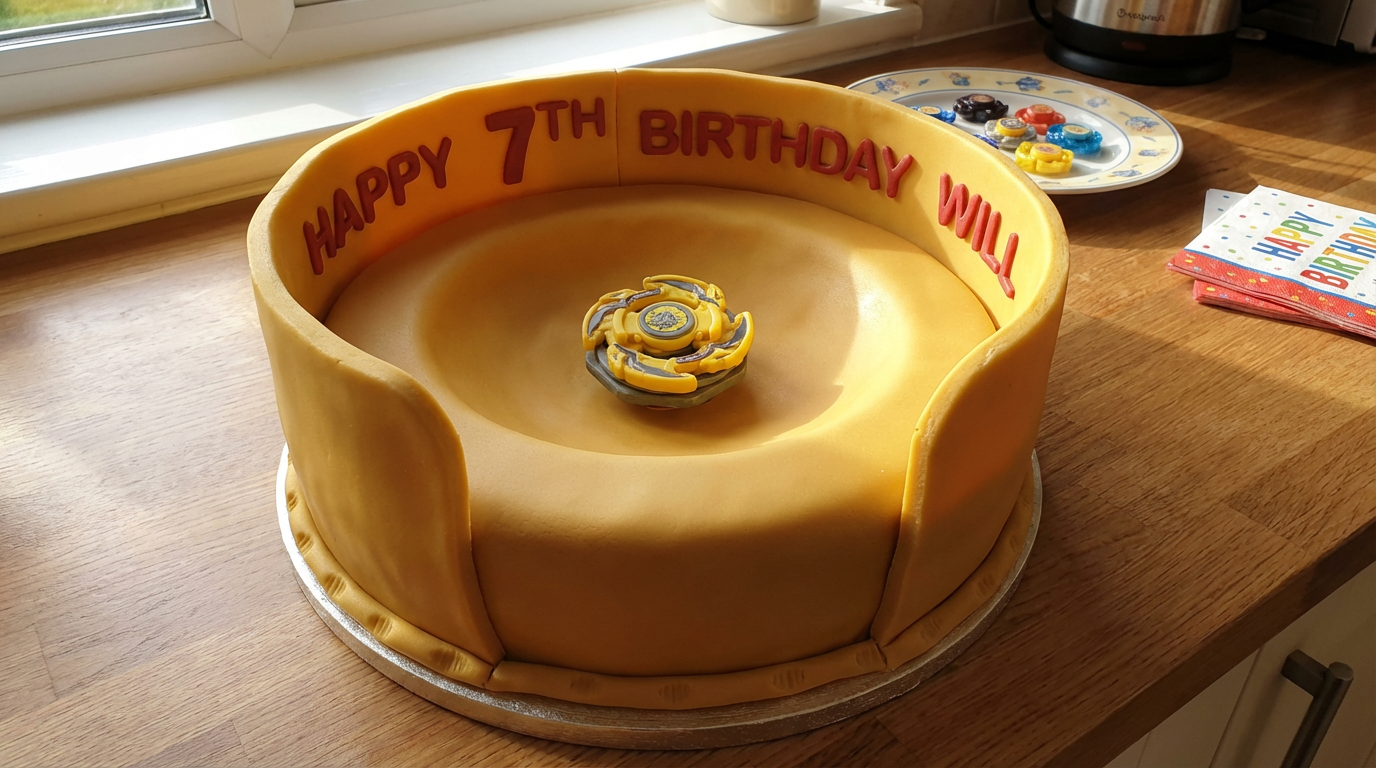
Ingredients
400g butter
400g chocolate
400g caster sugar
8 eggs
400g plain flour
sifted
1 50cm square cake board
1.5kg ready made white icing
also called fondant icing
Icing sugar
extra, to prevent sticking
Food colouring
orange, yellow, blue, red and black
Small silver balls
optional
9 icy pole sticks
Candles
1 egg white
1 tsp lemon juice
150g icing sugar
Orange food colour
Allergy Advice
Contains Dairy
Contains Eggs
Contains Gluten
Contains Soy
Equipment
- 1 Greaseproof paper
- 1 Piping bag
- 1 small nozzle
- 1 letter cutters
- 1 Mixing bowl
- 1 Microwave
- 1 Serrated knife
- 1 Wire rack
- 1 Rolling pin
- 1 50cm square cake board
- 1 Kitchen scissors
- 1 Sharp knife
Instructions
- Chocolate cake: Preheat oven to 180°C. Line tin with greaseproof paper.
- Melt the butter and chocolate in the microwave, on high, for one minute or until chocolate is melted.
- Beat eggs and sugar in a mixing bowl until pale.
- Mix in the butter/chocolate mix before folding in flour.
- Pour into tin and bake in oven until the mix springs back when gently pressed.
- Keep the cake in the tin for approx 5 minutes before turning onto a wire rack – keep the bottom side up at all times to avoid making lines as this will be the presentation side up.
- When the cake is completely cooled, place a sheet of greaseproof paper on the presentation side and turn over. Use a serrated knife and cut the top of the cake so it’s as flat as possible.
- Turn back over onto greaseproof paper and cut a circle in the centre to create the dome shape. Go slowly and steady to avoid cutting through to the bottom. Keep aside any large pieces of sponge to be used for the main pieces of the beyblades.
- Mix the sponge off cuts with a little water until it becomes a putty consistency. Use this to create a smooth surface over the entire sponge. It is now ready to cover with fondant icing.
- Readymade white icing: Break the icing into small pieces and knead until soft and smooth. Set aside a small amount (around 50g) for the yellow parts of the beyblades, 100g for the grey icing and 50g for the blue pieces.
- Flatten the main piece of icing, press some ‘creators’ into the dough and add a few drops of orange colour. Continue kneading until you have achieved the strength of colour you are after.
- Once the orange is mixed evenly throughout, roll out to approximately 1/2cm thickness. It can be easier to roll it out on greaseproof paper – don’t forget to use icing sugar if it starts to stick.
- Using your rolling pin, and starting closest to your body, loosely roll the icing into the rolling pin. ‘Unravel’ the icing over the larger cake, making sure you allow enough icing to fall over the edges.
- Use the natural curves of your hand and fingers to manipulate the icing so that it sits smoothly on the cake or use a ball of fondant dusted with icing.
- Using kitchen scissors or a sharp knife, cut around any excess icing from the bottom and gently tuck in to hide the ends.
- Carefully transfer the cake onto your serving plate or cake board.
- To make the side walls: Make these at least seven days before you put them on the cake. Roll out a strip of orange icing to the length of each side and approximately 5-8cm in height. Cut out squares and allow to dry for at least seven days. Make at least one extra wall.
- Once the walls are dry, use a stencil to pipe on wording or use letter cutters and stick on with a little water.
- Cover each icy pole stick with fondant icing, trim ends with a sharp knife and allow to dry.
- Making the glue: Combine the egg white, lemon juice, food colour and icing sugar into a bowl and mix until the egg white is stiff. Place in a piping bag ready to glue.
- Glue the poles to the walls at least 2-3 days before hand using royal icing. Allow to set until hard.
- To finish the cake: Glue the walls to the cake at least one day prior to the party – use props to help keep them upright and in the right position.
Notes
Tip
To make life easier, break down each stage of the cake making.
Tip
Make the sponge at least a month beforehand, cut out the dome stadium, fill holes with sponge putty and freeze.
Tip
Defrost the sponge 8 days prior to the party and cover with fondant. Prepare the decorations and sit in your kitchen pantry to set and go hard.
Storage
Once the cake has been iced all around with fondant icing, this acts as cling film and stops the cake from drying out. You can do this stage ahead of time by at least one to two weeks – depending on the weather. The icing decorations can be made well in advance (if they are kept uncovered in a cool and dry spot they will last for months).