Ingredients
200g self raising flour
sifted
50g cocoa powder
sifted
125g butter
softened
1 tsp vanilla essence
275g caster sugar
2 eggs
⅔ cup water
100g thickened cream
100g chocolate
dark
500g readymade white icing
icing sugar
extra to prevent white icing from sticking to the bench when rolling
food colouring
green and orange
1 small marshmallows
2 Flake chocolate
1 fairy floss
å_ mt Happy Birthday ribbon
(usually sold in a 4mt roll, can be used for another birthday!)
candles
Allergy Advice
Contains Dairy
Contains Gluten
Contains Soy
Equipment
- 1 greaseproof paper
- 1 large rolling pin
- 1 1cm round cutter
- 1 mixing bowl
- 1 wire rack
- 1 serrated knife
- 1 microwave bowl
- 1 cooling rack
- 1 flat knife
- 1 kitchen scissors
- 1 sharp knife
Instructions
- Preheat oven to 180å¡C.
- Line tin with greaseproof paper.
- Place sifted flour and cocoa in mixing bowl, add remaining ingredients and beat on low speed until combined.
- Increase speed to medium and beat until mix turns a lighter colour and is smooth and fluffy.
- Bake in oven until the mix springs back when gently pressed or when a skewer comes out clean.
- Keep the cake in the tins for approx 5 minutes before turning onto a wire rack ÛÒ keep the bottom side up at all times to avoid making lines as this will be the presentation side up. You can freeze your sponge at this point, tightly in cling film.
- When the cake is totally cooled (best if you can keep it in the fridge to chill right down before going any further) you will need to flatten the Û÷bottomÛª (which was the top.) Place a sheet of greaseproof paper on the presentation side and turn over. Use a serrated knife and cut the top of the cake so itÛªs as flat as possible. I usually cut a little at a time so that I donÛªt accidently cut away too much cake!
- Place the cream and chocolate in a microwave bowl, heat for 1 minute, remove and stir until all is combined and the mix is smooth.
- When the ganache is warm, sit the cake on a cooling rack and pour over until all is evenly covered. Smooth the edges and top if necessary with a flat knife (if you warm the knife it will make it easier but make sure no water comes in contact with the ganache)
- Allow to set in fridge for 5 minutes before transferring onto the bottom of a plate or soup bowl (depending on the size of the cake and your crockery) with a sheet of greaseproof paper ÛÒ this will make life easier when you need to transfer onto a cake board.
- Use the remainder of the ganache to dip some marshmallows which will be arranged around the campfire. (and some taste testers!)
- Usually the icing is quite firm to touch when you open the packet. Break it into small pieces with your fingers and begin to Û÷workÛª or Û÷massageÛª it until you notice is becomes smoother and softer. At this point, bring the icing together and knead as you would a dough until it is soft and smooth (the smoothness reminds me of my kidsÛª baby bottoms!) Once itÛªs smooth and soft you are ready to add the colour. Reserve approximately 100g of icing for the orange collar and colour the remainder with green.
- Flatten a little, press some Û÷creatorsÛª into the dough and add a few drops of colour. Again, going slowly but steady is better than adding too much at once (unless you are after a very bright colour!) until you have achieved the strength of colour you are after. To work the colour into the icing, continue kneading as you would a dough. If the icing starts to stick to the bench use icing sugar, as you would flour to dough.
- Once the green is mixed evenly throughout roll it out on greaseproof paper ÛÒ donÛªt forget to use icing sugar if it starts to stick. Use your rolling pin gently and turn the icing regularly so that the bottom wonÛªt stick.
- Using your rolling pin, and starting closest to your body, loosely roll the icing into the rolling pin. Û÷UnravelÛª the icing over the cake, making sure you allow enough icing to fall over the edges. This is the trickiest part of the whole process so the less kiddies around at this stage will probably make things easier. DonÛªt stress if it looks a mess, icing can be smoothed over and the ribbon and decorations will work their magic to hide the bits you donÛªt want anyone to see. Also use the natural curves of your hand and fingers to manipulate the icing so that it sits smoothly on the cake. Also try to touch the icing to the cake gently ÛÒ if you press to hard you will make finger holes in the cake.
- Using kitchen scissors or a sharp knife, cut around any excess icing from the bottom so that it has an overlap of around 2-3cm.
- Put a sheet of greaseproof paper on the top of the cake and gently turn over to expose the bottom. Fold in the icing overlap so that the edges are all sealed. If you have any cake spots exposed use the excess pieces of icing to cover. To seal them, run your finger over the joins a few times (gently!) and they will stick together. This is also your last chance to make any adjustments if the cakeÛªs not sitting straight ÛÒ either use the sponge which youÛªd cut off previously or a piece of icing.
- Turn the cake over onto your serving plate or cake board.
- Take the reserved piece of icing fondant, keep 10g aside for the white spots and colour the remainder with orange and knead until it is all incorporated and the icing is smooth.
- Roll out into a long cylinder on a piece of greaseproof paper, using icing sugar to prevent sticking, until it is long enough to curl around the cake ÛÒ if it is getting too long and hard to handle, cut in half and work with one piece at a time. Use your rolling pin to roll it flat with a width of approximately 4-5cm. The thickness should be no less than å_ cm. The thicker the easier it will be to handle.
- Roll out the white fondant icing and cut out spots, lay them over the orange collars and stick with a tiny bit of water if necessary. Gently roll over with rolling pin to make flat. Roll in both directions to keep spots as round as possible.
- Using a sharp thin bladed knife, trim the edges so they are straight. Allow the fondant to sit for å_ hour if possible before positioning on the cake as this will dry it out and make handling easier.
- Carefully wrap the collar/s around the base of the cake. The easiest way is to roll the collar into the rolling pin (on one end) and unroll around the cake. Use kitchen scissors to cut edges so they are sitting side by side neatly. If the collar isnÛªt sticking to the cake, use a little water. Ensure the edge/s are not showing at the front of the cake.
- Wrap happy birthday ribbon around the collar and secure with a pin/s.
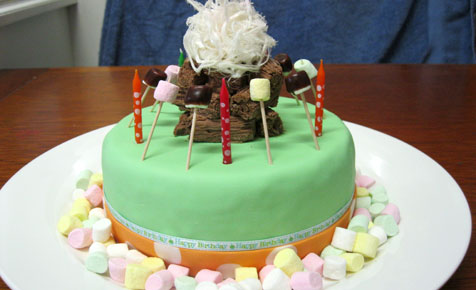
- Break the Flake chocolate and arrange on top of the cake to look like fire logs.
- Dip some marshmallows in left over ganache and place around the Û÷fireÛª
- Arrange remainder of marshmallows around base of the cake.
- Arrange candles.
- Place fairy floss Û÷flameÛª on top at the last minute.
Notes
Tip
Icing the cake is the trickiest part – I would recommend a time when it’s quiet and you don’t need to rush. Once the cake has been iced all around with fondant icing, this acts as cling film and stops the cake from drying out. You can do this stage ahead of time by at least one to two weeks – depending on the weather.
Tip
I prefer to use food colouring gels rather than liquid – you can get a better colour with less food colouring. You can buy food colouring gels from specialist cake shops.