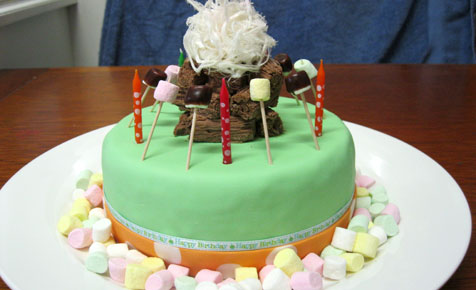
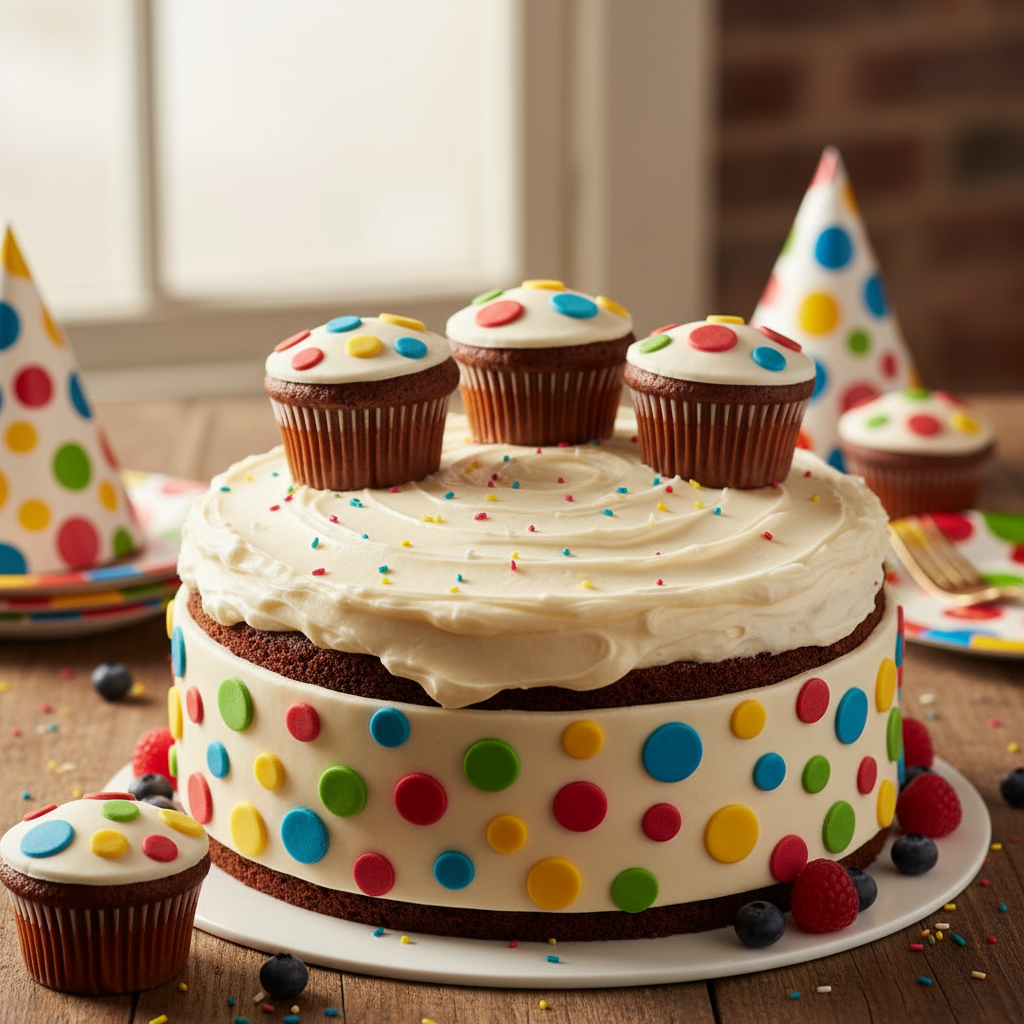
Spotty Dotty birthday cake
Ingredients
Cake
- 320g butter, softened
- 2 cups water
- 800g caster sugar
- 7 eggs, lightly beaten
- 400g self raising flour, sifted
- 120ml cocoa powder, sifted
Chocolate buttercream icing
- 50g cocoa powder, sifted
- 200g icing sugar, sifted
- 100g butter, softened
Decorations
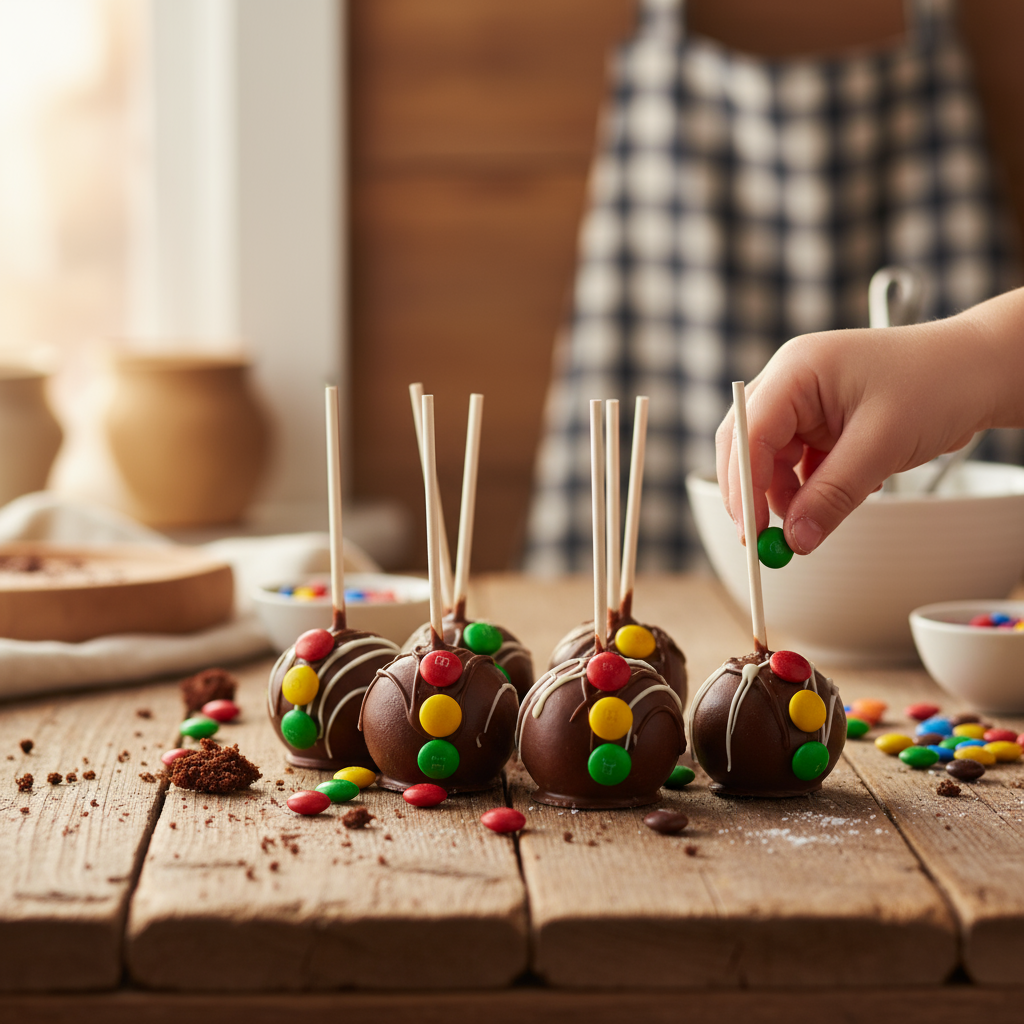
- 1 packet Maltesers, large bag
- 1 packet Smarties
- 200g ready-made white icing
- Icing sugar, extra to prevent white icing from sticking to the bench when rolling
- Natural food colours ÛÒ raspberry powder, passionfruit and spinach
- 24 large spotty cupcake cases
- Candles
- 30cm round cake board, found in cake decorating stores
- 35cm square cake board, found in cake decorating stores
- Packing or wide tape, to secure fabric onto cake board
- 1m spotty fabric, a strip cut 15cm x 90cm and a square piece cut at least 40cm x 40cm
- 4 fabric pins
Equipment
- 26cm springform tin
- Greaseproof paper to line tins and use with rolling out of the icing
- Large muffin tin, optional but I find the cupcakes bake more evenly
- Small rolling pin
- 2cm round cutter or you can use a small glass if you donÛªt have a set of cutters
Approximate timings:
- To make the cake and cupcakes: 15 minutes preparation time, approximately 20 minutes cooking time for the cupcakes and 30 minutes for the sponge
- Buttercream icing: 5-10 minutes to make, 20-30 minutes to fill and cover the sponge, 10-15 minutes in the fridge to set
- Decorations: allow 1-2 hours which includes: colouring the fondant, rolling and shaping it onto the sponge, covering with the fabric and preparing the fabric presentation board
- Decorating the cupcakes: 10-15 minutes
Method
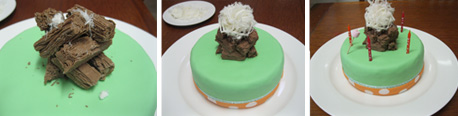
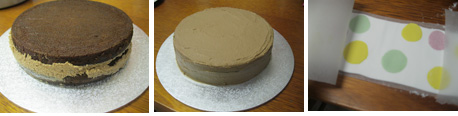
1. Fill with buttercream 2. Coat the cake with buttercream 3. Lie spots on fondant collar
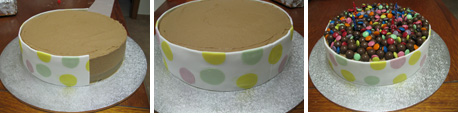
4. Wrap collar around cake 5. Join the collar 6. Fill the top of the cake with sweets
7. Wrap fabric around the collar 8. Ice the cupcakes 9. Decorate the cupcakes and arrange
Chocolate cake
Preheat oven to 190å¡C. Line tin with greaseproof paper and place cupcake cases in muffin tin.
Bring water to the boil in a medium pot, add the sugar and allow to dissolve before turning off the heat.
Add butter and chocolate, stir until melted. Allow to cool.
Add eggs, flour and cocoa and mix until combined.
Place into tin three quarters of the way up and half fill each cupcake case and place in the oven. The cupcakes will take less time than the cake to cook as they are smaller ÛÒ approximately 20-25 minutes. Once they are cooked, allow to cool on a rack and place to one side. Once cooled, you can freeze your cupcakes at this point in an airtight container.
Bake the cake in the oven until the it springs back when gently pressed or when a skewer comes out cleanly.
Keep the sponge in the tin for approx 5 minutes before turning onto a wire rack ÛÒ keep the bottom side up at all times to avoid making lines as this will be the presentation side up. You can freeze your sponge at this point, wrapped tightly in cling film.
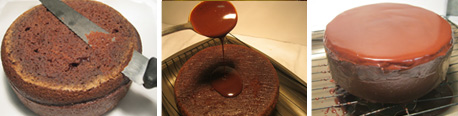
When the sponge is totally cooled (best if you can keep it in the fridge to chill right down before going any further) you will need to flatten the Û÷bottomÛª (which was the top.). If you had previously frozen your sponge, this stage will be made easier if it is still a little frozen ÛÒ that way it will hold much easier while you are cutting. Place a sheet of greaseproof paper on the presentation side and turn over. (to make life easier when you need to turn it back over!) Use a serrated knife and cut the top so itÛªs as flat as possible. I usually cut a little at a time so that I donÛªt accidentally cut away too much cake!
Using your serrated knife again, cut through the middle of the sponge, horizontally, to create two rounds.
Now the sponge is ready for decorating.
Buttercream icing
Place the icing sugar, butter and cocoa in a mixer. Place on low speed to combine all ingredients (if itÛªs on high you may lose a lot of the mix when it flies out of the bowl!) Once combined, turn up to high and allow to mix for a further 5-10 minutes until fluffy. You may need to scrape the bowl occasionally so it whips all of the mix.
Use approximately half of the buttercream to fill the middle of the sponge. For an easier and better result, I Û÷re-formÛª the sponge back into the baking tin (itÛªs a spring form). Cut a round piece of greaseproof paper, a little larger than the size of the tin, (to help you remove the sponge from the tin and onto the board a little later on once the buttercream has set) and place on the base of the tin. Turn the sponge upside down from when it was originally baked so the bottom will end up on the top (that is the flattest side and best for presentation). Start with what was the top and make sure the top side which you trimmed to make flat is sitting on the greaseproof paper.
Spread the buttercream evenly over the sponge using a small knife: a spoon will help get to the edges. Lie the other half of the sponge on top so the original bottom is facing up and you have a smooth cake top. Allow to sit in the fridge for 10 minutes before removing from the tin and placing on a board or flat plate.
Use å_ of the remaining buttercream to cover the sides and top of the cake. DonÛªt panic if it doesnÛªt look smooth or even as the top will be covered with lollies and the sides with the collar.
Readymade white icing
This is also known as Û÷fondant icingÛª and can be found in larger quantities in cake specialty shops. It will keep for a long time if stored in a cool place such as the fridge or freezer and wrapped very well (I usually use a few layers of cling film before placing in an airtight container) The collar has been made and placed around the cake to avoid the fabric becoming Û÷stainedÛª by the butter cream. If you donÛªt have much time, make the collar without the coloured dots.
Fondant icing collar
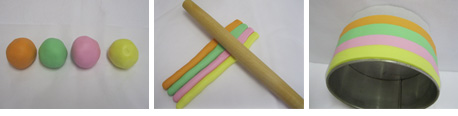
Usually the icing is quite firm to touch when you open the packet. Break it into small pieces with your fingers and begin to Û÷workÛª or Û÷massageÛª it until you notice is becomes smoother and softer. At this point, bring the icing together and knead as you would a dough until it is soft and smooth (the smoothness reminds me of my kidsÛª baby bottoms!) Once itÛªs smooth. reserve a small amount to be used for the coloured spots.
On greaseproof paper, roll the icing to create a long strip to the length of 85cm. (the diameter of the cake once it is iced) Using a small rolling pin, flatten to create a diameter the height of the cake ÛÒ approximately 8-9cm. (measure your cake in case the height is different) Cut the fondant in half to make handling easier. Use a ruler or measuring tape to measure the height (8-9cm approx) and cut so the collar is the same height or at least 1cm higher.
Divide the remaining fondant icing into three and carefully add one drop of each colour to each ÛÒ have some icing sugar on hand as it can get sticky when you are kneading in the colour. Continue to knead the colour into the icing until it is totally incorporated and there are no signs of white.
Roll each colour on some greaseproof paper or icing sugar (to prevent sticking) to å_ cm thickness, cut out circles and lie them along the collar. Using the rolling pin and another piece of greaseproof paper, gently roll the circles onto the collar to create a flat surface. An alternative would be to glue the circles onto the fondant with some water and allow to dry before wrapping the collar around the cake.
Allow the collar to sit for 10-12 minutes before wrapping around the cake. To wrap, gently roll the collar up into your rolling pin to prevent sticking, and unravel around the cake. Using dry, clean hands, gently smooth the collar around the cake so it is sitting as straight as possible.
Fabric collar
Using the strip of fabric, fold in each edge by approx 2cm, depending on the width of your collar, and iron to flatten.
Allow the fabric to cool before placing around the spotty collar and securing with fabric pins.
Cupcakes
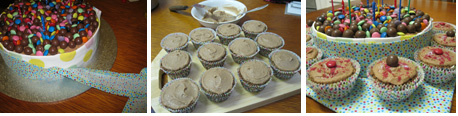
Use the remaining buttercream to cover each cupcake.
Finish with a sprinkling of raspberry powder and add a Malteser or Smartie. (I also sprinkled a little bit of blue edible glitter I had in my box of decorations!)
Cakeboard
Lay the square piece of fabric on a table and place the presentation board, face down, so it sits in the middle.
Pre-cut pieces of packing tape.
Start on one side and secure with tape. Secure on the opposite side next and use a little pressure to make sure the fabric is tight before securing with more tape. Finish off the other two sides. You could also use fabric pins, fabric glue or tacks to secure the fabric to the board but I find it is easier to remove the fabric from the board if it is tape and re-use both!
Finishing the cake
Arrange the Maltesers and Smarties on the cake, keep some aside to decorate the cupcakes.
Carefully remove the cake from the cake board or plate onto the fabric covered presentation board by using a large pallet knife or a large knife and smaller knife.
Arrange the cupcakes around the cake.
Finish with candles.
Notes:
- To save time, you can make a single layered cake in the same way.
- Rather than making chocolate buttercream, you can substitute the cocoa powder for one of the natural food powders.
- This recipe was created for Kidspot by Chef Sonia.
From Chef Sonia:
Although I am a qualified chef, IÛªve had no formal cake making training. What I have learned is through trial and many errors. I hope that by sharing my knowledge, you can become as confident and as excited about cake making as I am! (without the mistakes!) I think the most important thing is to Û÷give it a go,Ûª youÛªll be producing amazing cakes before you know it!