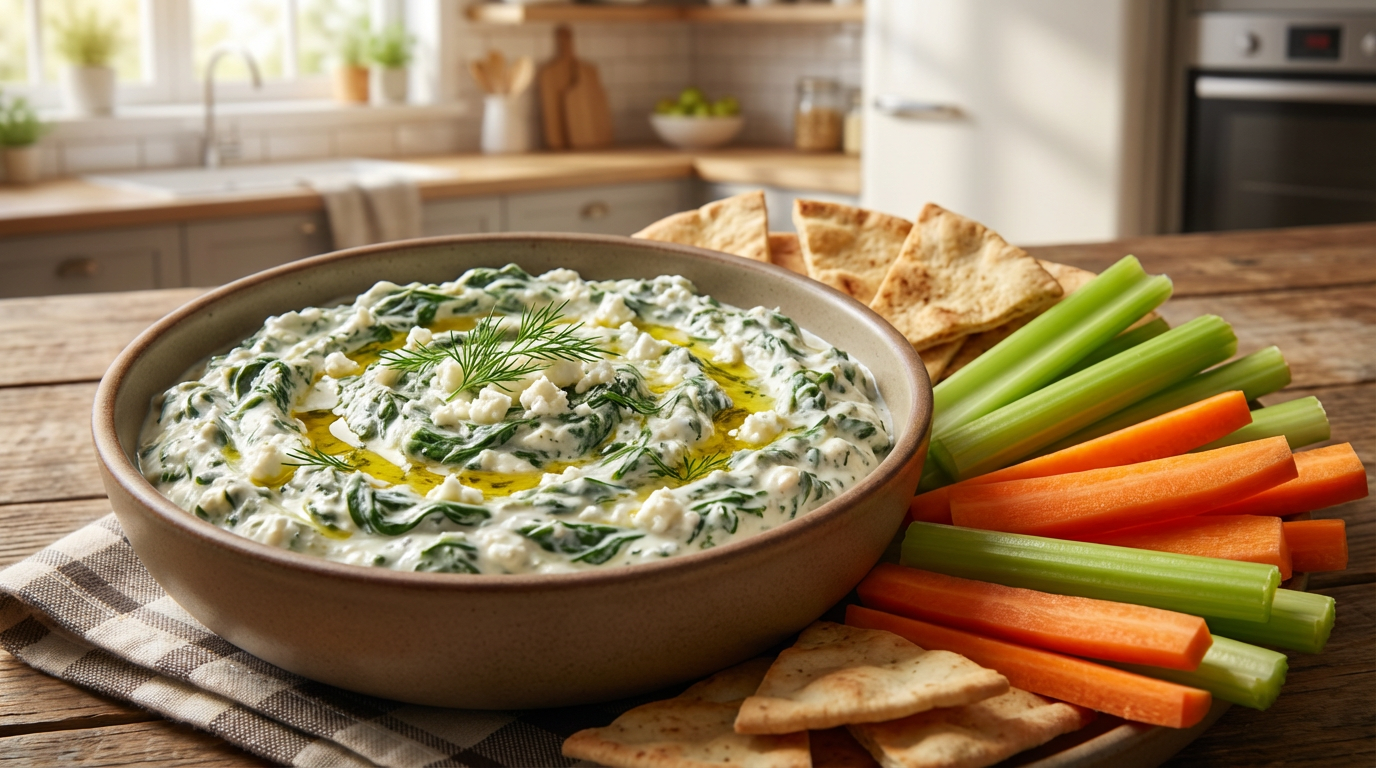
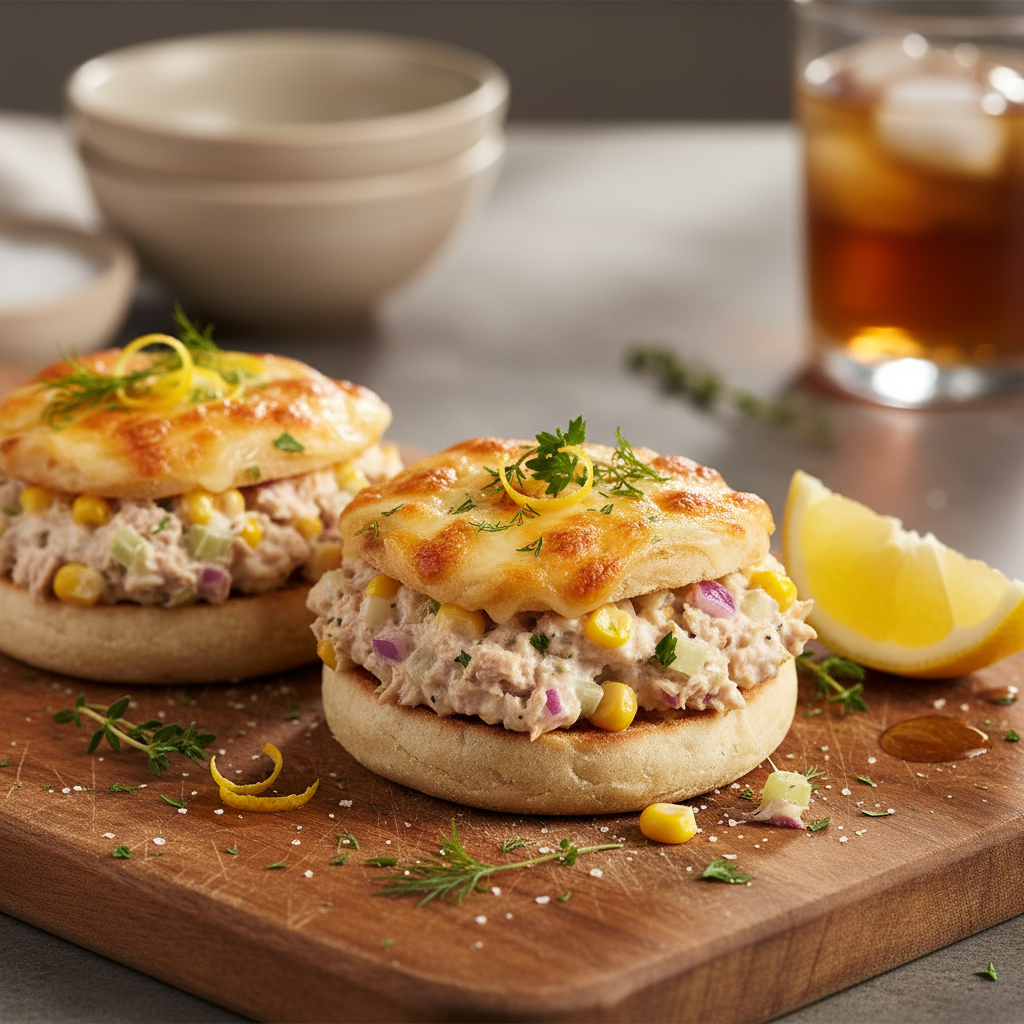
Heat oil in the frying pan over medium heat. Add spring onions and garlic and cook, stirring until fragrant (about 2 minutes). Add spinach and cook, stirring often until wilted ( about 2 more minutes).
Using a slotted spoon, scoop spinach mix into a food processor; pulse until roughly puréed (about 5 pulses). Add remaining ingredients except pepper, pulse once just to combine, and then season to taste with the pepper.
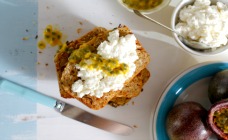
Add a sprinkle of the extra dill on top. Portion the dip into a small container with a lid for the lunch box. Add sliced capsicum, carrot and celery as dippers to serve.
Don’t be tempted not to cook the onion component of this recipe if you are serving it to kids. The flavours will be quite strong.
If I can’t be bothered getting the food processor out (because I am a lazybones), I just use my Bamix. It makes the dip more pureed, but it still tastes good.
400g pumpkin, peeled and diced into 2cm cubes (approx)
4 cups real chicken stock
25g butter
1 brown onion
1 clove garlic, minced
1 cup arborio rice
half a cup white wine
half a lemon
half a cup parmesan, grated
1-2 cups roast chicken, diced or shredded
Method
Place pumpkin and stock in a medium saucepan and bring to the boil.
Boil for 5 minutes to soften the pumpkin then turn off heat and cover until needed.
In a large frying pan, melt butter then saute onion, followed by the garlic and saute for 2-3 minutes.
Add rice, lightly season with salt and pepper then stir to distribute the heat evenly through the rice.
Add wine, stirring to prevent sticking- once 90% of the wine has absorbed, add two ladles of stock and pumpkin.
Continue stirring to prevent sticking and even cooking.
When rice absorbs 80% of liquid, add more of the stock and pumpkin and continue adding until all gone. You will need to mash the pumpkin lumps when stirring.
Remove from heat; add lemon juice, parmesan and roast chicken. Put a lid on the pan and rest for 5 minutes. Fold through and serve.
Notes
This is a great recipe to use with leftover roast chicken or bought BBQ chicken.
The stock is well seasoned so you really do not need to add extra salt.
Always make sure you dice the pumpkin small so it breaks down quickly.
Recipe created by Camilla Baker for Kidspot, New Zealands best recipe finder.
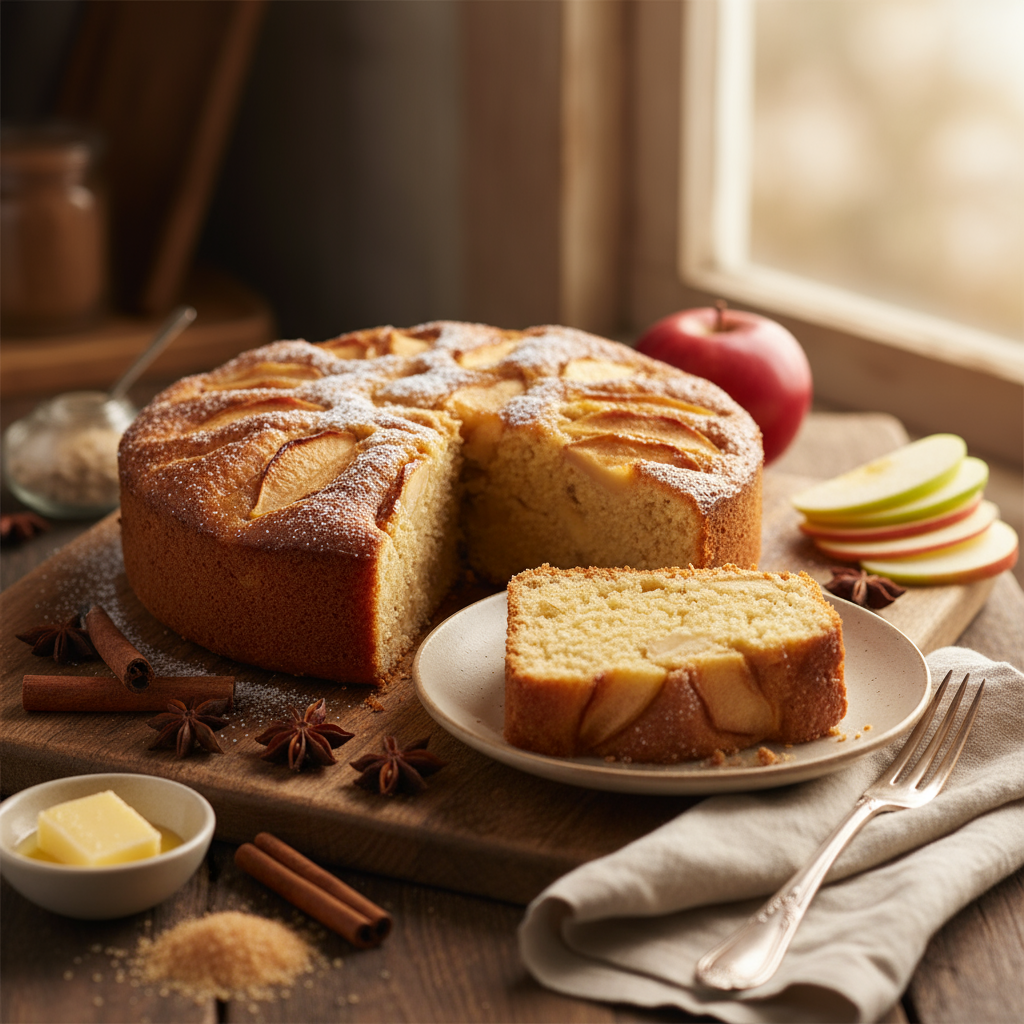
1 cup self-raising flour (see notes below for gluten-free)
2 tablespoons cream
2 small red apples
½ teaspoon cinnamon
1 teaspoon caster sugar, extra
Method
Preheat oven to 180°C. Grease and line a 20cm round cake tin.
Core and quarter apples, then slice each quarter into further quarters (i.e. 16 slices per apple).
Use an electric mixer to cream butter and sugar until light and fluffy, add eggs one at a time until well combined. Add flour and cream, beat until smooth.
Pour into prepared tin and press apple slices, skin side up, into batter.
The apple slices will be nearly touching. Sprinkle with cinnamon and caster sugar.
Bake for 35-40 minutes or until a skewer inserted into the centre of the cake comes out clean.
Allow cake to cool for 5 minutes in the tin and then turn out onto a wire rack to cool.
Notes
My school friend Beck gave me this recipe when we were about 16 years old (I take a small moment to acknowledge the years passed). It has become part of the family cookbook.
It is a wonderfully moist cake, quick to make and if there is any leftover, great for lunchboxes or after school snacks.
I used Pink Lady Apples.
Make this cake gluten-free by using gluten-free plain flour (e.g. Orgran) and 2 teaspoons gluten-free baking powder.
A smidgeon (about 1/8 teaspoon) of xanthan gum (from health food shops and some supermarkets) gives the ‘gluten-like’ consistency.
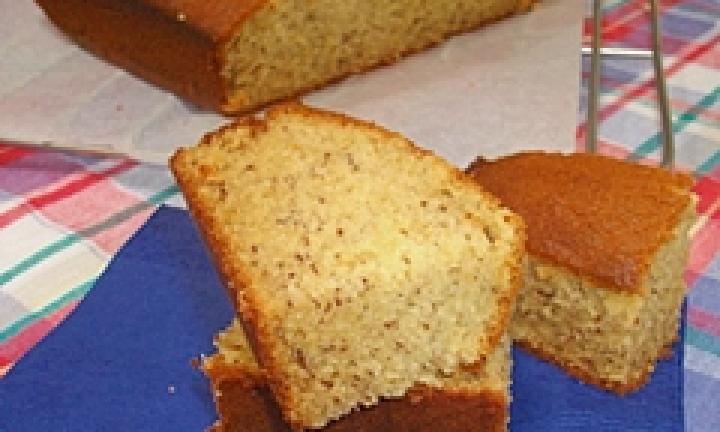
Preheat oven to 180 degrees C. Butter and line a square cake tin.
Cream butter and suar until light and fluffy. Beat in eggs, bananas and vanilla
Sift the dry ingredients together.
Mix together the milk and lemon juice.
Alternatng, add the dry ingredients and the milk, beating between each addition.
Bake in the oven for approximately 45 mins or until a skewer comes out clean.
Rest in the tin for 5 minutes before turning out onto a wire rack to cool.
Notes:
This banana cake has bee proclaimed the BEST cake ever by the toughest judges around – a group of 11-year old girls.
Thanks to Stephanie Alexander for giving the world this wonderful but super-easy cake recipe.
Delicious cool, this cake is even better (in my humble opinion!) still warm from the oven – it has a fantastic caramel-y flavour that is lip-smackingly good.
The ripeness of the bananas has a direct impact on the banana-iness of this cake.
This recipe was created by Ella Walsh for Kidspot, New Zealand’s best recipe finder.
Using a round cutter with an 8cm diameter, cut 9 circles from each sheet of pastry. Press them gently into the rounds of a patty-pan tray. (You will either need two trays or to do this in two batches).
Distribute the zucchini, ham and cheese evenly into each pastry case. Whisk eggs and milk in a jug and gently fill the pastry cases. Bake for 14 minutes until puffed and golden.
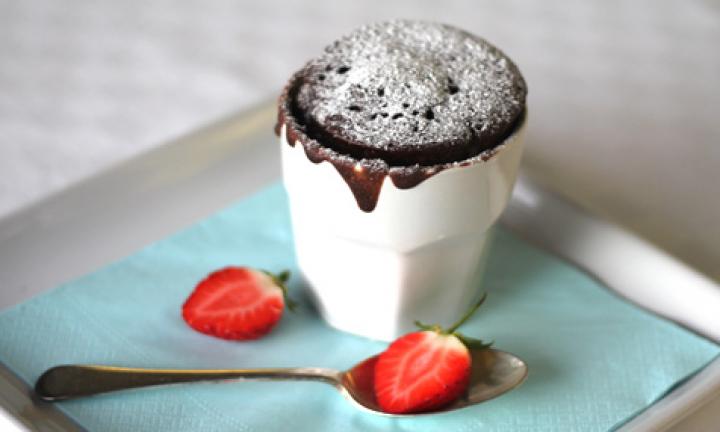
In a large mug, place all the dry ingredients and mix well with a spoon. Use the spoon to grind all of the cocoa against the side of the cup so there are no lumps.
Add the egg and beat it a little on top of the dry ingredients to break the yolk.
Add the oil, milk and vanilla and mix until well combined.
Stir the chocolate chips in and put into the microwave on high for 3 minutes.
Boil potatoes for 8 minutes or until tender. Drain.
Slice chicken into long strips and place between two sheets of cling wrap. Pound with a rolling pin or mallet until very thin. Tear into small pieces. Dust lightly in seasoned flour.
Melt butter and oil in a large frypan. Add chicken and cook for a couple of minutes, shaking pan. Add garlic and potatoes and continue shaking pan. Pour in wine and allow it to bubble up and reduce for approximately 1 minute.
Add lemon zest and peas and continue sizzling for another minute. Finally, add lemon juice, spinach and parsley and cook until spinach has just wilted.
If you don't want to use wine, a little light chicken stock would do the job.
Leave out the potatoes and serve the dish with pasta or rice.
Recipe by Greer Worsley, a working mum whose desire to make and bake things has grown in inverse proportion to the amount of spare time she has since her three gorgeous girls came along. Her blog is typically red.
Preheat oven to 180C. Grease a 12 hole and a 6 hole muffin pan or line with paper cases. Sift flour into a large bowl of an electric mixer. Add sugar and beat briefly to combine. In a glass measuring jug, pour in milk (up to 1 cup), oil (up to 1 1/3 cups) and add eggs, whisk to combine.
Pour milk mix and mashed banana into dry ingredients, beat with until just combined. Stir through chocolate. Spoon into muffin pans, fill each hole 2/3 full and bake for 15 minutes or until a skewer inserted into the centre comes out clean.
Cool slightly, then place on rack to cool completely.
Notes:
I make 18 muffins with this mixture because I dont like Muffin Tops on my muffins. High risk of spill over in the oven, too hard to get out of the pan and extra work cleaning the pan! But if this doesnt bother you, make 12 monster muffins.
Preheat oven to 160°C (180°C fan-forced). Line a 12-cup baking tray with patty cases and set aside.
Using a mixer, cream the butter, sugar and vanilla essence. Add eggs, beat well. Add milk and self-raising flour. Mix until ingredients are incorporated.
Spoon mixture into patty cases and bake for around 12-15 minutes, until golden. Cool on wire racks.
Mix cocoa powder with white frosting to make a pale brown colour. Cover spearmint leaves with brown icing. Ice cupcakes with white icing. Position ears. Use white marshmallows as noses, with black jelly beans as snouts. Draw mouths with black writing icing. Place red Smarties just under the marshmallows as tongues. Use brown mini M&Ms for eyes.
In a mixing bowl, combine sugar and butter and using electric beaters, cream until light and fluffy.
Sieve the plain flour and cornflout into the butter mixture and using a fork, combine all ingredients. When the mixture has mostly come together, tip the content of the mixing bowl onto the work bench and use your hands to bring the dough together into a smooth ball.
Wrap the ball of dough in plastic wrap and place in the fridge for 15 minutes to chill.
Place the dough between two pieces of baking paper and roll out until it is about 1cm thick all around.
Using a biscuit cutter, cut 12 biscuits out of the rolled dough and place on a lined baking tray. Bake for 20 minutes or until the biscuits the slightly coloured. Remove from the oven and allow to set in the baking tray before moving them to a rack to cool.
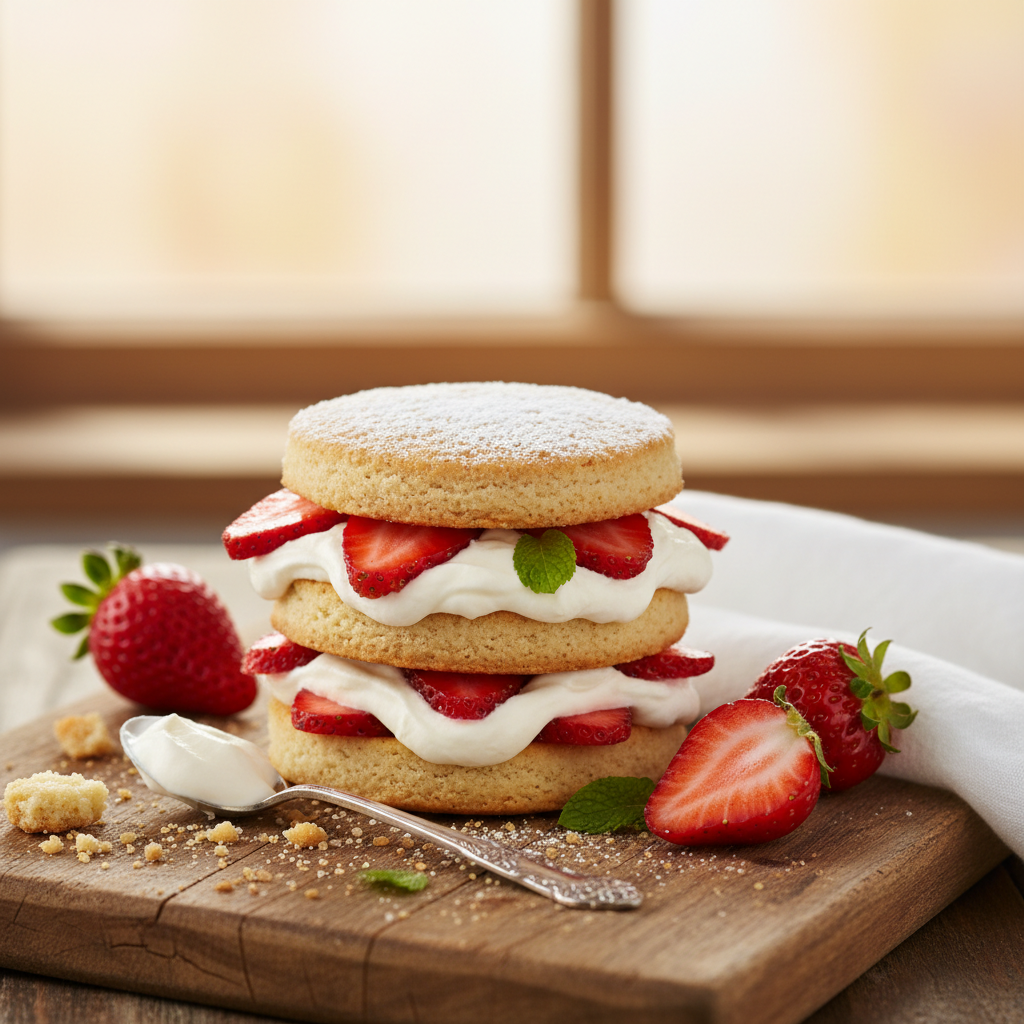
While the biscuits are cooling, warm the jam in a small saucepan. Take off the heat and stir the fresh strawberries though. Allow to cool.
Whip the cream to stiff peaks.
To assemble the biscuits, place a teaspoon of cream on a biscuit and then lie two or three strawberry pieces on top of the cream. Drizzle a little of the jam over the top .
Notes
My 12 year-old daughter made these with her best pal and they managed to do the whole lot without needing me to help. This made the eating the Strawberry and cream shortbread stacks all the more enjoyable for me!
Dont assemble the biscuits until you are ready to eat them as they dont keep well. They are definitely a fancy afternoon tea treat.
You could use different shaped biscuit cutters on the shortbread but take care not to choose a shape that has fine detailing as the edges usually cooks faster than the centre and you will end up with over-cooked biscuits.
This recipe was created by Ella Walsh for Kidspot, New Zealand
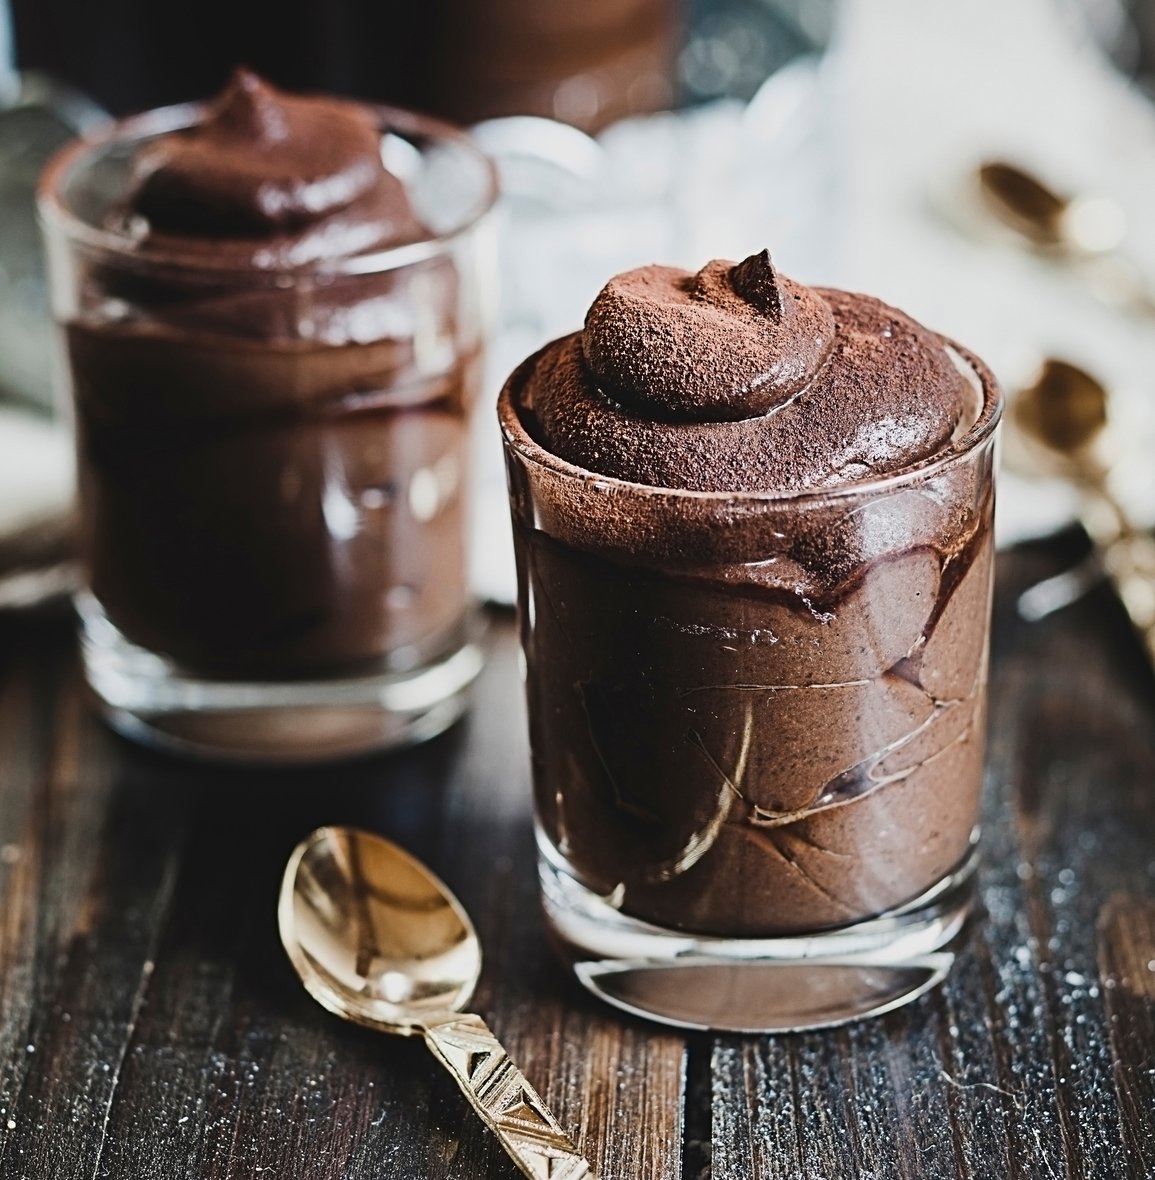
Break the chocolate into pieces and place in a heatproof bowl over simmering water. Don’t let the water touch the bottom of the bowl. Stir until the chocolate is smooth and set aside.
In a separate bowl, beat the eggs whites with an electric mixer until they form stiff peaks. Add the egg yolks one at a time beating well.
Beat in the chocolate and gradually add the oil in a thin stream and then the Grand Marnier, making sure it is all well combined.
Pour into small dishes or martini glasses and refrigerate until firm.
Notes
This is a super-rich decadent dessert and a little goes a long way.
The oil gives this chocolate mousse a silky feel on the tongue but adds no flavour at all.
This is really nice served with a dollop of double cream and some orange slices cooked in orange juice and brown sugar on the side.
You can make this recipe a day ahead and it works well for a midweek dinner party or special occasion.
This recipe was created by Jennifer Cheung for Kidspot, New Zealand’s best recipe finder.
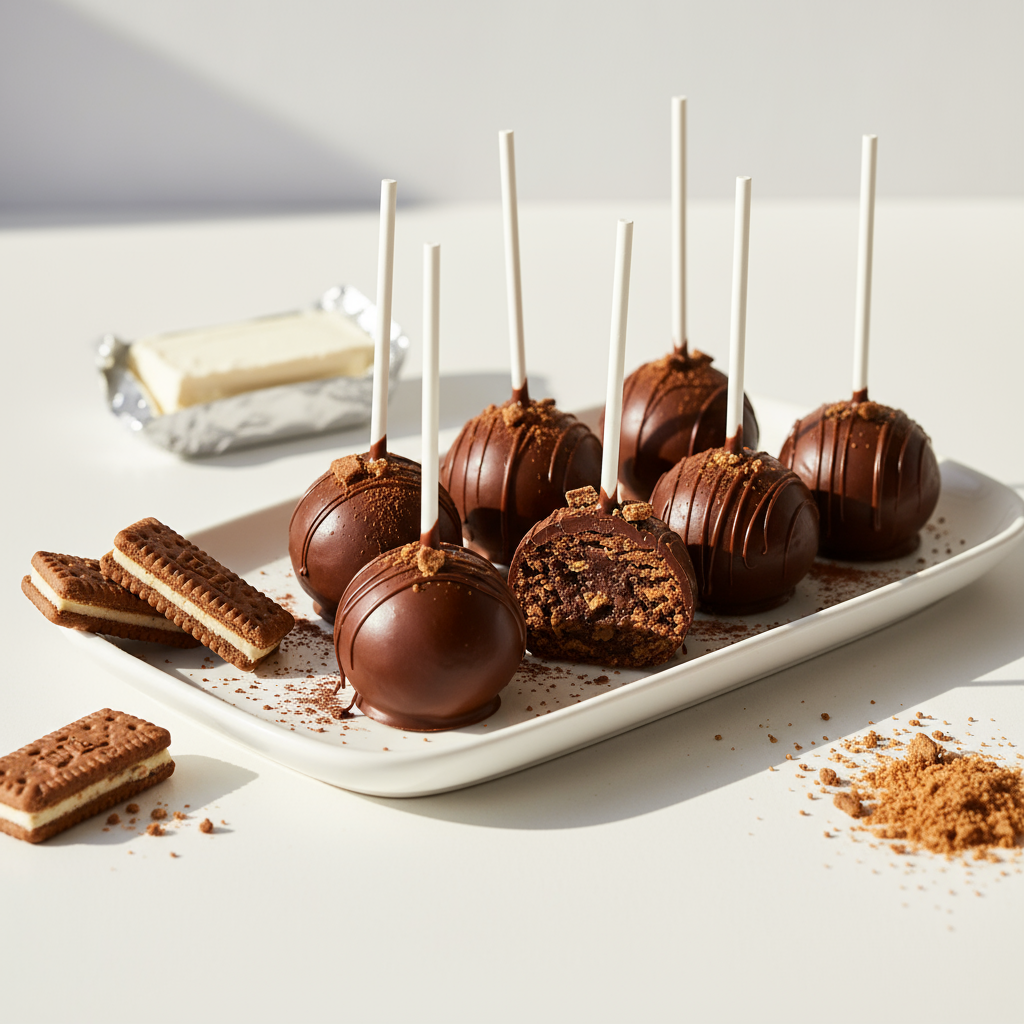
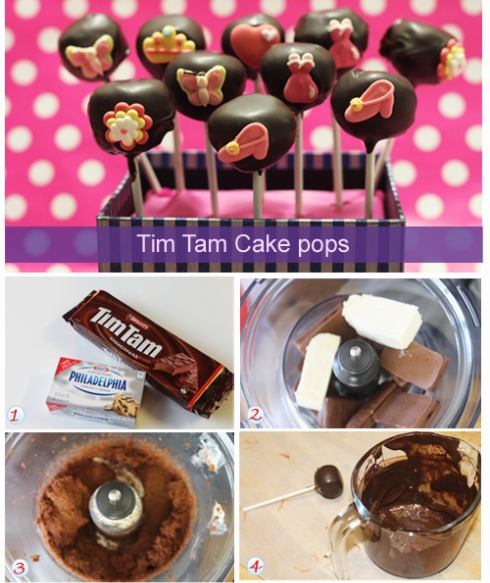
Step 1. Grab a packet of Tim Tams and the cream cheese.
Step 2. Place them in a food processor and blend until well combined.
Step 3. Roll tablespoon-sized balls of the mixture and lay on a tray covered with baking paper. Place in the freezer for 30 minutes. Remove from the freezer and push lollipop sticks into the balls.
Step 4. In a heatproof bowl, melt the chocolate and dip the balls into the melted chocolate. Tap on the side of the bowl to remove excess chocolate. Lie onto baking paper and decorate.
Notes:
I used ready-made fondant decorations from the supermarket but you could also use desiccated coconut, 100s & 1000s, crushed nuts, sprinkles or melted white chocolate.
You can also use Mint Slice biscuits in place of Tim Tams for this recipe.
This recipe makes 10 cake pops and may easily be doubled or even tripled.
These are great to wrap and give as gifts. If you want to display these on a party table, you can place some florist’s foam (Oasis) in a gift box and cover it with tissue paper. Then you can just poke in the pop sticks and serve.
This recipe was created by Jennifer Cheung for Kidspot, New Zealand’s best recipe finder.
Preheat oven to 180°C (160°C fan-forced). Spray a 11 x 21cm loaf pan with spray olive oil. Line the base and two opposite sides with non-stick baking paper, allowing it to overlap.
Sift the flours, cinnamon, and sugar into a large bowl. Stir in oats and coconut.
Place milk, eggs, melted butter and banana into a medium mixing bowl. Pass the passionfruit pulp through a sieve to remove seeds and place into bowl with wet ingredients. Stir until well combined.
Combine wet and dry ingredients and stir well. Spoon the mixture into the prepared pan and smooth the surface.
Bake for 45 minutes or until a skewer inserted into the centre comes out clean. Remove from oven and set aside in the pan for 5 minutes.
Turn out onto a wire rack and cool completely.
Cut into slices and toast. Garnish with a scoop of ricotta and some fresh passionfruit pulp.
You can toast this bread and serve it with butter if you don't have any ricotta.
You can slice this banana and passionfruit bread in slices and use it for lunch boxes. Just pop it into their bag frozen and it will defrost by morning tea.
This recipe was created by Sammy & Bella Jakubiak.
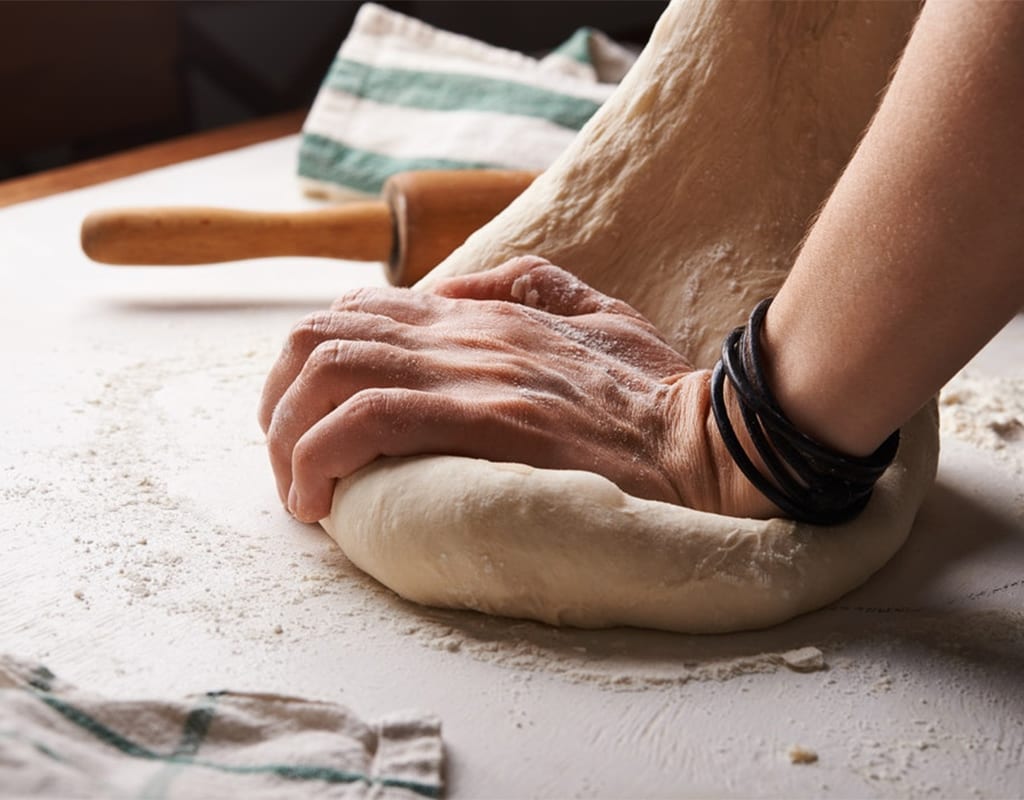
To make dough, combine yeast, milk and lukewarm water in a jug. Leave for 10 minutes until starting to froth. Combine with flour, olive oil and salt and knead for 10 minutes either by hand or in the bowl of a mixer with the dough hook attachment. Place dough in an oiled bowl, cover with plastic wrap and set aside for 1 hour until doubled in size.
Cook chorizo in a frypan until golden and sizzling.
Preheat oven to 220°C (200°C fan-forced). Turn out dough onto a floured surface and roll to form a large rectangle. Sprinkle half the onion, chorizo and feta along one half of the dough. Fold the dough over to enclose it filling. Gently roll again to flatten – you should now have a long, thin rectangle with the filling inside. Place remaining ingredients along the length. Fold again to enclose whilst also twisting to create a kind of coiled rope.
Form dough rope into a ring shape and carefully transfer to an oven tray lined with baking paper. Bake for 20-30 minutes until golden and cooked through, turning down the oven temperature partway through if it’s browning too quickly.
Make caramelised onion by cooking sliced onions in a little oil over very low heat for 10-15 minutes, adding a little brown sugar and balsamic vinegar towards the end. You can alternate with store-bought onion jam.
Cut one edge off both sponges about 1 inch from edge, with a bread knife.
Stand up one of the cakes on its cut edge and move it to butt against the other cake to resemble an open compact. Measure the aluminium foil against the cake, cut or fold the aluminium foil to fit with about 1cm gap to the edge of the cake.
Make the icing by beating butter and icing sugar together until well combined. Add vanilla and food colouring and ensure it has a smooth, spreadable consistency. Add water by the drop if the mixture is too stiff, or add extra icing sugar by the tablespoon until you reach the desired consistency.
Ice the bottom half of the cake and then the top. Fix the aluminium foil to the the top part of the cake – it will stick to the iciing. Stand the top part of the cake up and ice the back of it.
To decorate, cut the strips of licorice with scissors to 5mm widths and arrange around the aluminium foil as a border to the ‘mirror’ and create some boxes or circles on the lower part of the cake to represent blush and/or eyeshadow.
Fill in the gaps with sprinkes/sugar sand, and press down with forefinger into the icing.
Place two fruit-tingles near the connection of the two cakes to represent hinges.
Lastly, place a musk stick and a marshmallow cut to size with scissors for the make up applicator.
Notes:
Packaged sponge cakes can be found in large chain supermarkets with a bakery section, you may also order them from your local bakery.
You don’t need to use a round cake, use a square on if you like – your only limit is your imagination!
This cake is particularly popular with pre-teens, and can be decorated by them, freeing you of cake decorating duties if you so desire!
This recipe was created by Melissa Klemke for Kidspot New Zealand’s best recipe finder.
Preheat oven to 180C. Place pastry sheets on a work bench to defrost.
Lightly flour two pizza trays or baking trays (my pizza tray has small holes in the centre, which gives a lovely crunchy pastry base).
Heat a large non-stick frypan over medium-high heat. Brown mince, then add bacon and onion and cook for a further 5 minutes. Add capsicum, tomato paste and diced tomatoes. Reduce heat to low and simmer, uncovered for 20 minutes. The mixture should be quite thick, but add some water if it is sticking to the pan.
Place pastry on baking trays, use a knife to score a 1cm border in the pastry. Spoon mince mixture onto pastry within the border. If you have some pastry scraps, twist ribbons of pastry and decorate the top of the tart. Bake for 15 minutes or until pastry is puffed and golden.
Notes:
Mince tart was a family favourite when I was growing up and is a fabulous thing to do with mince! Make the meat sauce the day before or use leftover bolognaise sauce and dinner is ready in minutes.
Add carrot, celery, peas or mushrooms to the meat sauce, as tolerated by your family.
Grease a 2L capacity baking dish. Preheat oven to 180C. Cook pasta in a large pot of boiling water, following packet directions, until just tender.
Meanwhile, melt butter in a saucepan, stir in cornflour and cook for 1 minute. Remove from heat, slowly pour in milk, whisking all the time to make a smooth white sauce. Return to heat, continue stirring until sauce thickens.
Drain pasta, return to pot and stir in white sauce. Add cheese and vegetables, stir well to combine.
Spoon mixture into baking dish and sprinkle with parmesan. Bake for 25 minutes until golden and heated through.
Notes:
Great meal to prepare ahead, cover and refrigerate. Take out of the fridge 10 minutes before baking.
Depending on your kids vegetable intake, add some capsicum, zucchini, chopped tomato, basil or parsley to the bake.
Add some protein with a cup of leftover Christmas ham, turkey or chicken!
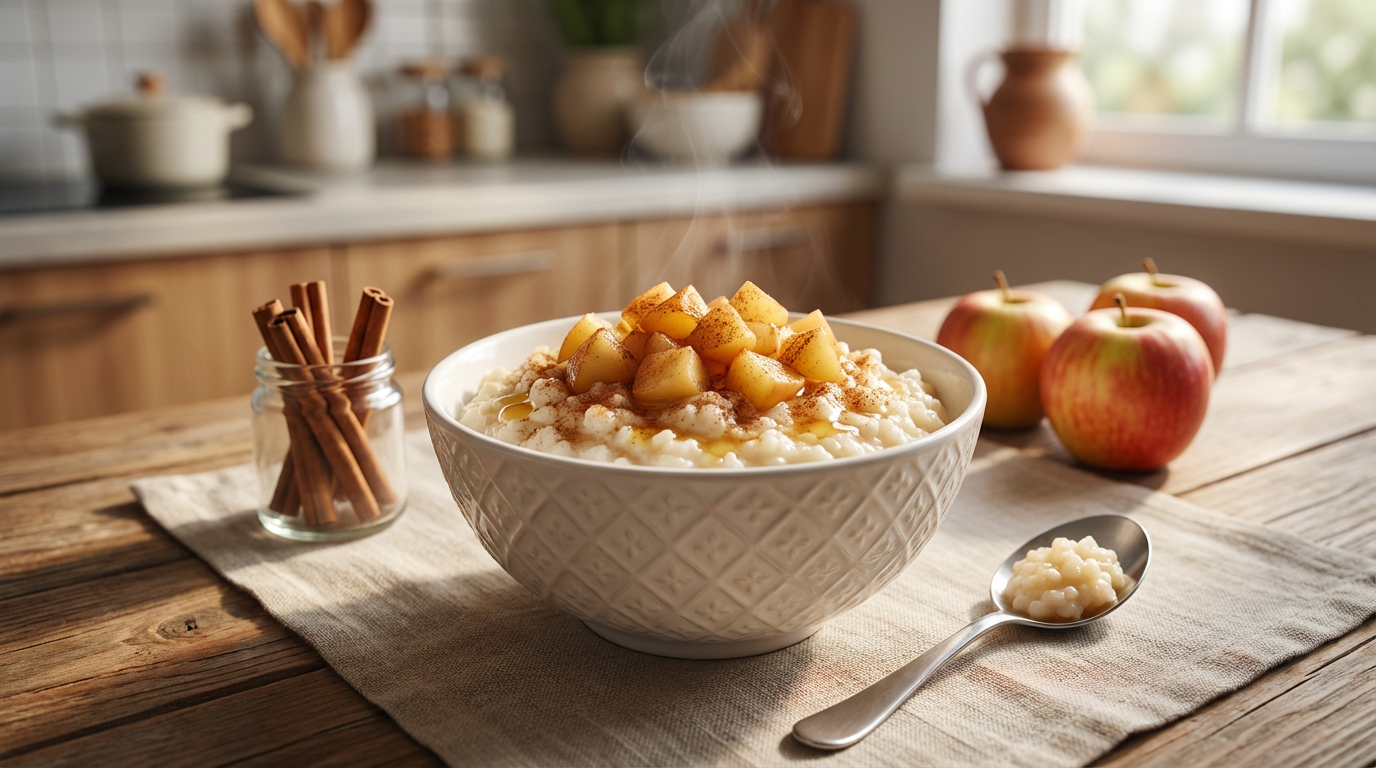
In a small pan over medium heat, melt a dollop of butter, add the rice and stir. Add half of the water and a quarter of the apple puree and stir until all the moisture has been absorbed.
Sprinkle in the cinnamon, stirring all the time. Add half the milk and another quarter of the apple and stir again until absorbed. Repeat with the rest of the ingredients and continue stirring until the rice is cooked and all the moisture has been absorbed.
Make a huge batch of apple puree, freeze in an ice tray then place in zip-lock bags and keep in the freezer for times when you need puree but aren’t keen on making it from scratch.
Taste test as you cook – the rice might need more or less of the liquids before it’s cooked through.
You can puree if a smoother finish is preferred.
You can double this recipe so tomorrow's rice is already made. Just make sure you keep it refrigerated in an airtight container.
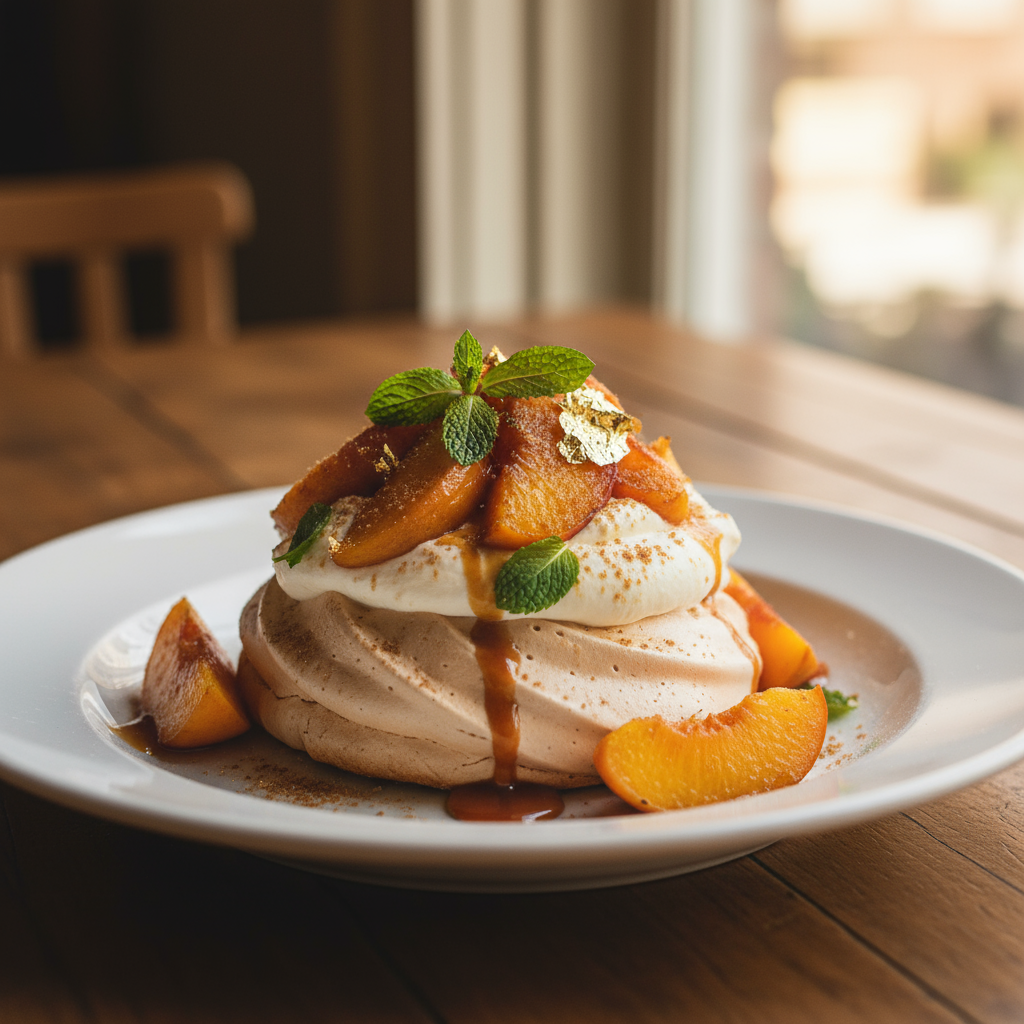
Brown sugar lends a caramel note to this otherwise classic pavlova, and the lightly roasted peaches are the perfect choice to make the most of New Zealand’s stone fruit at Christmas time!
Serves 6
Ingredients
4 egg whites
1/4 cup brown sugar
3/4 cup caster sugar
1 tsp apple cider vinegar
1 1/2 thickened cream
Peaches
4 peaches
2 tsp butter
1 tbs brown sugar
Brown sugar pavlova with roasted peaches
To make the pavlova, preheat the oven to 150°C (130°C fan-forced), and line a large baking sheet with baking paper.
Place the egg whites into the bowl of a stand mixer, and begin whisking them on a medium speed until stiff peaks form. Stir together the brown and caster sugars and then add them, with the mixer running on high, a spoonful at a time, waiting at least 20 seconds between each spoonful.
Once all the sugar is in, the mixture should be stiff and glossy. Rub a small amount of mixture between your fingers, and there should be no grains of sugar. (If there are, continue whisking until the sugar is dissolved.) Then fold the apple cider vinegar through the mixture.
Dollop the mixture on the lined baking sheet, and use a spatula to form an approximate 22cm circle. Turn the oven down to 120°C (100°C fan-forced) and bake the pavlova for one hour. Leave it to cool in the oven completely.
To make the peaches, wash them and cut them in half, removing the stone. Place in a shallow baking dish, cut side up, and dot with the butter and brown sugar. Bake them at 180°C (160°C fan-forced) for 10-15 minutes, or until just beginning to wilt. Set aside to cool to room temperature.
To assemble the pavlova, whip the cream to soft peaks and spread over the base. Top with the peaches, and any of their juice, and then serve.
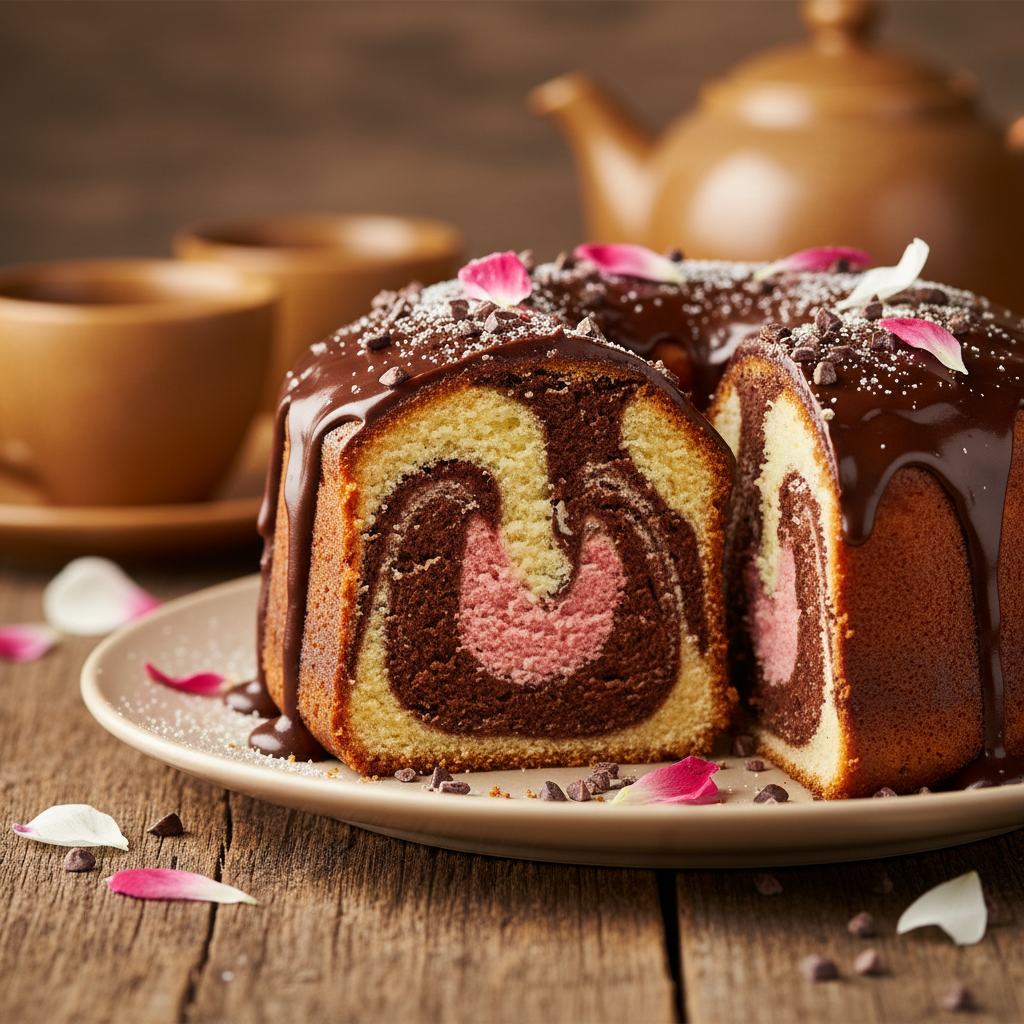
Preheat oven to 180°C. Grease a 20cm ring cake tin and line with baking paper.
Use an electric mixer to beat the butter and sugar until pale and creamy.
Add the vanilla extract and then the eggs one at a time, beating well between adding each egg.
Add the sifted flour and milk in two batches and mix until just combined.
Divide the mixture between three bowls. Use the red food colouring to tint the mixture pink in one bowl, mix well. Add sifted cocoa and extra milk into another bowl, mix well.
Drop spoonfuls of each mixture into the cake pan. Swirl knife through the mixture once or twice (don’t over do it).
Bake for 30-40 minutes or until a skewer inserted into the middle of the cake comes out clean. Cool in tin for 10 minutes before turning out onto a wire rack.
To make icing, combine all ingredients in a small bowl and beat until smooth. Spread on cold cake.
Notes:
This has to be an all time kids favourite! Also highly suitable for grown-ups at morning tea time, or try the chocolate-orange liqueur cake.
I just used a chocolate icing for this cake, but if you have the time and inclination, make pink and white for a marbled icing effect.
Make this cake gluten-free using gluten free plain flour and 2 teaspoons gluten-free baking powder. Make sure your icing is gluten free.
You can make a few hotcakes at a time, making sure they are golden and cooked through and keeping them warm in the oven while you cook each batch.
You can also serve these with honeycomb butter. Blitz 100g of butter with 1 Crunchie Bar in the food processor. Roll into a sausage shape and chill. Cut off in discs and serve with toast, crumpets or hotcakes.
This recipe was created by Pip Lincolne for Kidspot, New Zealand’s best recipe finder.
Push the prepared cupcakes into the ice cream cones. (They may be snug and they will be iced over if you damage the tops.)
Add the blue food colouring to the Vanilla Frosting and combine well. Cover the top of each cupcake in icing.
Add the Tiny Teddies to the top to create your beach scene. Place the Lifesavers swim rings on the icing to look like swim rings and roll up one end of the Sour Straps to look like towels with head rests. Scatter the Jaffas to look like beach balls. Place your Teddies onto the icing.
Notes
These are cute for beach themed parties and to take to school to celebrate birthdays.
I like to fill the bottoms of the cones with lollies so they will sit firmly on the tray, otherwise they are top heavy.
If you don’t have time to make cupcakes, you can buy them and decorate.
If you can’t get Sour Straps for this recipe, you can use Fruit Roll-Ups as a substitute.
This recipe was created by Jennifer Cheung for Kidspot, New Zealand’s best recipe finder.
In a food processor, combine pastry ingredients to form a ball. Add more water if necessary. Cover with cling film and refrigerate for one hour.
To cook the onions, heat olive oil in a heavy based saucepan with a lid. Add onions and stir to coat, then seal with lid and cook over very low heat for 20 minutes, stirring occasionally. Add sugar and vinegar and cook for a further 2 minutes.
Melt butter with oil in a large frypan, add mushrooms and saute over medium-high heat for 4-5 minutes until brown. Add garlic and continue cooking for another minute. Season well.
Preheat oven to 220°C conventional or 200°C fan-forced. Roll out pastry into a rectangle – approx. 20x26cm and 4mm thick. Fold over 1-2cm of the edges to create a border. Place on a lined baking tray and prick all over with a fork. Cover with foil and fill with baking weights, rice or lentils. Bake for 20 minutes, remove baking weights and foil, and return to oven for another 10 minutes until lightly browned.
Spread caramelised onions over the pastry. Top with mushrooms and dot with goats cheese. Bake for 5 minutes until warmed through.
Garnish with thyme sprigs, cut into large squares and serve.
Make the onions ahead of time and store in the fridge.
Double the onion recipe and use the extra in other meals. It is delicious on a steak sandwich or stirred through a frittata.
Recipe by Greer Worsley, a working mum whose desire to make and bake things has grown in inverse proportion to the amount of spare time she has since her three gorgeous girls came along. Her blog is typically red.
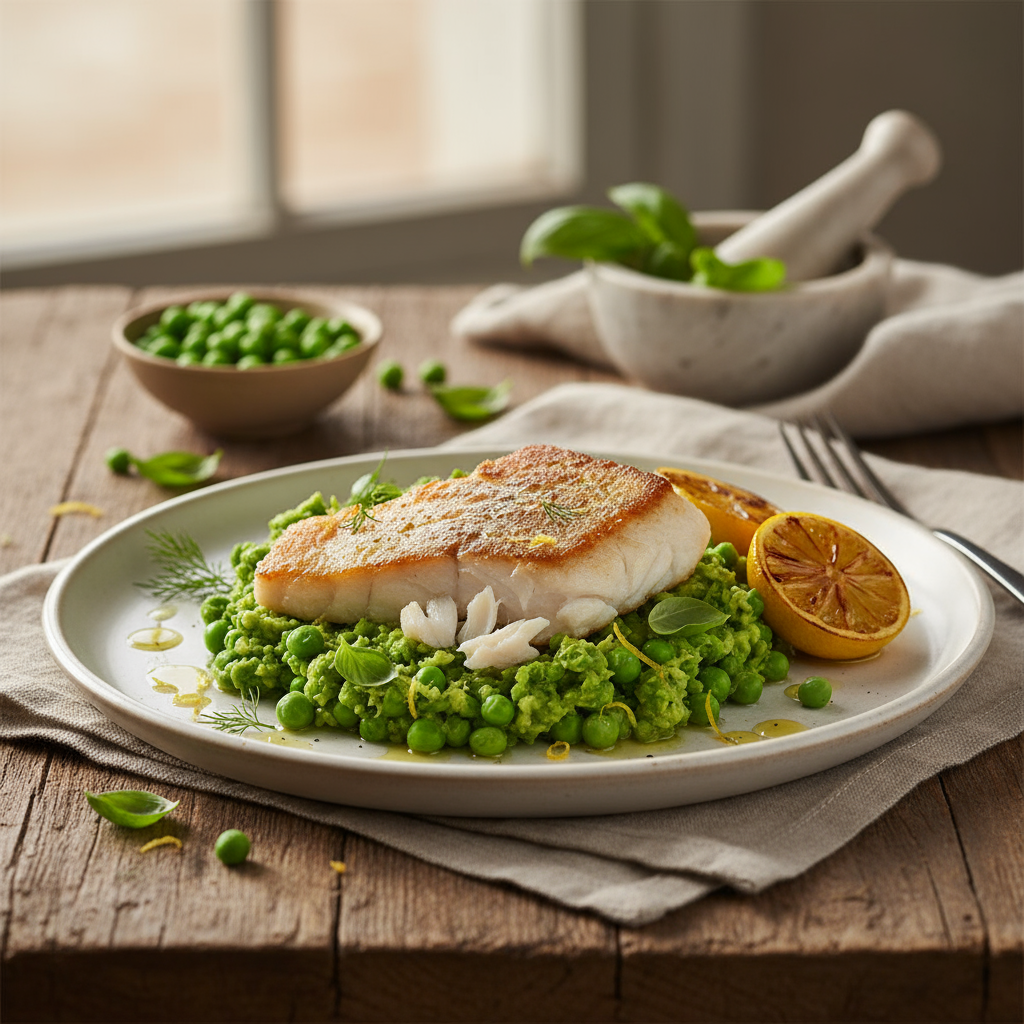
Heat a non-stick frypan over medium-high heat. Add olive oil and fry fish fillets until golden brown on each side and cooked through. The pieces I used were 2.5cm thick and required about 5 minutes each side.
While the fish is cooking, bring a saucepan of water to the boil, add the peas and cook for 2 minutes –they should still be bright green. Drain the peas, add the basil leaves and use a stab mixer to puree. Stir the butter into the peas, then cover until ready to serve.
Spoon some pea mash onto a plate, top with fish and some lemon, serve immediately.
Serving Suggestions
Note
If the fish still has the skin on, cook that side last until it is quite crisp. The crispy skin is then easy to remove with a spatula or leave on and serve crispy side up.
Depending on your tastes, you may like to add some salt and pepper to the pea mash, but we like it flavoured with just the basil and butter.
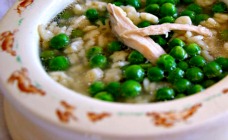
Rinse and pat the chicken dry. Place it in a large stockpot and add remaining ingredients.
Bring to a gentle simmer and let bubble away for 2 hours.
Check every now and then that the chicken isn’t sticking to the bottom of the pan as it could burn. Remove the chicken from stock and place on a chopping board, sitting on a tea towel (this should catch any juices from escaping all over your kitchen bench).
Let cool a little before shredding off the chicken and store in an airtight container in the fridge until needed.
To make up the soup
Bring a couple of cups of the stock to a boil, add the soup pasta and cook for aproximately 5 minutes.
Add frozen peas and cook for another 2 minutes.
Stir through some shredded chicken and serve with a little shaving of parmesan.