Decorating advice with Resene
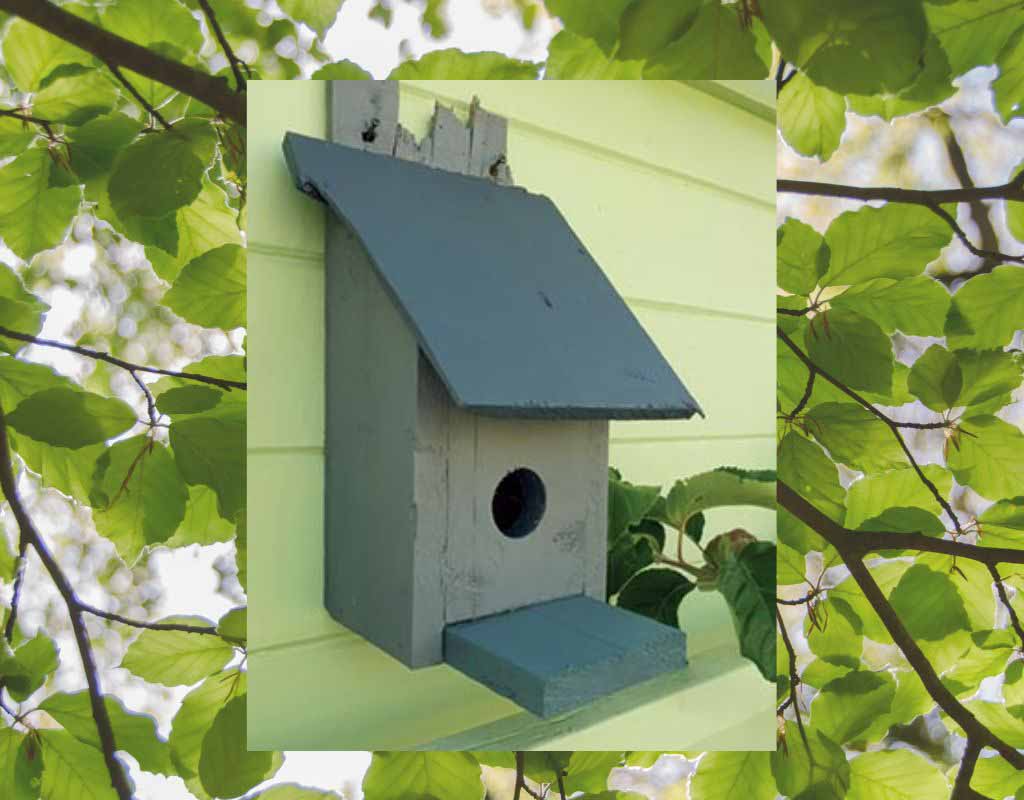
Create this rustic birdhouse from reclaimed timber and Resene testpots – it not only looks great, but it can also provide a safe place for a pair of birds to create their nest and raise their young.
The birdhouse pictured has been finished in the Resene Waterborne Woodsman range which is an exterior wood stain designed to colour timber, while still allowing the natural grain of the timber to show through. It’s the perfect way to add colour to new or previously stained timber without losing its natural beauty.
Top tip: Not all birds like to use a birdhouse – but some definitely do. The size of the entrance hole you choose will depend on the species of bird you would like to host. A morepork likes a hole 100mm wide, sparrows just 32mm while starlings like 42mm.
You will need:
- 115mm x 20mm timber cut to the following sizes:
- 200mm (x1) – floor
- 180mm (x1) – front wall
- 310mm sloping to 200mm (x2) – side walls
- 10mm thick timber cut to the following sizes:
- 160mm x 400mm (back wall)
- 230mm x 240mm (roof)
- 40mm galvanised nails
- hole cutting attachments
- drill with 10mm drill bit
- hammer
- paintbrush
- pencil
- sandpaper
- saw
- tape measure
- Resene Waterborne Woodsman testpots of Resene Silvered Grey, Resene Skywater and Resene Pickled Bluewood. The bird house could also be painted with a selection of Resene testpot colours – just ensure you prime it first with Resene Quick Dry.
Step-by-step instructions

Step one
Measure, mark and cut the pieces of timber to the dimensions listed above and smooth any rough edges with sandpaper.

Step two
Fix the two side walls, floor and front wall together, as shown, using 40mm nails.

Step three
Fix the back wall into position using 40mm nails.

Step four
Fix the roof into position using 40mm nails.

Step five
Drill a 100mm hole in the back of the bird house (for maintenance access) and an entrance hole the size of your choice (see above) in the front wall. Drill two 10mm hanging holes in the top of the back wall, as shown.

Step six
Apply two coats of Resene Silvered Grey to the walls of the bird house, allowing two hours for each coat to dry.

Step seven
Apply two coats of Resene Pickled Bluewood to the floor of the bird house, allowing two hours for each coat to dry.

Step eight
Apply two coats of Resene Skywalker to the roof of the bird house, allowing two hours for each coat to dry.
This project is from the Ways With Wood series with Mark Rayner for Resene. Mark painted the background shed wall with Resene Lumbersider tinted to Resene Soft Apple.
For more colour ideas and inspiration, view the latest looks online and visit your local Resene ColorShop.
Article created with information from Resene.co.nz
Read more on Kidspot:


Leave A Comment
You must be logged in to post a comment.