Kids rip off their uniforms with little thought (unsurprisingly) for the buttons that are trying to hold it all together. A missing button looks scruffy (on a shirt) or has the potential for causing extreme embarrassment (on a skirt). What you want to do is sew it on and make sure it stays on. My grandma used to re-sew on every button if she bought something new just in case it pinged off at an inappropriate moment. You don’t need to go that far unless you discover an affinity with button sewing but still, it’s best to know how to keep the little blighters in place. Learn how with these simple instructions and easy video tutorial.
You will need:
- needle
- thread (match to colour of button)
- scissors
- pin
How to button up
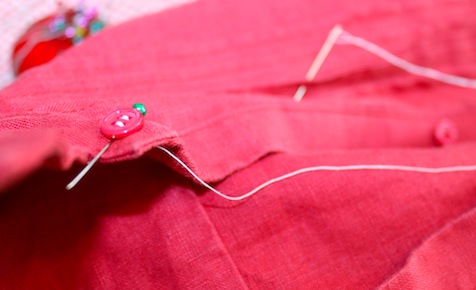
Thread your needle with a single piece of thread and tie a knot in the end.
Position your button and thread the needle through the holes in the button from inside to outside (you want the knot on the inside of the garment).
Now stitch across two of the holes in the button. Stitch in a straight line, don’t go diagonally as it looks messy.
Put a pin in between the two places where the thread goes into the fabric (see video). This stops you sewing on the button too tightly.
Continue stitching through button holes in the same way.
When you’re done, go through the underside of the fabric but stop short of going through a button hole this time.
Wind the thread around, between the fabric and the back of the button six times then push the needle through the fabric to the back again.
Tie of the thread with a knot. Consider yourself buttoned.
Thank you to our friends at Kidspot Australia for the instructional video.


Leave A Comment
You must be logged in to post a comment.