How to make a mantis paper plane
Making paper planes is a simple paper craft activity for kids that will lead to some great outdoor games as you fly your paper airplanes. This mantis design comes with its own landing gear!
What you need:
- 1 x A4 sheet of paper
Number of players:
1
Activity:
Watch the video tutorial for the best instructions on how to make your mantis paper plane.
Place your sheet of paper on the table with short edges top and bottom.
Fold the top left corner down to be even with the right hand side – fold it across the square diagonal, leaving a small oblong of paper beneath. Unfold.
Do the same diagonal fold the other way. Unfold. Flip the page over.
Fold the top down so that it is even with the creases you just made (folding the square over again). Unfold. Flip it over.
Press at the centre of all the creases with your fingertip. It should then collapse into a squash fold, leaving you with a house shaped piece of paper (see video).
Fold the top point down to the lines formed by the layers of folds beneath.
Fold the top flap on the right over to the left. Now fold that same flap to the right to form your first little mantis leg. Do the same on the other side.
Flip the whole thing over so that the blank side is facing up. Fold it in half, across its body.
Now create wings and fuselage (about 2cm) by folding the top layer over to the left. Make a little flap on the edge of the wing. Do the same on the other side.
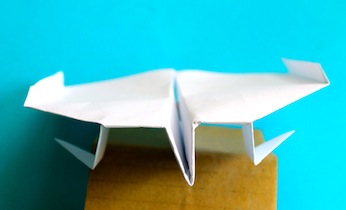
Pop out your wings, lower the landing gear (the feet underneath will need to be unfolded into position) and you're ready to fly.
The mantis is a temperamental flyer but it can be acrobatic as well. Happy flying!
- Thanks to our sister company Kidspot Australia for creating the instructional video.