
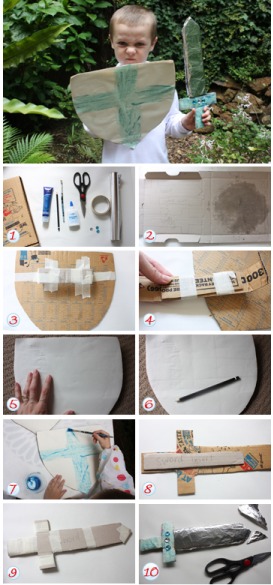
Make a knight’s costume from a pizza box
Before you throw out last night’s pizza box, think of all the fun kids could have with it! It’s the right size to create a knight’s essentials: a shield and sword. So recycle that pizza box into a cool knight's costume. How the kids decorate it is up to them, but here’s how to get them started. Try it as a Book Week costume!
What you need:
- Pizza box
- Large piece of white paper (eg, butcher’s paper)
- Paint – child’s choice of colour
- Pencil
- Paintbrush
- Glue
- Scissors
- Masking tape
- Fake jewels
- Foil
Number of players:
Activity:
Step 1. Unfold the pizza box so it’s flat with the plain side facing you. On the lid of the pizza box draw a shield shape, taking up as much of the cardboard as possible but not going over the folded edges (the folded edges will become the handle for the shield). On the base of the pizza box, draw a sword shape – for extra length, go over the creased edges, but make a narrow strip (same width or smaller than the handle) to go in the middle as a support.
Step 2. Cut the pieces out. Take one of the handle strips and fold the two ends to the centre so they meet, then fold each end in half again so you have a square-ish “C” shape if you turned it on its side. Cut one of the pieces to fit just the grip section and tape together.
Step 3. Tape the handle onto the other side of the shield just above centre of the shield.
Step 4. Place the shield face down on a piece of white paper and trace around the edge with a pencil. Cut the paper out and glue onto the face of the shield.
Step 5. Lightly draw a cross shape (if that’s the shape you want) or leave blank for your child to draw their own picture or coat or arms.
Step 6. Let your little knight colour in the cross or shape with paint or draw their own image. Leave to dry.
Step 7. Lie the sword down and place the sword insert in the centre to strengthen the handle.
Step 8. Place the other side of the sword on top and tape into place, concentrating on wrapping the tape around the handle.
Step 9. Have your child paint the handle and sword face (if they wish!) and stick on some jewels on the handle. Leave to dry.
Step 10. Lie the blade on a piece of foil and glue the edge onto the blade. Wrap it around and glue the other edge into place. Cut off the excess at the point and either glue into place again or gently pinch the foil together.
Step 11. Knight your charge and enjoy a (gentle!!) sword fight.
Find more great reading ideas for kids:
- Tips for reluctant readers
- Why toddlers love reading
- Literacy milestones for kids
- How to make reading a lifetime habit
- Reading with your toddler
- Reading games for kids
- Find more about reading and writing in Kidspot's School Zone
- Reading to babies
- Find out more about kids and reading
- Find Book Week events near you in Kidspot Weekend
Learning benefits of play, craft and activities:
- Benefits of crafts for kids
- Craft ideas to make for babies
- Why reading is important
- Your child's development milestones
- Why play makes kids smarter
- The importance of outdoor play
- Types of play
- How craft helps unplug kids from screentime

Leave A Comment
You must be logged in to post a comment.