
Make your own drum
Making a drum for your kids will make you one rockin' mum in their eyes. But why help create something that makes noise when you're always telling them to be quiet? Because once your little musos start drumming, they'll be happily occupied for ages.PLUS the drum can be used as a secret special storage compartment when they get bored of it.
What you need:
- A cardboard hat box – try budget stores for cheap ones.
- Coloured contact paper
- Scissors
- A ruler
- Thin rope or string
- A single hole punch
- Also helpful: a pen/texta
Number of players:
1
Activity:
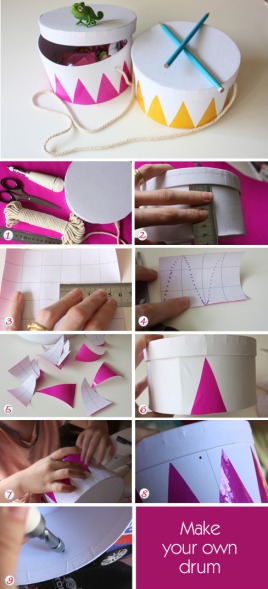
Step 1. Gather what you need to make your drum kit.
Step 2. Measure the height of the hat box from below the lid to the base.
Step 3. Mark this measurement on the inside of the contact paper. If you're lucky (like we were here!), it'll already match the lines on the back! Cut into long strips at that height.
Step 4. Mark the strips into triangles so they're the same height as that distance you measured. You can get more out of the paper by using the lines on the back of the contact paper to guide you, as we've marked here.
Step 5. Cut them all out. Or have your child cut them out along the lines.
Step 6. Peel off the backing and stick one triangle at the base of the box. Press it firmly in place and smooth out any bubbles.
Step 7. Continue placing triangles side by side until the box is covered. Your child can do this step.
Step 8. Mark the outside of the box just under where the lid sits and on the opposite side for the string.
Step 9. Use your single hole punch to punch through from the outside first (for a neater hole), then the inside if it's too thick to cut through completely. Thread your string through the hole, tie into a knot on the inside, loop through to the other side and tie again with the knots inside. Pop the lid on and arm your child with some pencils or chopsticks and let them at it! They can place their secret squirrel business treasures inside the drum when they're done.
This craft was created by Belinda Graham, who blogs at The Happy Home Blog.