Homemade paper photo frame
Once you know how to make these homemade photo frames, you’ll be looking for excuses to make them again and again. You can stick them inside cards or tie them onto presents – either way, they always look impressive!
What you need:
- A square piece of paper (origami paper or any paper measured into a square)
- Photos
Number of players:
Activity:
Fold the opposite corners of the paper together and press.
Then open the paper and fold the other corners together.
Open the paper (the non patterned side of your paper should be visible.).
The lines will be your fold guides.
Fold the corners to the center. Repeat with all four corners.
Flip the square over, and fold the corners to the center again.
Do the same with all four corners.
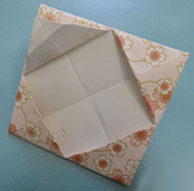
Flip your square over.
You should have four square flaps.
Fold each flap up to the corner.
Tuck the triangle flaps inside or fold them backwards to make a band of white around where your picture will sit.
Cut your picture a little smaller than the frame and carefully slide it in.
Notes:
- These photo frames are easy to make, so your children can make lots of them. The frames even stand up on their own!