Make a paper bead colour necklace
Paper beads are easy to make and will only cost you pennies, not to mention make a fashionable colour block necklace for any little girl. Why not make a whole bowl of different coloured beads together, then mix and match to add a fun twist to any outfit?
What you need:
- colourful paper strips (the wider the strip the longer the finished bead)
- quick dry craft glue
- a pencil
- a long chain with fastener (look in your jewellery box)
Number of players:
1 +
Activity:
Check out our video on how to roll paper beads, or try our step-by-step tutorial below.
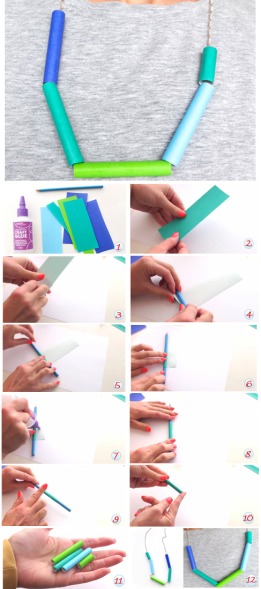
Step 1. Gather all you need to make your paper bead colour necklace.
Step 2. We've cut our strips of origami paper to 3 fingers wide. And the longer the strips of paper, the thicker and more durable your beads will be.
Step 3. Flip your first strip of paper upside down. Select a pencil to roll your paper colour beads with (a round one the best for rolling).
Step 4. Start winding the end of the paper around the pencil.
Step 5. Wind the paper bead up around the pencil as tight as you can.
Step 6. When you get to about 2cm away for the end of the paper stop rolling.
Step 7. Run a bead of glue over the edge of the paper at about the 1cm mark.
Step 8. Roll the bead over the glue, pushing the glue towards the edge of the paper.
Step 9. If the glue spills on outside of the bead, no matter – it forms a protective bead on the outside of the paper.
Step 10. When tacky, press the edge of the paper down. Make sure you slide your finished bead off the pencil before the glue fully dries or it will get stuck.
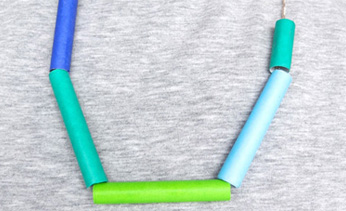
_Step 11. There you go – you've finished a paper bead. Try making them in few colours like we have here, for an on trend colour blocking necklace.
_Step 12. Find an old chain and thread your beads on.The ones we've made here are quite light weight and sit well on a delicate silver chain. And if they get squashed just make another quick batch. Too easy!
This craft was created by Cintia, who blogs at my poppet.
- Thanks to our sister company Kidspot Australia for creating the instructional video.