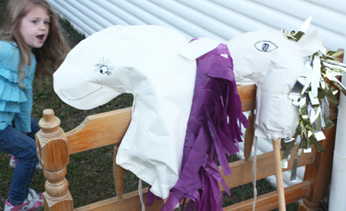
Get the kids to help you make these ride-on horses that require no sewing. They’re perfect for backyard races, pony shows and other equestrian events. You could have some gold coin chocolates on hand for medals.
What you need:
- Large sheets of paper (butcher’s paper, gift wrap or paper roll from IKEA, which we used here)
- Hot glue gun
- Newspaper
- Scissors
- Pencil
- Piece of dowel or old broomstick
- Coloured tissue paper
- Rope or ribbon
- Sticky tape or masking tape
Number of players:
1
Activity:
Step 1. Gather what you need to make your own ride-on paper hobby horse.
Step 2. Lay one piece of paper on top of another and draw the shape of the horse head onto the top piece.
Step 3. Cut out the head through both pieces of paper. Keep the offcuts to stuff the hobby horse and make the ears.
Step 4. Cut several sheets of tissue paper into a rectangle, with the longest side about the same length as the back of the horse’s neck. The more sheets of tissue paper you have, the fluffier and nicer the mane. Now sandwich the tissue paper in between the two heads and glue in place to the bottom head piece.
Step 5. Place a couple of dollops of glue in between the sheets of tissue paper to ensure they all stick together and don’t fall out.
Step 6. Glue the two heads together around the edges, leaving the bottom of the neck open. Now it’s time for the kids to give their ride-on horse eyes and a mouth, and any extra decoration they like.
Step 7. Now stuff the head with the paper and leftover cuttings – not too tightly, just enough to make it 3D – and glue the bottom of the neck.
Step 8. Before inserting the stick, wrap the end that will be in the head with scrunched-up newspaper and secure with sticky tape or masking tape to give it a little more padding.
Step 9. Secure the stick in the horse’s head. If needed, re-glue any edges together or glue again for extra security.
Step 10. Cut paper into an ear shape and pinch the bottom of one ear, gluing the folds together so it looks like the picture in our tutorial.
Step 11. Glue the ear in place at the top of the head. Repeat on the other side.
Step 12. For older kids, let them fringe the mane with scissors by cutting the tissue paper into thin strips up to the edge of the head.
Step 13. Place a dollop of glue on the curve at the top of the horse’s neck, stick on one end of the rope, then smudge another blob of glue over the top of the rope end to secure in place. Repeat on the other side for reins. Time to ‘giddy up!’ with your paper hobby horse!

This craft was created by Belinda Graham, who blogs at The Happy Home Blog.