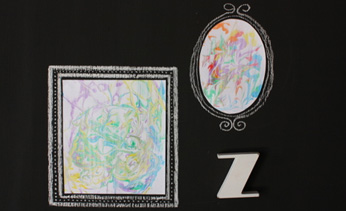
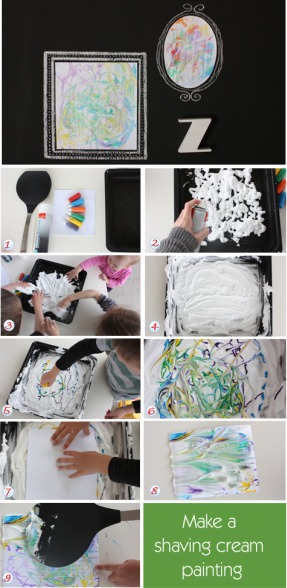
Shaving cream painting
'Messy' and 'fun' – two words that kids love to hear together! And this activity is just that, but it also results in a very cool, very original patterned piece of art. After the shaving cream painting session is over, why not frame your creation and show it off?
What you need:
- a tray
- a squeegie or spatula
- shaving cream
- a skewer
- cardboard
- paint in a variety of colours
Number of players:
1
Activity:
Step 1. Gather all you need to make a shaving cream painting.
Step 2. Spray a decent amount of shaving foam into the tray.
Step 3. Let the kids have a play in the shaving foam because they will anyway!
Step 4. Use your hands to smooth the foam over so it’s relatively flat on top.
Step 5. Squeeze your paint onto the top of the foam – just adding light dots and splotches is ideal.
Step 6. Use the skewer to swirl the paint around to create a cool pattern. It doesn't matter if the colours blend together a little.
Step 7. Lay your cardboard down on top of the paint and leave for a few seconds.
Step 8. Remove and let it sit for about a minute.
Step 9. Gently wipe off the shaving cream with a spatula or squeegie, leaving the pattern behind. Leave it to dry. Once your shaving cream painting is dry, try framing it or using it to cover books. You could also try cutting shapes out of your dried shaving cream painting, and turning them into a garland.
This craft was created by Belinda Graham, who blogs at The Happy Home Blog.


Leave A Comment
You must be logged in to post a comment.