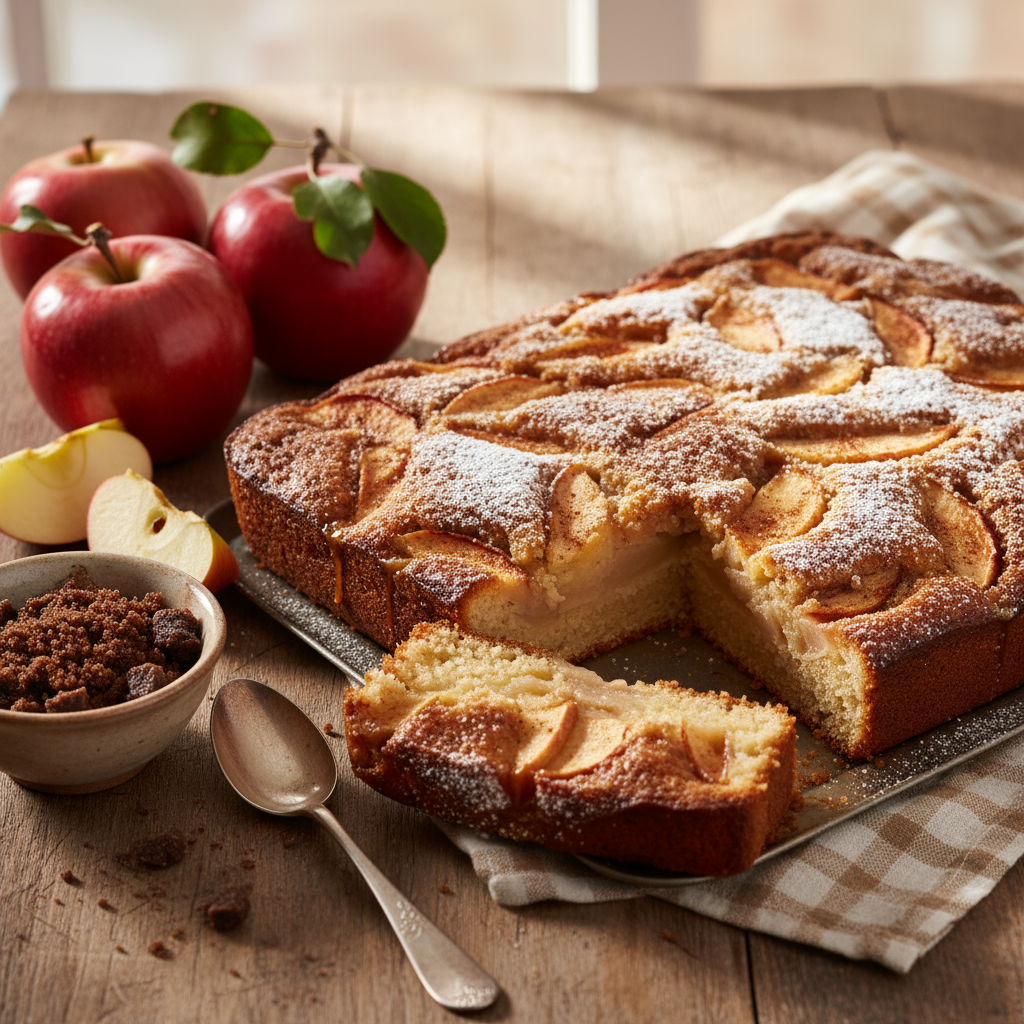
Preheat oven to 180°C (160°C fan-forced). Grease and line a 23cm springform cake tin.
Cream butter and sugar until pale and fluffy. Add eggs one at a time, beating well between each. Fold through vanilla, baking powder, flour and milk. Stir through fruit. Pour into prepared tin, distributing evenly.
In a smaller bowl, rub butter into flour until it resembles breadcrumbs. Stir through sugar and oats. Sprinkle this mixture evenly over the cake batter.
Bake for 1 hour and 10 minutes until a skewer inserted into the centre comes out clean.
2 red apples, cored, quartered and finely sliced/ grated
1 teaspoon cinnamon
1 teaspoon caster sugar, extra
Method
Preheat oven to 180C and place paper cases in muffin tray (12 large or 18 cupcake size).
Sift flour into large bowl, add almond meal, caster sugar and cranberries, mix well. In a glass jug, measure out oil (to 1/3 cup), add milk (to 1 1/3 cup) and eggs, whisk to combine.
Pour liquid into dry ingredients, add mashed banana and mix until just combined. Spoon mixture into paper cases and press 2-3 slices of apple, skin up, into muffins.
Sprinkle with combined cinnamon and extra caster sugar. Bake for 20-25 minutes until a skewer inserted into the muffin comes out clean.
Notes:
If you need to hide the apple, peel, grate and add with the banana. Omit the cranberries (or replace with finely grated carrot!)
Make these muffins gluten-free using gluten-free plain flour and 4 teaspoons gluten-free baking powder.
1 cup self-rising flour, sifted (if you have time)
1 cup whole milk
2 eggs, beaten
2 cobs of fresh corn, kernels removed and cooked
1/3 cup coriander leaves, chopped roughly
1 cup mozzarella cheese
2 tbsp extra-virgin olive oil
sea salt to taste
pepper to taste
3 rindless bacon rashers
Method
In a large mixing bowl, stir together the first seven ingredients to make a batter.
Brush bacon rashers with oil and place on a baking sheet lined with foil. Grill the bacon for 5-8 minutes.
Heat a large frying pan or skillet over medium heat, then add oil and swirl around in the pan.
Drop one heaped tablespoon of fritter batter into the pan, patting it flat with the same spoon.
Cook until golden on each side – about 2 minutes. Remove the fritters from the pan and drain on paper towels as you cook them. Serve topped with bacon.
Note
You could add one seeded, and finely chopped, Birdseye chili for a more adult version.
ItÛªs important not to overcrowd the pan – cook the fritters in batches.
You can substitute the fresh corn for 1å_ cups of canned or frozen corn kernels.
I prefer to use free-range bacon for ethical reasons.
This recipe was created by Kristine Duran-Thiessen for Kidspot, New ZealandÛªsåÊbest recipe finder.
Heat oven to 200å¡C and lightly grease 12 medium muffin tins or 6 large ones (or line with paper cases).
Cream butter and sugar together until light and fluffy. Add the eggs, one by one, beating well between each addition.
Stir through the pears and ginger. Mix the milk and yogurt together and in a separate bowl sift the flour with the baking powder.
Gently fold half of the milk mixture into the butter and sugar then half of the flour. Repeat until everything is well combined.
Divide the mixture between the muffin tins, making sure they are about three quarters full and bake in the preheated oven for 25 minutes until golden.
Notes
If making these the night before, follow the method right up to the point of actually placing them in the oven but cover with plastic wrap and pop in the fridge. The next morning, place in preheated oven straight from the fridge but add 5 minutes to the cooking time.
Substitute the pear with apple, berries or dried fruit.
If you don’t have any fresh ginger at home, swap for 1 stp ground ginger or even just mixed spice.
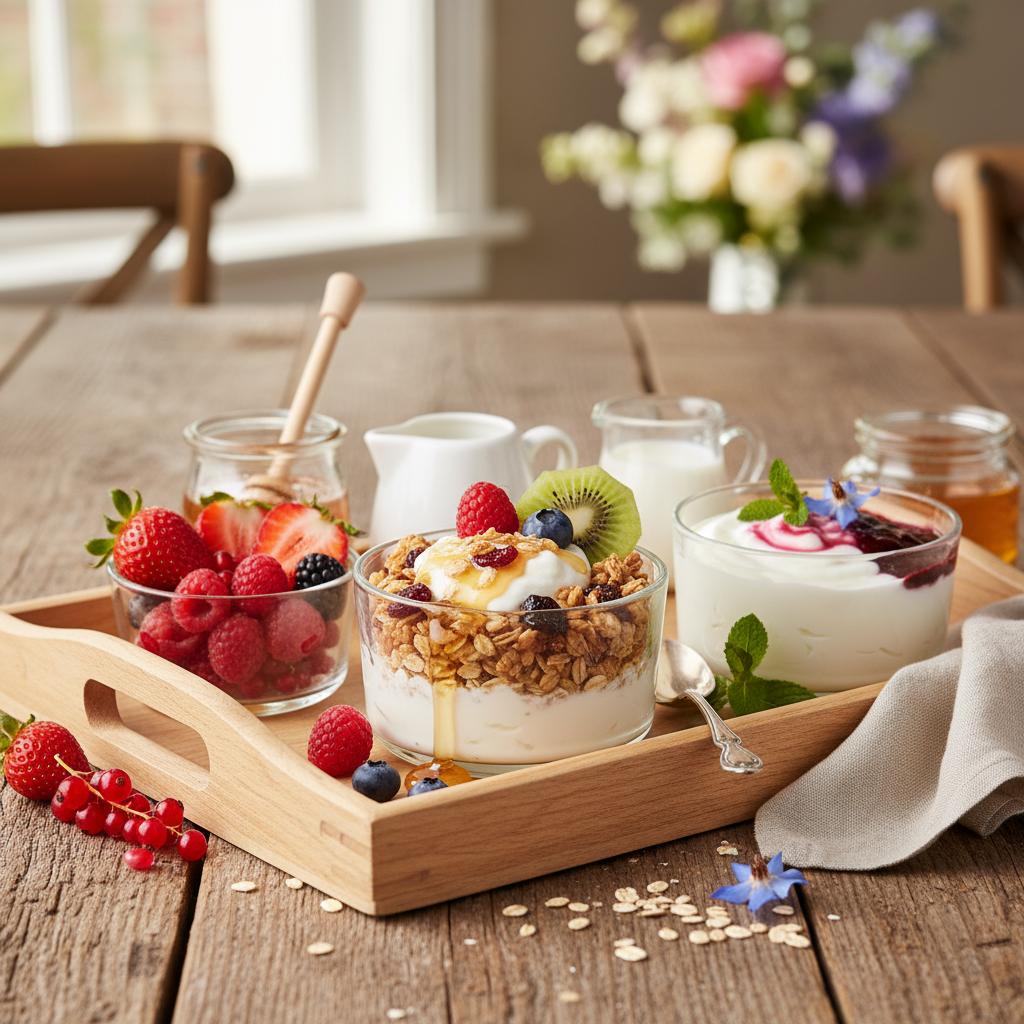
Place muesli in a bowl. Place yoghurt in a separate bowl.
Pour milk into a small serving jug or glass. Combine fruit in a bowl.
Present all the dishes on a breakfast tray or set a special place at the table.
Don’t forget a serviette, cutlery and a small vase of flowers.
Notes:
This is a great breakfast idea for Mother’s Day or your birthday if you have very small children – you can prepare the fruit the night before and then all they have to do is mix it together for you (strawberries and bananas go soggy if you mix them in before serving).
Gluten-free me can’t eat muesli anymore , but my friend Sam highly recommends Carmen’s muesli, toasted or untoasted depending on what you prefer.
I used the fruit we had in the house – it can be as simple as a few strawberries, slices of banana or a few grapes.
Maybe splurge and buy a punnet of raspberries. BC we used our breakfast tray (complete with adjustable legs) regularly.
For this photo, I had to vigorously scrub it to remove bottom-of-the-pantry debris!
This pizza is healthy and doesn’t have the high fat content of most regular pizzas. Just remember that the softer the cheese is, the fewer kilojoules it will contain.
This recipe was created by Jennifer Cheung for Kidspot, New Zealand's best recipe finder.
125g unsalted butter, softened, plus extra, for greasing
half a cup caster sugar
Zest of 2 lemons, finely chopped
2 eggs
2 cups plain flour
2 teaspoons baking powder
1 cup (250mL) warm milk
Ice cream or thick cream, to serve
Method
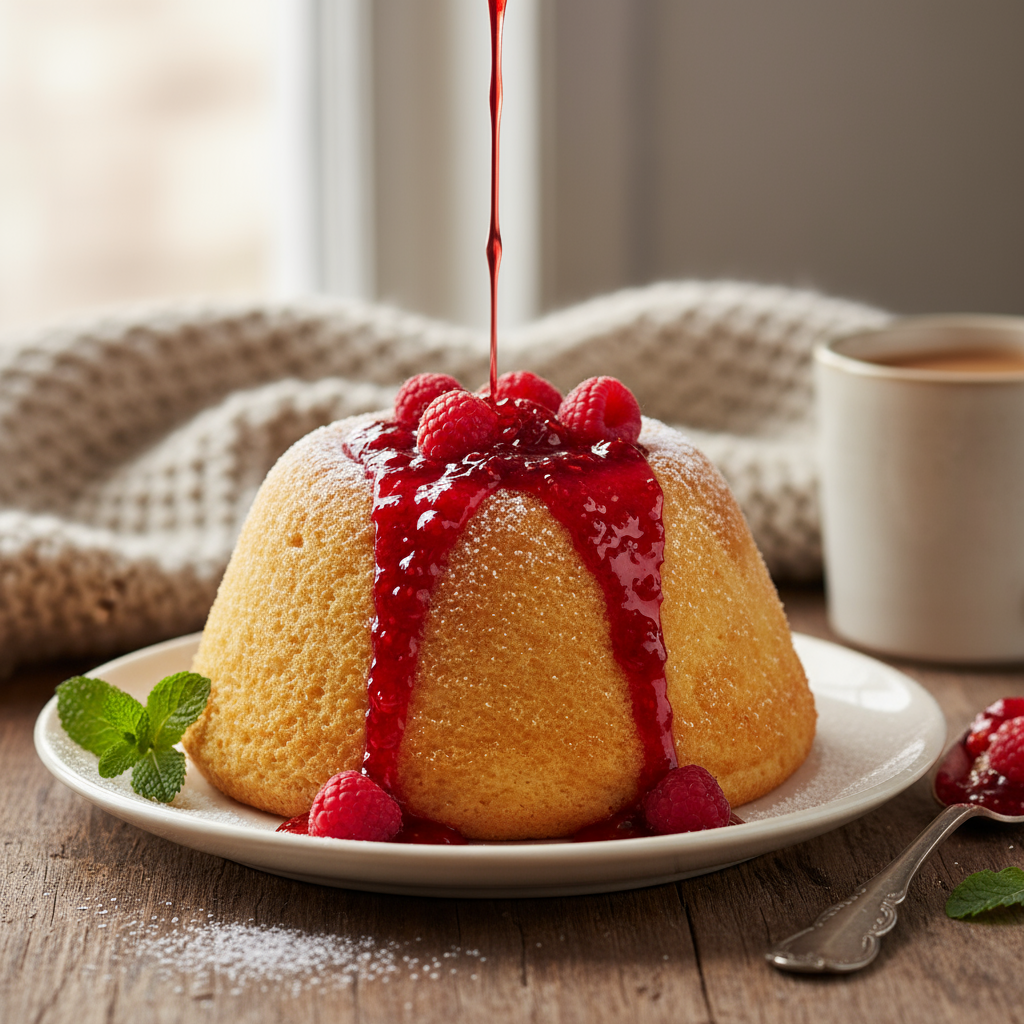
Grease a 1L (4-cup) capacity porcelain pudding basin with butter. Put it in the fridge for 5 minutes, then grease again. Place jam and raspberries in the base of the basin.
Using an electric mixer to beat butter, sugar and lemon rind until light and fluffy. Add eggs and beat on medium speed until smooth. Sift flour and baking powder into mixture, pour in milk and beat on low speed until just combined.
Spoon batter into basin, smooth top and place a circle of baking paper over the surface of the pudding. Place two circles of aluminium foil over the basin and tie on with unwaxed kitchen string.
Place basin in a large saucepan or pot and pour in enough boiling water to reach halfway up the side of the basin. Cover and simmer for 1 and a half to 2 hours or until a skewer inserted into the pudding comes out clean. Check the water level every 30 minutes and top up if necessary.
Remove pudding from saucepan, remove foil and paper, stand for 5 minutes before inverting on to a plate. Serve immediately with custard or thick cream.
Notes:
This pudding was the highlight of an otherwise deep-fried food menu at my residential college during first year Uni. A difficult year.
I love the bright red raspberry topping that runs down the lemony steamed pudding. Perfect dessert for these cold winter nights.
Make sure the foil does not touch the water or it may seep into the pudding.
Would recommend this as a weekend dish if you have to do kinder/school pick up. While it is quick to prepare the mixture, the steaming time is a bit of a problem. Needs to be started at about 4pm to be ready for dessert.
Make gluten-free using gluten-free plain flour and 3 teaspoons baking powder.
Fill cupcake or muffin tin with 12 cupcake papers/casings.
Combine all ingredients in a mixing bowl or stand mixer.
Beat on low speed, graduating to medium speed until the mixture is well combined and smooth.
Spoon the mixture into papers/casings 3/4 full (this allows room for the cupcakes to rise).
Place tin in the oven and bake for 15-20 minutes until cooked through.
Serve warm or cold!
Notes:
You can freeze these cupcakes un-iced in ziplock bags for school lunches or snacks. They will keep in freezer for one month.
You may wish to add 1 tblsp lemon, lime or orange zest to vary and enhance the flavour.
This recipe can also be used to make a loaf cake, adjust baking temperature to 160C and cooking time to 40 minutes.
Ice if you wish or dust with icing sugar.
Icing as pictured is 1 tblsp yoghut mixed with 1 1/2 cups icing sugar and whipped until fluffy. The flower detail is coloured marzipan cut with ‘funky flower’ icing cutters by Wilton.
This recipe was created by Melissa Klemke for Kidspot, New Zealand best recipe finder.
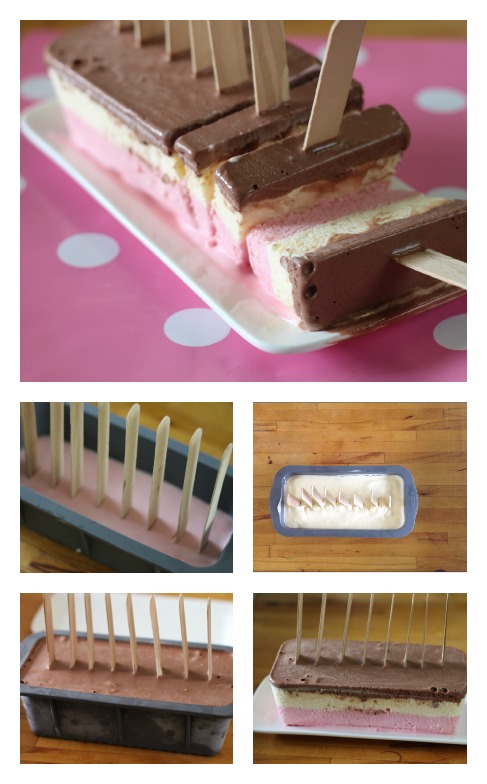
Step 1.åÊPour the melted strawberry ice cream into a silicon loaf pan. Freeze for 2-3 hours or until set, then carefully push the 8 popsicle sticks into the ice cream, an even distance apart.
Step 2.åÊNext, pour in the vanilla ice cream and freeze for another 2-3 hours, or until the second layer has set.
Step 3.åÊPour in the chocolate ice cream and freeze for a further 2-3 hours, again waiting for the final layer to set.
Step 4.åÊRemove from freezer and flex the loaf pan (the same way you would pop an ice cube out of the tray) to remove the ice cream block. Slice in between popsicle sticks and serve.
Note
I recommend that you pop the serving dish in the freezer too. This helps it stay cold while you are serving.
If you don’t have a silicon loaf pan, you could line a rigid cake pan with baking paper and then dip it in warm water to turn the cake out.
I used neapolitan flavours but you can use any ice cream that you like. Peanut butter, caramel and chocolate flavours would also be nice.
This recipe was created by Jennifer Cheung foråÊKidspot, New Zealand’s beståÊrecipe finder.
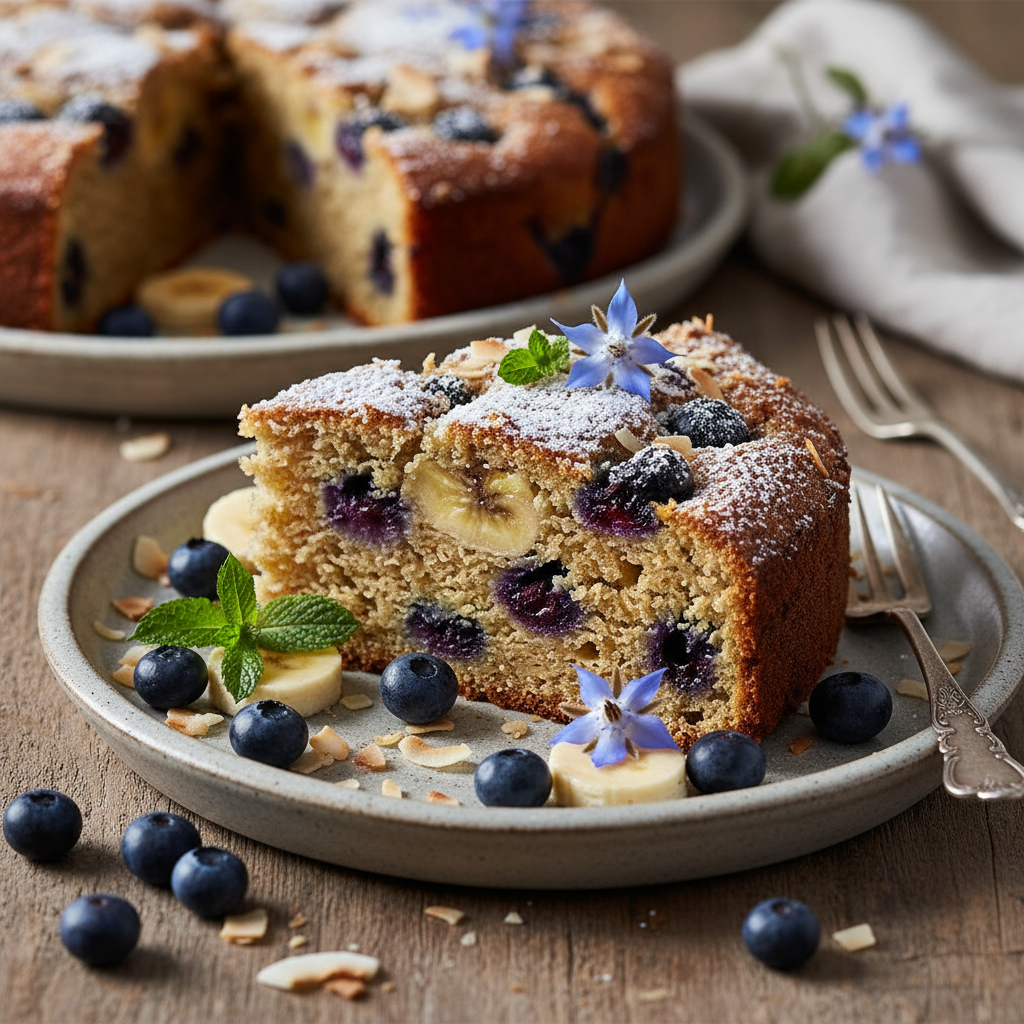
Preheat oven to 175C (155C fan-forced). Grease a cake tin and line with baking paper.
In one bowl, mix all the dry ingredients together. In another bowl, beat all the wet ingredients together. Make sure to leave your blueberries until the end.
Fold the wet ingredients into the dry ingredients until just combined, then add the blueberries and gently stir through.
Pour the mixture into your cake tin and pop into the oven for 40-50 minutes, or until skewer comes out clean.
Leave to cool in the pan for 5 minutes before turning out onto cake rack. Serve and enjoy!
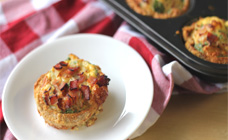
Preheat oven to 180°C or 160°C fan-forced. Spray a 6-cup Texas muffin tin with oil and set aside.
Spray oil in a frying pan; over medium heat, cook the onion and bacon until the onion is translucent.
Push the bread into the muffin tin and spoon in the bacon and onion mixture.
In a bowl, whisk together egg, milk and parsley and distribute evenly into the 6 muffin tins.
Bake for 20 minutes. Leave to sit for 3 mins before running a knife around the edges. Serve.
Notes:
When pouring in the egg mixture into the tins, it will overflow and then absorb down into the bread. It seems like it is too much but then is settles and you add the rest.
Make these muffins more scrumptious by adding a little grated cheese on the top.
Use your favourite bread. I prefer crunchy multigrain for the great texture it brings.
This recipe was created by Jennifer Cheung for Kidspot, New Zealand’s best recipe finder.
In a frying pan heat a tablespoon of vegetable oil and fry the beef strips in small batches to brown and seal in the flavour. Add a little more oil to the pan as you need it. Making sure that the pan is very hot as you begin each batch. Set aside in a warm place.
In the same frying pan cook the onions with the garlic, tomato paste, stock powder, paprika and mushrooms until the onions are translucent.
Add the water and beef and simmer for 5 minutes.
Stir through the sour cream and parsley.
Serve on steaming hot fettucine or rice.
Notes
When you slice the rump steak for this dish, make sure that you slice thin slices across the grain of the meat so it is tender.
If you pay attention to the method of this dish, the meat should melt in your mouth without being cooked for a long period of time.
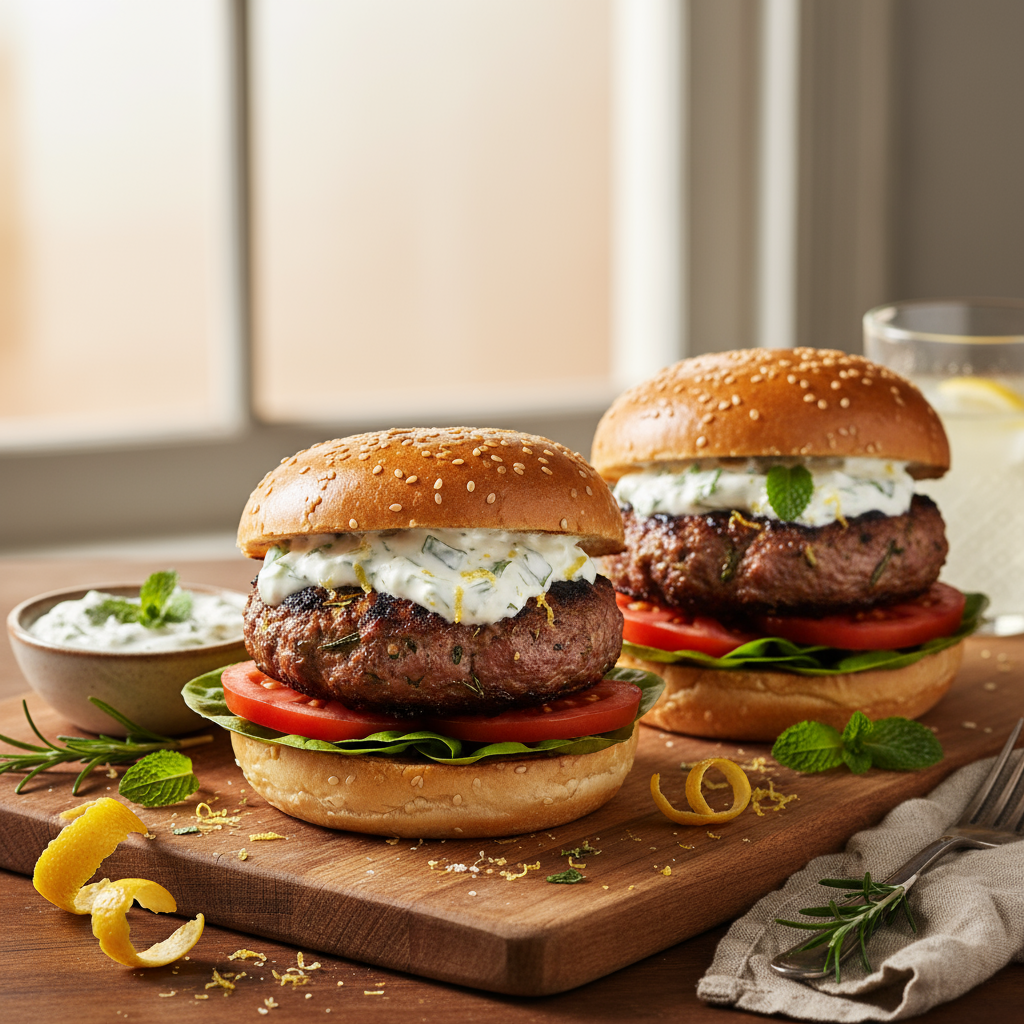
In a large bowl, mix together all the patty ingredients until completely combined. Shape into 6 patties.
Bring a frying pan, grill pan or barbecue to a medium to high heat and place the patties onto the cooking surface. Cook for 5 minutes on each side, or until cooked just through.
In the meantime, whisk together all the yogurt sauce ingredients and chill.
When the burgers are ready, serve in a buttered hamburger bun or in a warm Lebanese wrap with cucumber, lettuce, tomato slices and mint-yoghurt sauce.
Serving Suggestions
Note
We are lucky enough to live near the world’s BEST delicatessen. The owner, Nazek makes the most amazing tabbouleh every day except Sunday (she deserves a break!). My husband loves it when I stuff this into wraps for him with these lamb burgers.
If you can’t find lamb mince, you can make your own by using boneless lamb rump, or something similar with a bit of fat in it, and then gently processing it until you have your own mince.
This recipe was created by Kristine Duran-Thiessen for Kidspot, New Zealand’s best recipe finder.
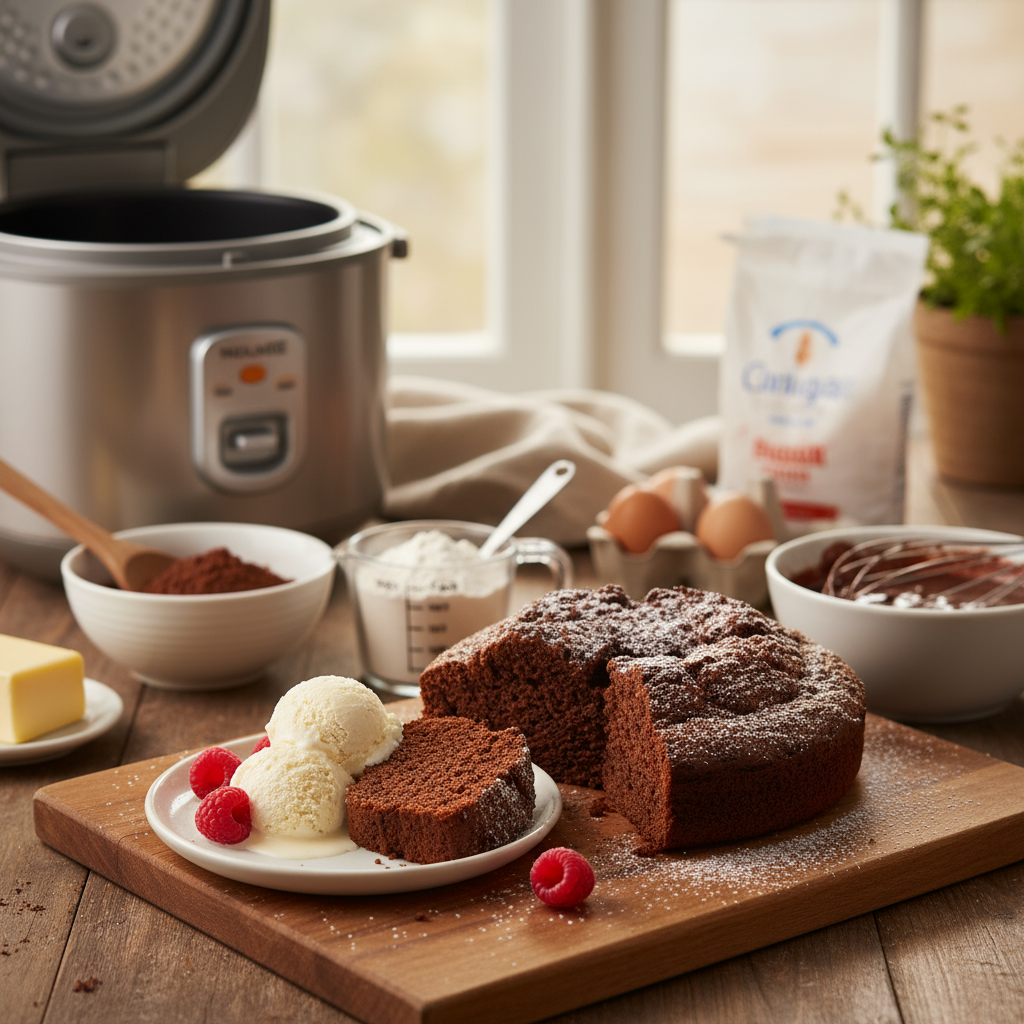
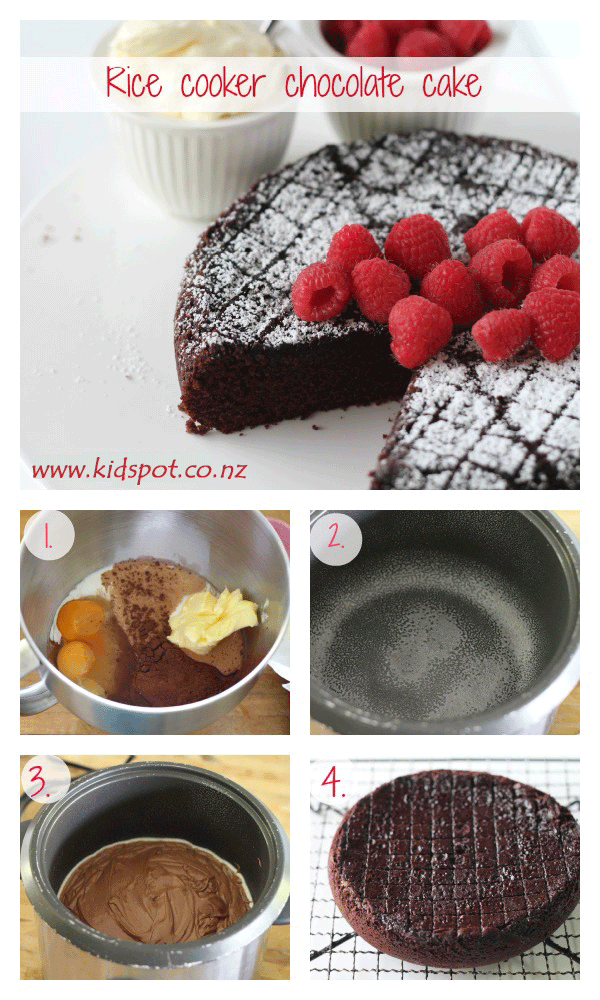
Step 1. Grease and flour the bowl of the rice cooker (unless it is non-stick).
Step 2. Place all ingredients into a mixing bowl and using a mixer, mix on high for 4 minutes or until combined.
Step 3. Pour mixture into the rice cooker bowl.
Step 4. Press cook on your rice cooker. If you have a standard rice cooker, you will have to push the cook button several times until this cake is cooked. You may need a rest between each push so the temperature sensor can cool down. If you have an advanced rice cooker you can choose the cake selection. Test you cake with a skewer to see if it is cooked. Turn out onto a cooling rack to cool and serve with raspberries and cream.
Notes:
You can double this recipe if you need a larger cake but you may also need to increase the cooking time.
We served this with raspberries but you can use any berries you like.
If you are looking for another simple recipe then try these 2 ingredient chocolate cupcakes. They give you a delicious chocolate hit.
If you are looking for a chocolate cake just like your mum used to make then try this Best chocolate cake recipe.
If you are not a fan of washing up then you can make this One pan chocolate cake. It is mixed in the pan and is so delicious that you’ll want to make it over and over.
This Flourless chocolate cake is a perfect, dense recipe and tastes just like the ones you buy in cafes.
This recipe was created by Jennifer Cheung for Kidspot, New Zealand’ best recipe finder.
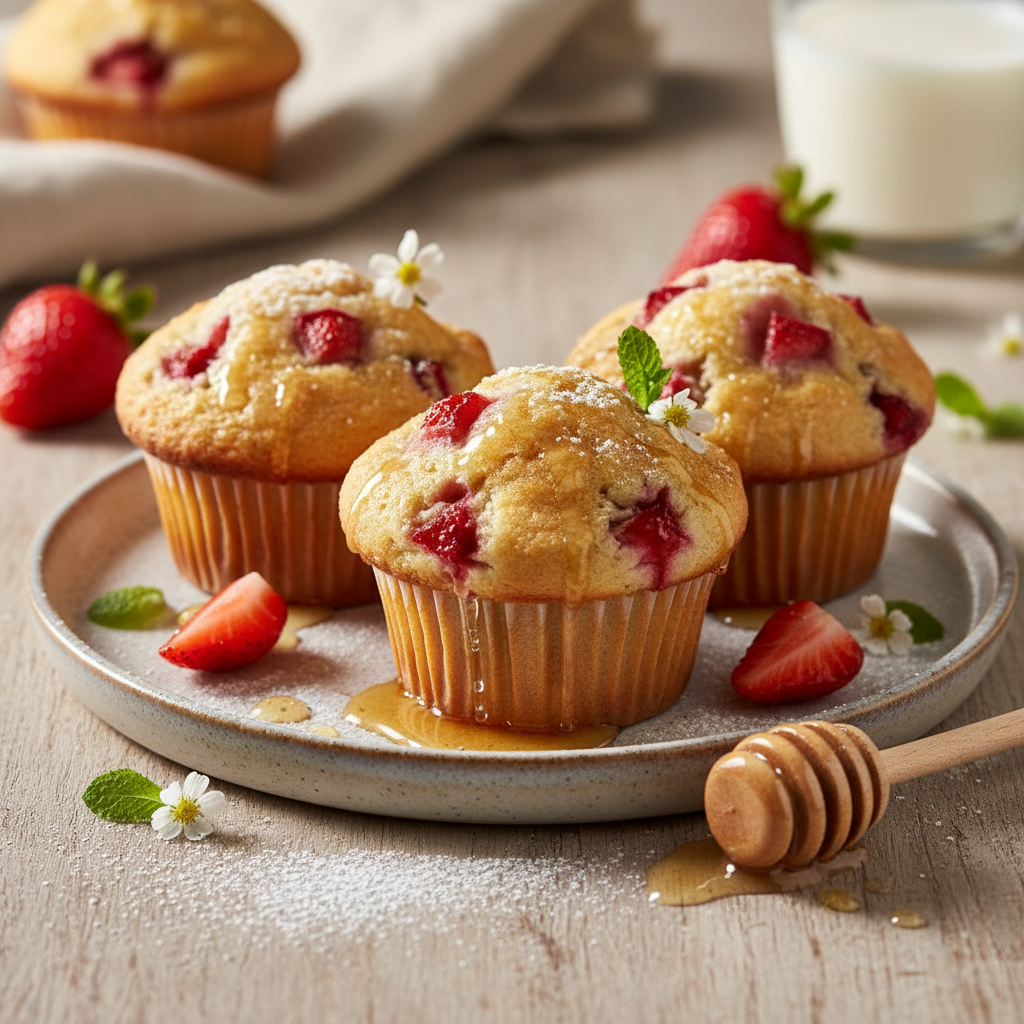
2 large apples (whatever fresh, crunchy ones you have available), cored and thinly sliced
Method
Preheat oven to 180°C (160°C fan-forced) and grease and line a baking tray with deep sides (about 5cm).
Cream the butter and sugar together with an electric mixer until pale and fluffy (this should take about 5 minutes). Add the eggs, one at a time, beating well between each addition.
Sift the flour, cinnamon, ginger and baking powder together then fold this through the butter mixture.
Spoon this into your prepared tray, press apple over the top and then bake for 35 minutes or until the sides of the cake are just pulling away from the tin and a skewer comes out clean. Let cool in the tin, dust with icing sugar and serve.
1/3 cup (75g) caster sugar, plus extra for dusting
1/3 cup (75g) currants or sultanas, or a mixture of both
grated zest of half a lemon
1 egg, beaten
a little milk, if needed
a little extra butter for greasing
2 tbsp caster sugar, for sprinkling
Method
Sift the flour, salt and cinnamon into a bowl and add the diced butter.
Rub with your fingertips until the mixture resembles breadcrumbs. It doesnÛªt have to be perfect.
Mix in the sugar, currants, lemon zest and beaten egg and stir to form a dough, adding a splash of milk if too dry. Try not to work it too much or your cakes will be tough.
On a lightly floured surface, roll out the dough to a thickness of about 1.5cm.
Cut into rounds with a 6 or 7cm plain cutter.
Warm a heavy based frypan over a medium to low heat.
With a piece of kitchen paper, wipe some extra butter over the frypan until lightly coated.
Cook each cake for about 4 minutes each side or until golden brown ÛÒ check them often to make sure they do not burn. Sprinkle with caster sugar and serve.
Note
TraditionallyåÊ these are served with a pot of tea. They are so easy you could even get the children to help while you have a cup of tea after your busy day. Afternoon snack and activity all rolled into one.
You can split them like a scone and top with whipped cream and jam to be fancy.
Apparently they keep in an airtight container for up to 4 four days, but honestly, theyÛªve never lasted long enough in our house to test that theory.
This recipe was created by Michele Crawford for Kidspot, New Zealand’s beståÊrecipe finder.
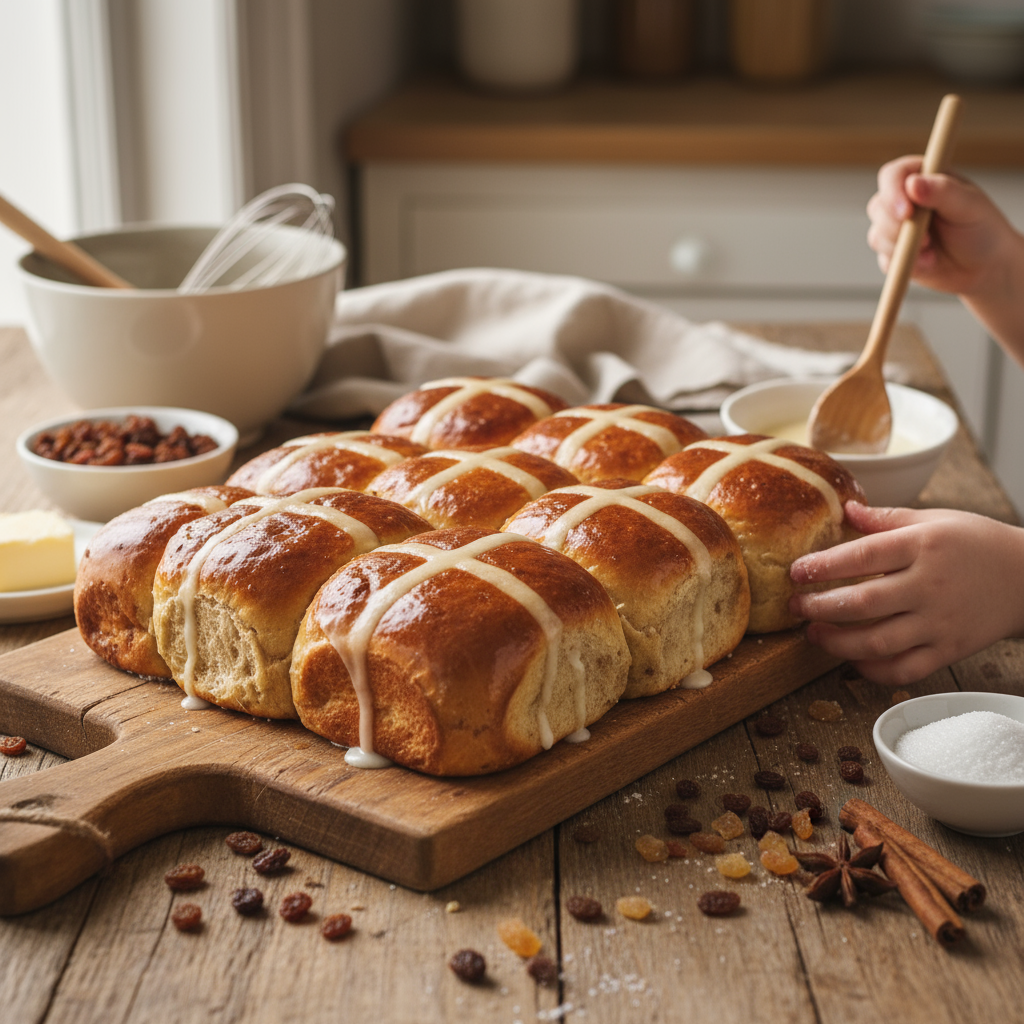
Mix flour, yeast, sugar, spices and salt in a large bowl.
Whisk eggs, milk and marmalade together and pour into the flour mixture to form a sticky dough.
Knead on a floured surface for 10 minutes until elastic. Add softened butter and knead for a further 5 minutes until smooth.
Fold in fruit and peel and knead for further 3 minutes.
Form the dough into a ball, put it in an oiled bowl and cover with cling film. Place it in a warm place for about 2 hours, or until dough has doubled in size. Then turn the dough out onto a floured surface.
Form into a loaf and use a knife to cut the loaf into 12 buns – in half lengthways, then six loaves each (see video).
Line a shallow baking dish with baking paper and put your hot cross buns onto it, ready for the oven.
Preheat oven to 180°C (160°C fan-forced).
To make the crosses, mix the flour, icing sugar and water into a thick paste.
Pour paste into a resealabe bag and snip off one of the corners to create a piping bag.
Pipe crosses on buns and bake for 15-20 mins. Turn out on wire rack.
To create glaze, bring the sugar and water to the boil until it is a clear syrup and then take it off the heat.
Apply glaze with a pastry brush while the buns are still hot.
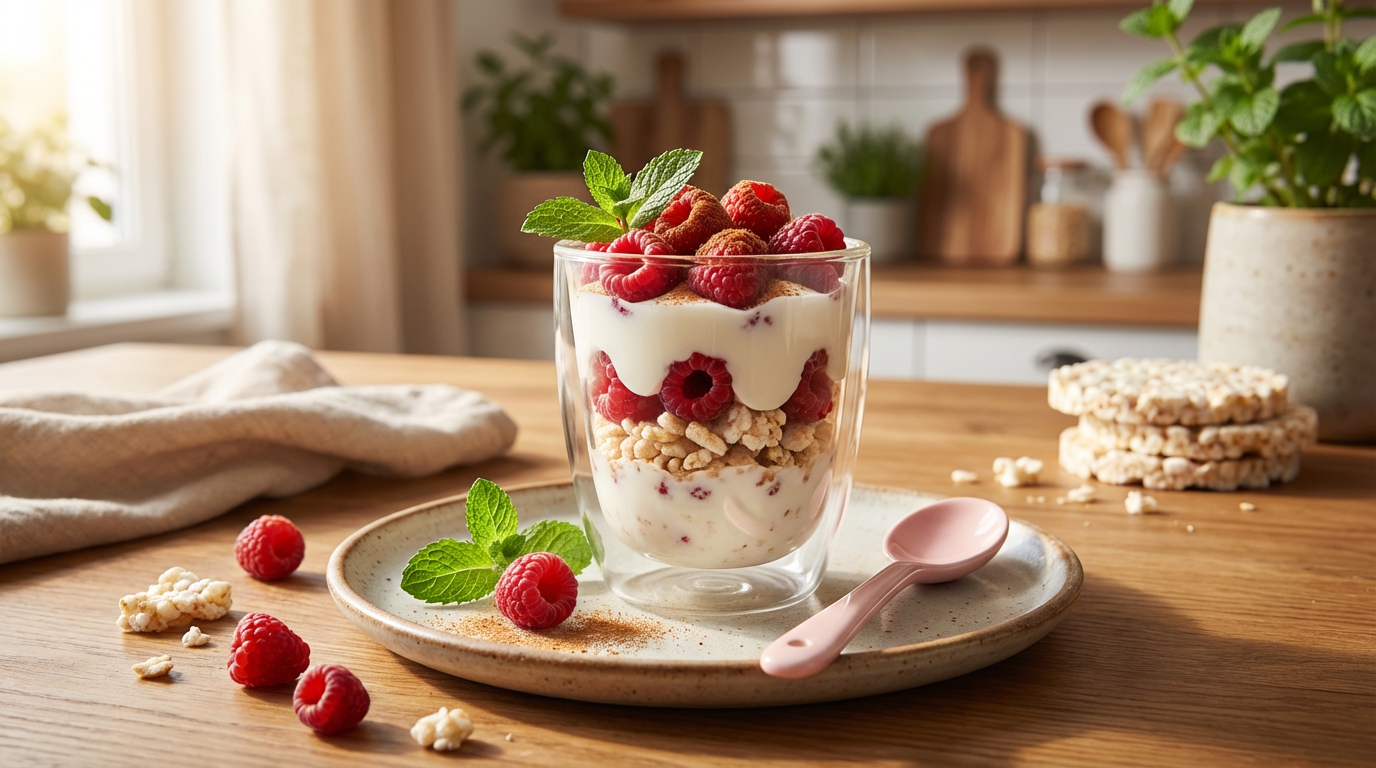
Select your bowl, cup or jar and cover its base with yoghurt.
Crumble 1 rice cake over the yoghurt base.
Spoon over more yoghurt to cover the crumbled rice cake and then a sprinkle of cinnamon.
Place a 1/4 cup of berries on top of the yoghurt and then repeat for another layer – 1 rice cake, yoghurt, berries, cinnamon – and then add a drizzle of honey to complete.
Cover with wrap or similar and let soak overnight in the fridge.
Preferably Greek-style yoghurt or something pot-set, which is a healthier choice.
Fresh strawberries, blueberries or raspberries are perfect for this dish.
You can use frozen berries if you don’t have fresh. They will defrost by morning and if you are making this often, it will be cheaper.
This recipe was created by Karla Gilbert. You can read her blog at Ironmum Karla, catch up with her on Twitter, find her on Facebook or peek at her pins on Pinterest.
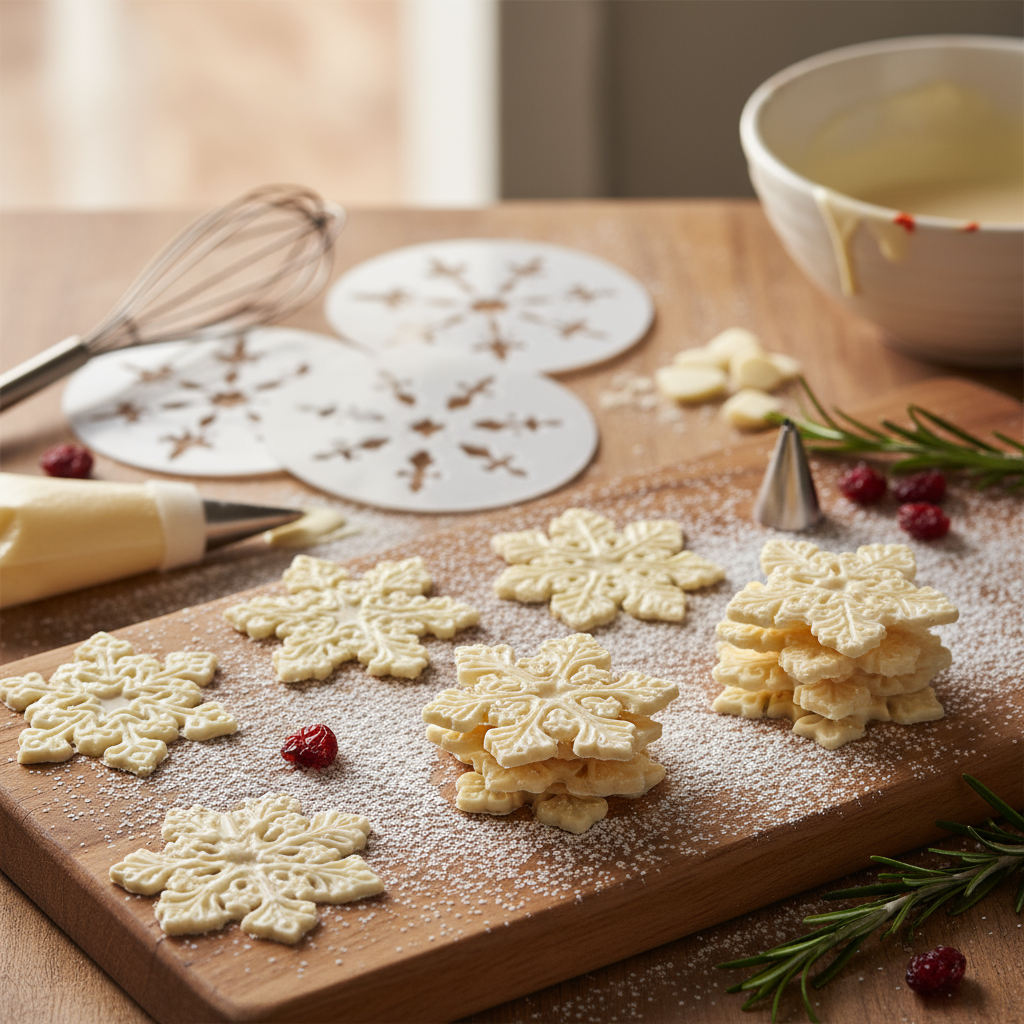
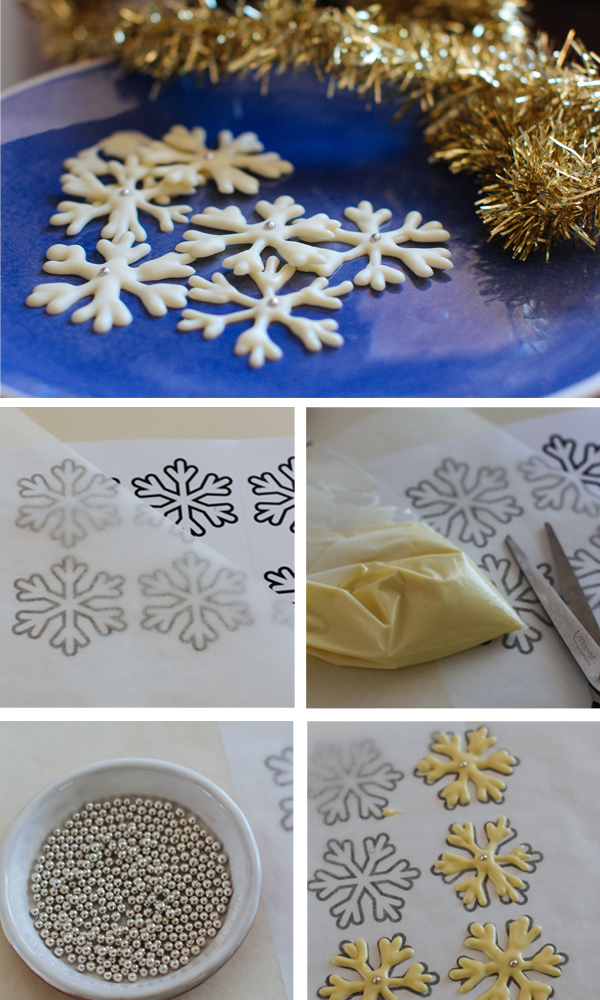
Step 1. Search online for a snowflake pattern that you like, repeat it on a blank document then print out.
Step 2. Melt the white chocolate in a heat-proof bowl over a saucepan of simmering water, stirring until smooth. Transfer to a snap-lock or piping bag.
Step 3. Lay a piece of baking paper over the snowflake stencil.
Step 4. Carefully snip a tiny corner from your bag of melted chocolate and pipe snowflakes onto the baking paper using stencils as a guide. DonÛªt worry if the first one or two donÛªt work out perfectly. This is a real case of trial and error; youÛªll soon figure out how much to squeeze the bag, how best to trace the pattern with chocolate – and the best thing is that any Û÷wobblyÛª ones will still taste delicious. Pop a silver cachou in the centre of each snowflake then set aside to set completely.
Swap white chocolate for milk chocolate or dark chocolate. Or use all three and marble together – fancy!
You could also sprinkle these with edible glitter.
This recipe was created by Sophie Hansen for Kidspot, New Zealand’s best recipe finder: You can follow Sophie on Local is Lovely, Facebook, Twitter or Pinterest.
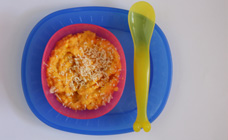
Give little ones a well-rounded meal with this easy carrot, corn and chicken dish.
This is an easy one to make if you’ve already got pureed carrot and corn in the freezer – simply grate in a little chicken from your meal and you’re good to go.
Ingredients
1 carrot
1 cob sweet corn
olive oil, for frying
1 small piece (50g-100g) chicken breast or thigh, or a portion of roast chicken
1 tsp water (or breastmilk/formula)
Method
Peel and chop the carrot and tear off the husks of corn.
Place both the carrots and corn cob into a pan of boiling water. Boil until soft, around 10 minutes.
Meanwhile, heat a little olive oil in a frying pan and cook the chicken until cooked through. Allow chicken to cool.
Remove carrot and corn from water and once corn cob is cooled, cut kernels from the cob.
Place cooked corn kernels and carrot into a blender with a teaspoon of water and blend until smooth. Add more water if needed to get a creamy consistency. Breastmilk or formula could also be used for a creamier taste.
Use a fine grater to grate the chicken over the top of the puree. Stir to combine and serve.
Peel and chop the carrot and tear off husks of corn. Place both the carrots and the corn cob into a microwave-safe container. Place a lid loosely on the container and cook on HIGH for around 2 minutes.
Remove the vegetables from the container and replace with the chicken – cook for another two minutes or until cooked through. Allow the chicken to cool.
Once the corn cob is cooled, cut the kernels from the cob and place in blender with the carrot with a teaspoon of water and blend until smooth. Add more water if needed to get a creamy consistency. Breast milk or formula could also be used for a creamier taste.
Use a fine grater to grate the chicken over the top of the puree. Stir to combine and serve.
Notes:
Serving Suggestions
Note
Up until recently it was advised to wait until baby is 12 months old before introducing corn due to the potential for allergies. Happily, this advice has changed and babies as young as six months old can enjoy sweet corn pureed – a great veggie to mix with chicken and other vegetables such as carrot, sweet potato or pumpkin. If your child has a history of eczema, asthma or other food allergies, ask your doctor first. And don’t feed them whole kernels until around they’re about one year old. Look for signs of an allergic reaction: rash around the mouth area, swelling of the tongue, lips or face, a rash, vomiting or diarrhoea.
Can be frozen for up to four weeks.
This recipe was created by Belinda Graham for Kidspot.
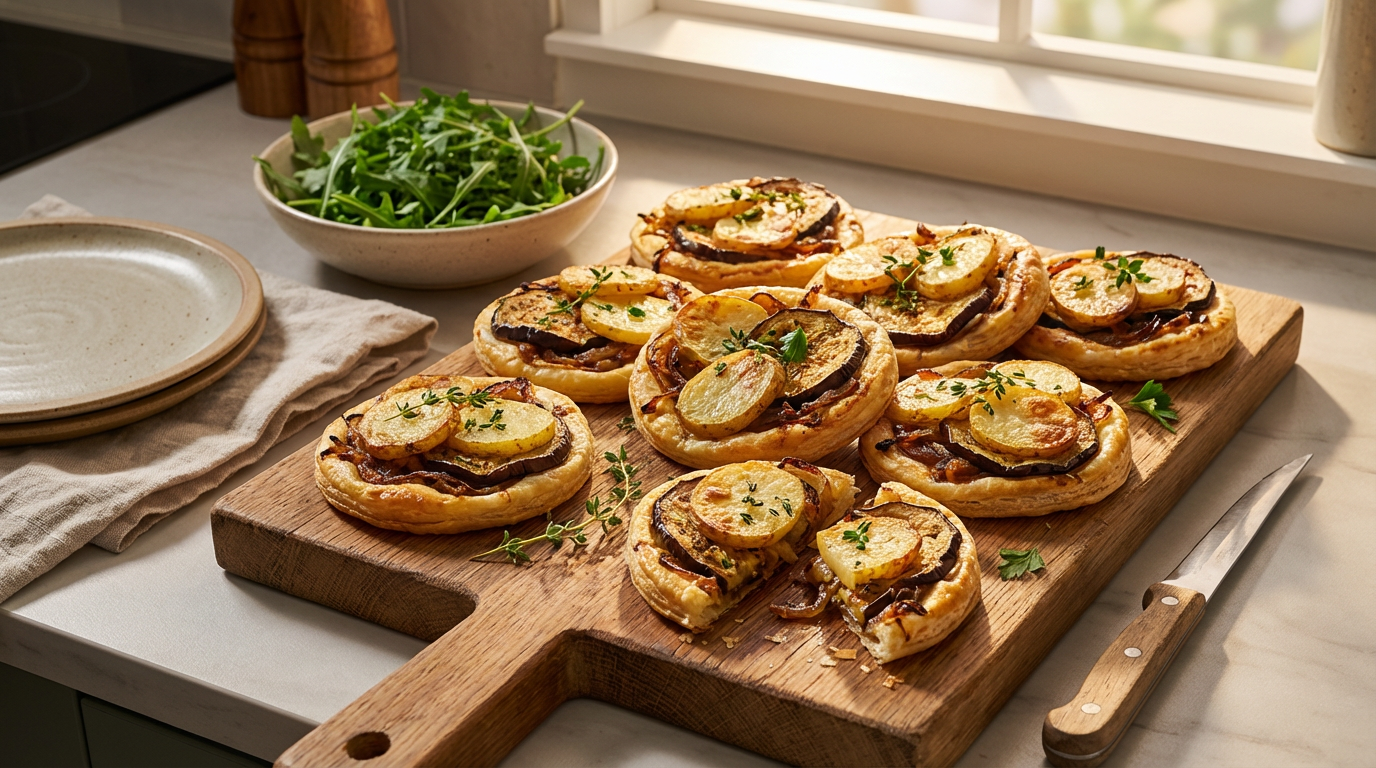
Preheat oven to 200°C conventional (180°C fan-forced)
Heat 1 tablespoon of oil in a large frypan. Cook eggplant slices over medium heat until golden and soft. Remove to a plate. Add 1 tablespoon oil and cook potatoes until tender and starting to brown. Remove to a plate.
Add 1 tablespoon oil and cook onion and garlic over very gentle heat for 6-8 minutes until starting to caramelise. Season well with salt and pepper then stir through chopped parsley.
Use a small bowl or cookie cutter as a guide to cut four circles from each pastry sheet. Place on a tray lined with baking paper. Divide onion mixture between each disc, being sure to leave a border. Top with cooked eggplant and potatoes. Brush a little extra oil on the pastry border.
Bake for 14 minutes until pastry is puffed and golden. Serve with a green salad.
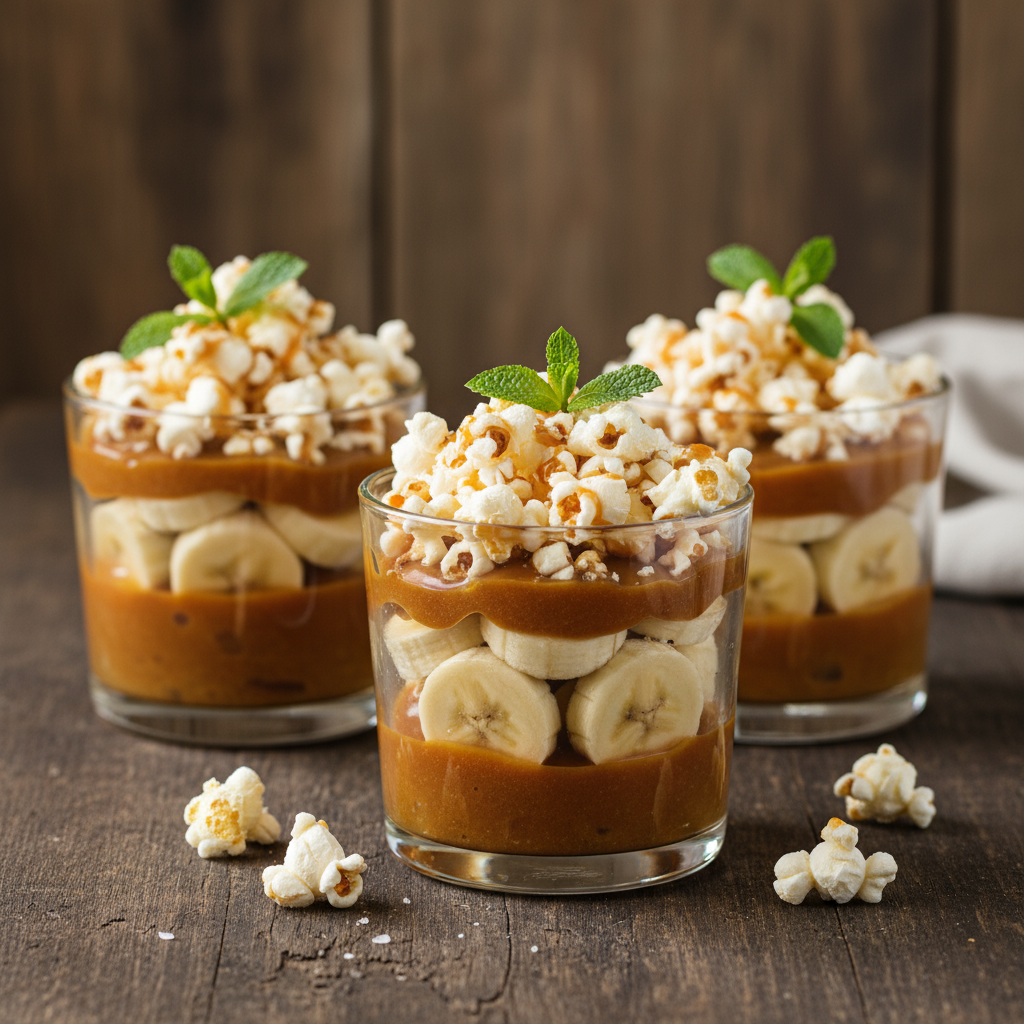
Combine butter, sugar, golden syrup and cream in a small, heavy-based saucepan.
Stir over medium heat until the butter is melted and mixture is a smooth consistency – do not allow to boil. Reduce heat and leave to simmer, for about 5 minutes, stirring occasionally.
Stir through the salt. Remove from heat and set aside to thicken for 20 minutes.
Once the sauce has cooled and thickened, dollop a tablespoon or two into the bottom of serving cups or glasses, then arrange banana slices, top with popcorn and to finish off drizzle over some more caramel sauce.
If making ahead to serve later, transfer the caramel sauce into a storage jar or tub and keep chilled, it stays spreadable even in the fridge but can be brought back to pouring consistency left out for 10 minutes.
Alternatively, you can pour the first layer of caramel into your serving glasses and refrigerate these to cut prep time when ready to serve.
This caramel sauce will serve four adults, or could be stretched between 8 serving glasses for a lighter dessert or an after-school snack.
This sauce would be equally well matched to fresh slice pear or poached apples.
Also as a decadent addition to yoghurt or ice cream, or a filling for tart shells or a layer cake.
If you don’t fancy salted caramel, then just leave out the salt!
This recipe was created by Katie Rainbird for Kidspot, New Zealand's best recipe finder.
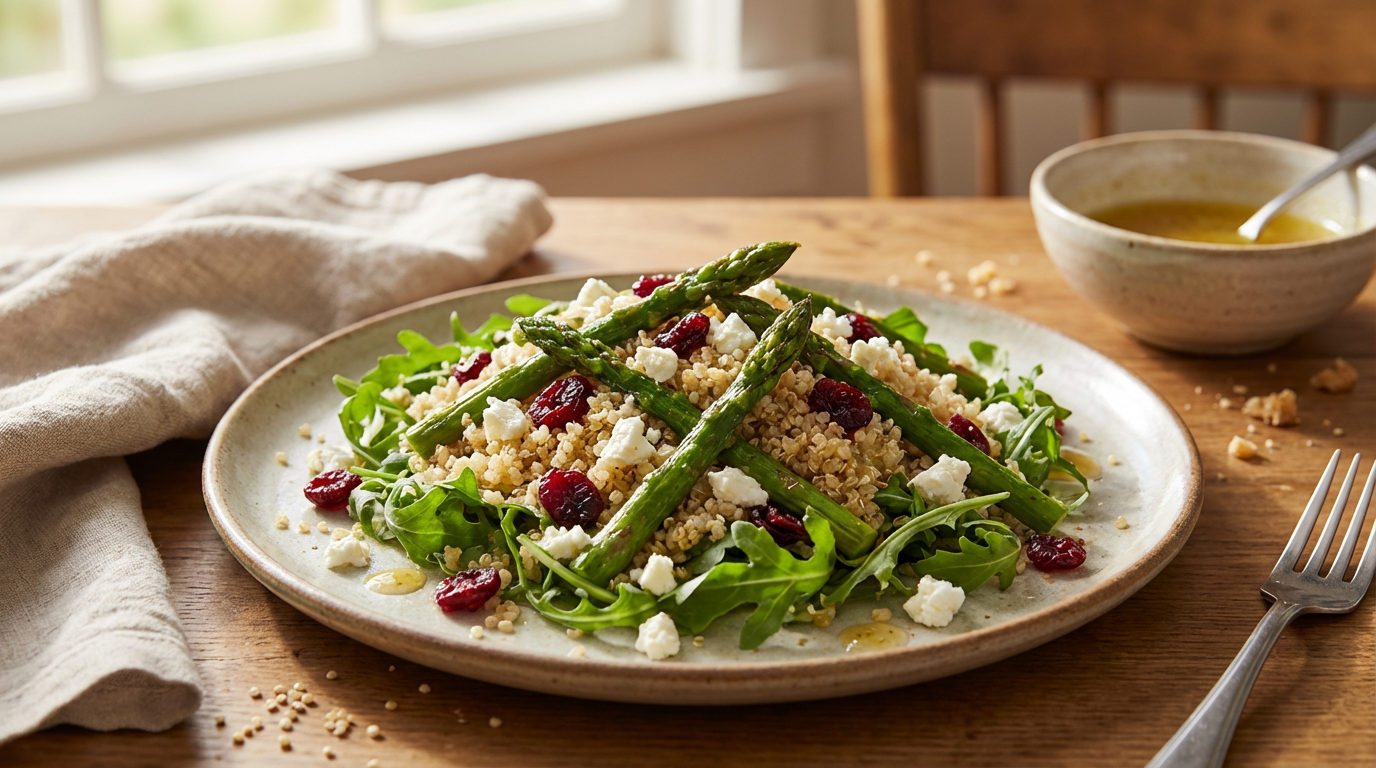
10 fresh asparagus spears (150g), ends trimmed, cut into thirds
1 red onion (about 180g), sliced
80g feta cheese
1/4 cup chopped mint leaves
1 cup soft lettuce leaves, roughly chopped
1 cup baby rocket leaves, roughly chopped
Dressing
1 tbsp extra virgin olive oil
2 tbsp lemon juice
1 tbsp honey
Method
In a medium saucepan, bring water to the boil and add quinoa and garlic. Reduce heat, cover and simmer for 15 minutes. Turn off the heat and let stand for 5 minutes before discarding the garlic clove.
While quinoa is cooking, place cranberries into a small bowl and cover with water. Leave to stand for 5 minutes before draining.
Heat a grill pan, spray with oil and add asparagus and red onion. Season with a little salt and pepper and cook for 6-7 minutes.
Mix dressing ingredients together in a jar and give a good shake. Assemble salad by mixing all ingredients together.
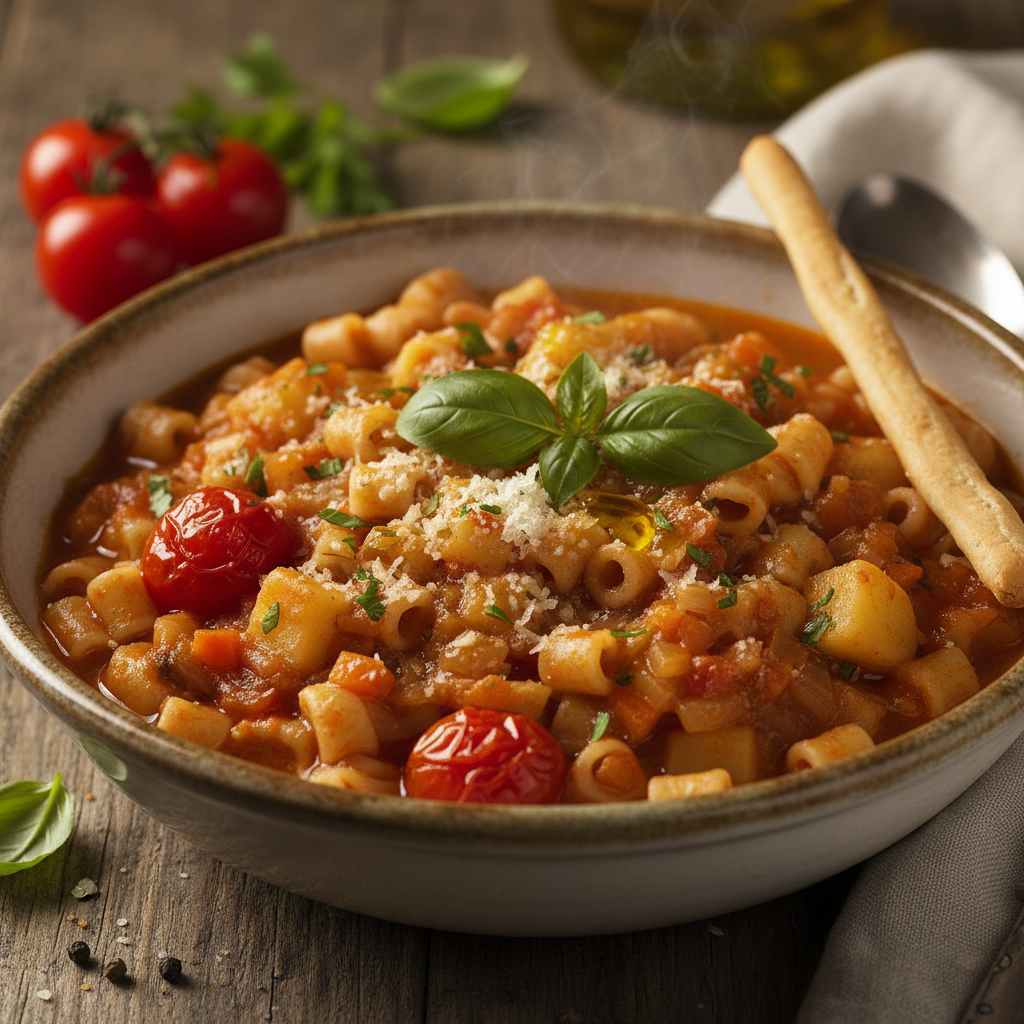
Heat the oil in a large saucepan over medium. Add the garlic, celery, carrot and onion and cook, stirring regularly until the onion is soft and translucent.
Add the tomatoes, water and potatoes to the pan, cover and cook until the potatoes are almost tender, about 30 minutes.
Add the pasta and cook for another 10 minutes or until the pasta is al dente. Remove from heat, season to taste and serve in big bowls with the parmesan and parsley.