
Sponsored content provided by Resene
Create a personalised measuring stick to track your growth.
Measure the children up against their own personal measuring stick so they can see how much they are growing. You can personalise each stick with their name, and a colour scheme of their choice.
You will need:
- Pencil and ruler
- Alphabet stencil set (75mm high)
- Paint brushes in various sizes
- Low tack masking tape
- Resene KidzColour range testpots in Resene Splat (blue), Resene Sing Song (yellow), Resene Fairylight (lavender), Resene Tutti Frutti (green) and Resene Flower Power (pink), and Resene Art Action Quick Dry undercoat. (On the second stick, we used Resene Splat for the background, Resene Tutti Frutti for the numbers and markings, and Resene Smiles for the name.)
- One 1.6m length of untreated, dressed pine (150mm x 19mm) per measuring stick
- 150-grit sandpaper.
Top tips…
- Use a different brush for each colour so you don’t have to keep washing the brushes.
- Wrap each brush in cling film between coats if you find the paint is drying out.
- When painting the segments, brush away from the masking tape to avoid any seepage under the tape.
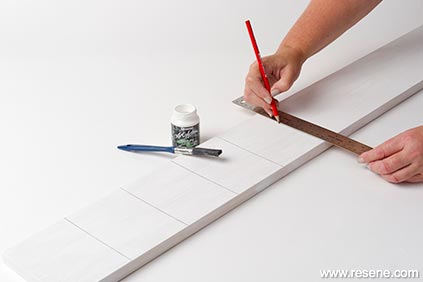
Step one
Take the length of pine and lightly sand the edges and ends to get rid of any roughness, then use Resene Art Action Quick Dry undercoat on the side you will be painting and the edges. Leave the undercoat to dry thoroughly, then measure up from the end and mark at 10cm intervals. Rule across the timber so you have a guideline for the masking tape.
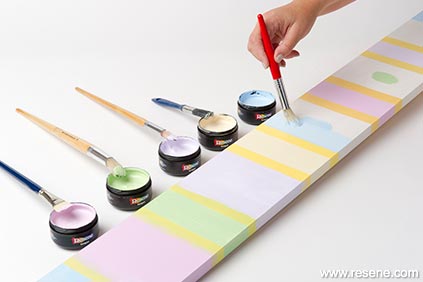
Step two
Carefully place the low tack masking tape along the edges of every second 10cm block so that some will look narrow and some wide, you will painting the wider segments first. Put a dab of each colour on the segments so you know which colour to paint. Paint the wider segments on the measuring stick first, making sure you paint the edges as well as the top. Allow to touch-dry, then remove the masking tape. Mask the remaining unpainted sections, and paint them in the marked colours. Remove the masking tape.
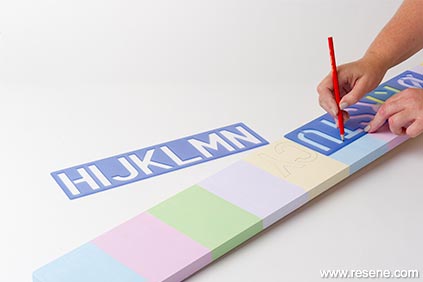
Step three
Take the stencils and place the letters evenly along the measuring stick, draw the letters on with pencil.
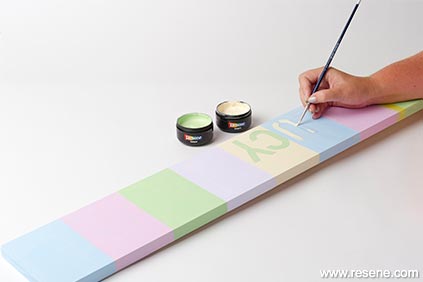
Step four
Paint the letters in contrasting colours to the backgound colour, or paint the name on freehand if you prefer.
For more projects and colour inspiration visit Resene.co.nz.
Styling and writing: Helena Dunn, pictures: Mark Heaslip, props: Pink leather pouffe, papier mache dog, birdcage, rabbit candles all from Republic Home (www.republichome.com)
Read more on Kidspot: