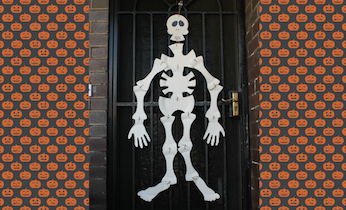
Paper plate skeleton
Making a skeleton is not only a fun Halloween activity, but it's also a great way to figure out how our skeleton actually goes together. This paper plate skeleton is so easy and will make your front door extra spooky for Halloween this year.
What you need:
- 15 x plain white paper plates
- scissors or a craft knife
- black marker pen
- pencil
- string
- hole punch
Number of players:
Activity:
From your 15 paper plates, you will need to create:
- 1 x head
- 1 x neck and shoulder bone
- 1 x rib cage
- 1 x hip bone
- 4 x arm bones (2 for each arm)
- 4 x leg bones (2 for each leg)
- 2 x hands
- 2 x feet (cut out of same plate)
See below for the rough shape you can use for each section:

Cut out each section of the skeleton and use the hole punch to punch holes in each section (as indicated in the pictures above).
Once you have them all ready, lay them out on the floor and build your skeleton. This will be a fun problem solving activity for kids.
When the skeleton is assembled correctly, string all the bits together through the holes you've punched.
Now hang your skeleton on the front door for Halloween. Spooky!
Hints and tips:
- For the leg and arm bones, cut one 'master' bone and then use it as a template to create all the rest.
- For the hands and feet, use your child's own hands and feet to trace around. Easy!
- Thanks to our sister company Kidspot Australia for creating the instructional video.