Put together a kid’s witch costume with these easy step-by-step videos and you’ll have the perfect Halloween dressup!
What you need:
(See the requirements and instructions further down the page for the witch’s hat, tutu, broom, and plaits)
- A witch’s hat
- An old black dress (or make a witchy tutu)
- Stripy long socks or tights
- Red or black boots
- A witch’s broom
- A ball of orange wool to make witchy plaits
Putting together the witch’s outfit
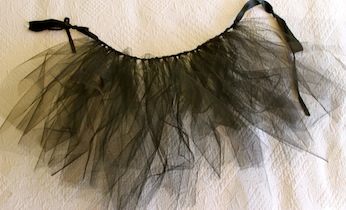
Either make a witchy tutu for a truly witchy poo princess (no sewing skills required – see below) or fashion something from old clothes. Anything black will do the trick. For instance, you could cut a ragged hem to an old black dress or long t-shirt and use a black shirt as a jacket.
Now add the stripy tights, boots, hat and broom.
How to make a witchy tutu
What you need:
- 2m of black tulle
- 150cm of black ribbon
- Scissors

Activity:
Watch the video below to find out how to put your witchy tutu together. Just substitute black tulle for the pink!
- Use the black ribbon to measure your child’s waist. Tie a knot in the ribbon at each end to mark where the waist measurement begins and ends.
- The width of the tulle will be twice the length of the skirt eventually. So cut the entire piece of tulle to the desired width for the length of the skirt before you begin. For example, if you want the skirt to be 25cm long, the tulle will need to be 50cm in width.
- Fold the piece of tulle over lengthways, about four times so it’s easier to cut. You should end up with a 2m piece of black tulle folded over itself about eight times.
- Cut along the folded tulle in 10cm pieces. You will end up with lots of strips of black tulle.
- Double each one over and then tie it onto the ribbon in strips (just like in the video below).
- Keep tying strips on until you have filled the entire waist measurement of the skirt. The leftover bits of ribbon will be used to tie the skirt onto the child.
Make a witch’s broomstick
Great dress-up costumes are all about the accessories. Accessorise the witch costume with this easy but authentic homemade witch’s broom.
What you need:
- 1 x big long stick (for the broom’s handle)
- Bunch of smaller, thinner sticks (for the broom’s brushes)
- Leg from a pair of pantyhose
- Ball of jute string or similar
Activity:
- You may have to go on a bushwalk or to the park to find enough sticks to make your witch’s broom. If you are lucky, you will find enough sticks in your garden.
- Bunch the smaller sticks together so that they look like the brushes of a broom.
- Place them on the end of the big stick so that the whole bunch of sticks is now about 10cm wide.
- Two pairs of hands is ideal for this next bit. Use the pantyhose to wind the sticks tightly together, wind it around and around as many times as it will go so that the bunch is nice and tight.
- Now cover the pantyhose binding with more appropriately “witchy” jute string. Bind it around and around so that it looks like a real old-fashioned witch’s broom.
How to make a witch’s hat
Refer to the video below for guidance.
What you need:
- 2 x large A3 sheets of black cardboard
- 1 x small sheet of yellow cardboard or construction paper
- A strip of black felt or fabric about 5cm x 50cm
- Pencil
- Craft glue
- Stapler
- A large saucepan lid or plate to use as a circle template
Activity:
- Make a cone out of one of the A3 sheets. Do this by rolling it into a pointed cone shape until the base of it is about right to fit your child’s head. There will be bits overlapping at the bottom.
- Glue the cone into shape. Staple it or use stickytape to keep it together while the glue dries.
- When the glue dries, trim around the bottom edge so that it sits flat and upright on the table.
- Use the bottom edge of the cone to make a template for the brim. Place it on the second piece of black card and trace around it. Remove the cone and place your saucepan lid over the black card and make another, larger circle around the first one (or use the second circle as a guide to make a second circle so you have a good-sized brim).
- Cut around the outside circle of the brim. For the inner circle, cut approximately 5mm inside the marked circle all the way around.
- Put the brim over the cone and mark where it sits with a pencil around the cone.
- Make fold out fringes along the bottom edge of the cone. This will be an edge to stick the hat brim to. Cut small slits all along the bottom edge, like a fringe, then fold out the fringes to sit perpendicular to the cone.
- Put the brim over the pointy end of the cone until it meets the fringed edge. Glue it in place.
- Make a belt for your witch’s hat using the black felt or any black strip of fabric. Put it around the bottom edge of the cone, just above the brim. Glue or staple it in place.
- Cut a yellow square shaped ‘buckle’ out of the yellow card. Stick it on to the hat belt.
- Now you have a truly original and very smart witch’s hat.
Notes:
- These witch hats also make fantastic place markers for a Halloween party – just glue a name tag on each, or write your guest’s names on the hat brims with a white paint pen.
- You can make the witch hats any size you like – small for decorations and table markers, or large for a striking table centrepiece.
Make witch’s plaits
- Cut about 20 lengths of wool 50cm long. Trim so it’s all even length. Divide in half.
- Knot half the orange wool at one end, and secure to an old clipboard. Begin plaiting. Tie with a hair or ribbon when you’ve plaited the whole length. Repeat with the other half of the wool.
- Attach each plait underneath the witch’s hat (one on each side). Use double-sided tape (or a glue gun if you really want them to hold).
- Make sure you let it all dry before popping on the witch’s head!
Optional witchy extras
- Blacken one tooth using special effects tooth paint available from costume/special effects retailers.
- Cut out long fingernail shapes from your black cardboard. Paint the nails with nail varnish and pop some double-sided tape underneath when it’s nearly dry. Press the fake fingernails on your witch’s hands.
Props for your witch costume
- A cauldron – use a bucket or large saucepan
- A witch’s cat – use a soft toy
Thanks to Kidspot Australia for creating the instructional videos.


Leave A Comment
You must be logged in to post a comment.