Over the Rainbow birthday cake

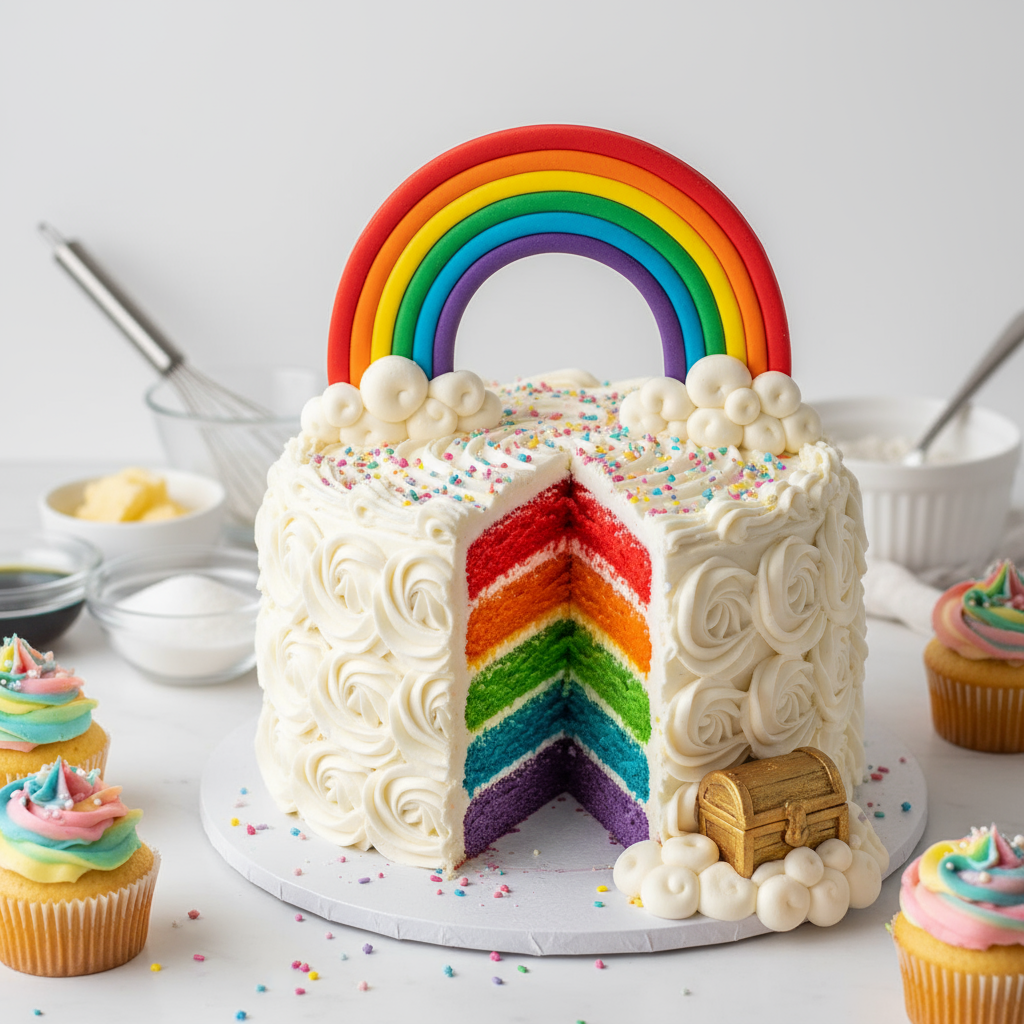
Over the Rainbow cake

Ingredients:

Butter cake:

This can be made up to a month in advance and kept in the freezer.

  • 250g butter, softened
  • 1 tsp vanilla essence
  • 230g caster sugar
  • 4 eggs
  • 450g self raising flour, sifted
  • 250ml milk
  • Food colour ‰ÛÒ blue and pink
  • 1 orange juice of (optional)

Orange buttercream icing:

This can be made up to two months in advance and kept in the freezer or made fresh and frozen for next time. If orange is not a popular flavour substitute it with vanilla.

  • 200g icing sugar, sifted
  • 150g butter, softened
  • 1 orange, zest and juice

Decorations:

  • 45cm round cake board
  • 700g readymade white icing (also called fondant icing, you can find Orchard white icing at all major supermarkets)
  • 500g approximately for covering the cake and the remaining 200g for the rainbow and other decorations
  • Icing sugar, extra to prevent white icing from sticking to the bench when rolling
  • Food colouring ‰ÛÒ green, pink, blue, yellow and orange
  • 50cm gold ribbon ‰ÛÒ 2-3cm wide
  • 50cm Happy Birthday ribbon (usually sold in a 4mt roll, can be used for another birthday!)
  • Cardboard craft box with lid, decorated with stickers (you can also find decorated boxes at $2 stores)
  • 25cm fabric, anything pink and sparkly!
  • Gold chocolate coins
  • 12 small cupcakes cases
  • 1 pkt fondant butterflies and small fondant daisy flowers (see stockist below)
  • Blue edible glitter, optional
  • Candles

Equipment and other items needed:

  • Greaseproof paper
  • Pallet knife to spread the butter cream
  • Small cupcake tin, optional but I find the cupcakes bake more evenly
  • Small round cake tin approx 15cm in diameter to rest the rainbow to dry
  • Piping bag and 1cm round nozzle

Approximate timings:

  • To make the cake and cupcakes: 20 minutes preparation time, approximately 18-45 minutes cooking time
  • Buttercream icing: 5 minutes to make, 10-15 minutes to cover sponge
  • Icing the cake: approx 30 minutes to 1 hour. Allow more time if you are doing this for the first time ‰ÛÒ you will have a much better end result if you‰Ûªre not rushing (trust me on this one!)
  • Rainbow decoration: allow 30 minutes.
  • Decorating the cupcakes: approx 15 minutes depending how fast you are with a piping bag! If you don‰Ûªt have a piping bag, spread over the top of cupcakes with a smooth edged knife.
  • Finishing up the cake with ribbon and decorations: allow one hour

Method:

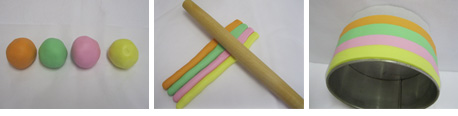
1. Roll coloured fondant into four equal sized balls 2 Use a rolling pin to roll the balls lengthwise into a strip. 3. Drape over a tin to give it a curve and completely leave to dry for 7-10 days.

4. Cover the cake with fondant icing 5. Attach both ribbons to cake 6. Gently attach the rainbow to the cake using buttercream to fix it in place.

7. Remove cupcakes from paper. Pipe buttercream in paper, add cake and pipe more buttercream on top 8. Add fondant butterflies 9. Stamp out flowers from fondant and add to cake

Butter cakePreheat oven to 175å¡C.

Line tin with greaseproof paper and place cupcake cases in cupcake tin.

Cream together butter, vanilla and sugar until light and fluffy; slowly add in eggs one at a time.

Fold in flour and milk in two stages, don‰Ûªt over mix.

Spread one third of the cake mix into the cake tin.

Split the remaining mix into two, colour one with blue and the other with pink, gently folding through the colour.

Fill cupcake cases to half way point.

Layer remaining mix evenly into the cake tin.

Bake in oven until the mix springs back when gently pressed or when a skewer comes out clean.

The cupcakes will take approx 8-10 minutes, the sponge approx 35-45 minutes.

Keep the sponge in the tin for approx 5 minutes before turning onto a wire rack ‰ÛÒ keep the bottom side up at all times to avoid making lines as this will be the presentation side up. You can freeze your sponge and cupcakes at this point, tightly in cling film.

When the cake is totally cooled (best if you can keep it in the fridge to chill right down before going any further) you will need to flatten the ‰Û÷bottom‰Ûª (which was the top.) Place a sheet of greaseproof paper on the presentation side and turn over. Use a serrated knife and cut the top of the cake so it‰Ûªs as flat as possible. I usually cut a little at a time so that I don‰Ûªt accidently cut away too much cake!

To guarantee a moist cake, squeeze an orange over the sponge and allow the juice to soak through before spreading on the butter cream. (this is optional)

Buttercream icingPlace all of the ingredients into a mixing bowl, mix on low until combined before turning on high speed.

Continue to beat on high until the mix is light and fluffy ‰ÛÒ at least 5 – 10 minutes. Any left-over can be frozen.

Using a small pallet knife or smooth edged knife, spread the butter cream around the cake as evenly as possible. The trick is to have it as smooth as possible as the icing will show any bumps and lumps but don‰Ûªt despair if it‰Ûªs not perfectly even (mine usually aren‰Ûªt) as the decorations will be used to hide these.

Readymade white icingThis is also known as ‰Û÷fondant icing‰Ûª and can be found in larger quantities in cake specialty shops ‰ÛÒ they also sell them already coloured if you don‰Ûªt wish to do that yourself. It will keep for a long time if stored in the freezer and if it‰Ûªs wrapped very well (I usually use a few layers of cling film before placing in an airtight container)

Fondant rainbowUsually the icing is quite firm to touch when you open the packet. Break it into small pieces with your fingers and begin to ‰Û÷work‰Ûª or ‰Û÷massage‰Ûª it until you notice is becomes smoother and softer. At this point, bring the icing together and knead as you would a dough until it is soft and smooth (the smoothness reminds me of my kids‰Ûª baby bottoms!) Once it‰Ûªs smooth and soft you are ready to add the colour.

You will need to use 200g of the fondant icing for the rainbow. Split this evenly into four and colour each ball with one of the following ‰ÛÒ pink, orange, yellow and green. To do this, flatten a little, press some ‰Û÷craters‰Ûª into the dough and add a few drops of colour at one time. (I use a toothpick or end of a sharp knife) Slowly but steady is better than adding too much at once (unless you are after a very bright colour!) until you have achieved the strength of colour you are after. To work the colour into the icing, continue kneading as you would a dough. If the icing starts to stick to the bench use icing sugar, as you would flour to dough.

Once all four balls are ready, roll them into even sized balls and place them side by side on a piece of greaseproof paper, which has been cut in a piece 8cm x 20cm, and gently roll flat with a rolling pin, rolling lengthways only, until the fondant is just under 1cm in thickness. The length should be approx 15 ‰ÛÒ 18 cm. Keep in mind, the longer the rainbow the higher probability it will break ‰ÛÒ short and stocky is the way to go here to avoid any disasters (if the rainbow does break use some butter cream to join back together ‰ÛÒ the best time to do this is when you are assembling the cake so the rainbow isn‰Ûªt moved. Yes, it has happened to me!!) Trim the edges with a sharp knife so they are straight and lay the rainbow, with the greaseproof paper, over a 15cm round cake tin. Keep in a cool, dry place ‰ÛÒ I have a high pantry which is perfect as the kids can‰Ûªt reach! And to avoid the tin from rolling, weigh down by placing a bag of rice or flour inside the tin. This will need at least 10 days of drying time ‰ÛÒ the longer the time, the less likely it will break as the fondant dries quite hard.

Use any left-over fondant for decorating the cake and cupcakes.

Covering the cake with fondant icingColour the remaining white fondant with green and knead until the colour is fully incorporated. Roll out to approximately 1/2cm thickness and wide enough to allow overhang ‰ÛÒ use your baking tin as a guide. It can be easier to roll out on greaseproof paper ‰ÛÒ don‰Ûªt forget to use icing sugar if it starts to stick. Use your rolling pin gently and turn the icing regularly so that the bottom won‰Ûªt stick.

Using your rolling pin, and starting closest to your body, loosely roll the icing into the rolling pin. ‰Û÷Unravel‰Ûª the icing over the cake, making sure you allow enough icing to fall over the edges. This is the trickiest part of the whole process so the less kiddies around at this stage will probably make things easier. Don‰Ûªt stress if it looks a mess, icing can be smoothed over and the ribbon and decorations will work their magic to hide the bits you don‰Ûªt want anyone to see. Also use the natural curves of your hand and fingers to manipulate the icing so that it sits smoothly on the cake. Touch the icing to the cake gently ‰ÛÒ if you press to hard you will make finger holes in the cake.

Using kitchen scissors or a sharp knife, cut around any excess icing from the bottom so that it has an overlap of around 2-3cm.

Put a sheet of greaseproof paper on the top of the cake and gently turn over to expose the bottom. Fold in the icing overlap so that the edges are all sealed. If you have any cake spots exposed use the excess pieces of icing to cover. To seal them, run your finger over the joins a few times (gently!) and they will stick together. This is also your last chance to make any adjustments if the cake‰Ûªs not sitting evenly ‰ÛÒ either use the sponge which you‰Ûªd cut off previously or a piece of icing.

Turn the cake over onto your serving plate or cake board. Remember to position your cake so that the best side will be showing out and the side which may not be quite so beautiful will be hidden by the rainbow and treasure box.

Tightly wrap any left-over fondant and keep in the freezer for next time.

Decorating the cupcakesKeep 3 tbsp of butter cream to one side to use as ‰Û÷glue‰Ûª before piping onto the cupcakes. When I baked mine they came away from the paper (and didn‰Ûªt look appealing at all!) so I piped a little butter cream into the base of fresh cupcake cases (to secure the cupcake sponge), popped the sponge on top and piped more butter cream on top. If you are making these ahead of time keep them in a sealed container in the fridge at this stage and finish with the butterflies just before serving (the butterflies will go soft otherwise).

To decorate and finish the cakeWrap the gold ribbon around the base of the cake and secure with a pin. Repeat this process with the happy birthday ribbon.

Fill the treasure box with fabric and gold chocolate coins, position onto the cake board. ‰Û÷Glue‰Ûª with a teaspoon of butter cream to avoid movement.

Gently position the rainbow to rest at the base of the treasure box and on top of the sponge. Use butter cream to attach the top of the rainbow to the cake ‰ÛÒ smooth away any excess butter cream with the tip of your finger.

If you have your own flower cutters, use any left-over fondant to cut out. Allow to sit for 15 minutes (for easier handling) before gluing onto cake with butter cream.

Arrange butterflies around cake and secure with butter cream.

Dust with edible glitter.

Position candles on top of cake. It‰Ûªs important to keep the finished cake at room temp in a dry cool place not the fridge!

Notes:

  • I usually make cupcakes if I have some cake mix left over so if you prefer, cut down the quantity of cake mix or use a larger cake tin if you would prefer not to have any.
  • Icing the cake is the trickiest part ‰ÛÒ I would recommend a time when it‰Ûªs quiet and you don‰Ûªt need to rush (I know that doesn‰Ûªt happen very often with us mums!) and once the cake has been iced all around with fondant icing, this acts as cling film and stops the cake from drying out. You can do this stage ahead of time by at least one to two weeks ‰ÛÒ depending on the weather. (and keep the iced cake in a dry place ‰ÛÒ not the fridge or the fondant icing will start to break down and go gooey) Don‰Ûªt worry if it doesn‰Ûªt look perfect as the decorations will hide any imperfections!
  • This recipe was created by Sonia Anthony.

From Chef Sonia

Although I am a qualified chef, I‰Ûªve had no formal cake making training. What I have learned is through trial and many errors. I hope that by sharing my knowledge, you can become as confident and as excited about cake making as I am! (without the mistakes!). I think the most important thing is to ‰Û÷give it a go,‰Ûª you‰Ûªll be producing amazing cakes before you know it!

Nutella fairy bread

Nutella fairy bread

Ingredients:åÊ

  • 6 slices of bread of your choice
  • 1/2 cup Nutella
  • 100’s and 1000’s

Method:

Spread each slice of bread generously with Nutella.

Press slices face down into 100’s and 1000’s.

Slice into triangles.

Notes

  • You can use sharp cookie cutters to create shapes with this fairy bread.
  • This recipe was created by Jennifer Cheung for Kidspot, New Zealand’s best recipe finder.

Roasted tomato soup

Roasted tomato soup

Serves:

Ingredients

  • 4 tbs olive oil
  • 1kg roma tomatoes, halved
  • 1 onion, sliced
  • 2 garlic cloves, halved
  • small handful of thyme sprigs
  • 1 tsp caster sugar
  • 1 tsp of sea salt
  • 1 litre chicken stock
  • 2 semi-dried tomatoes
  • 1 tbsp barbecue sauce

Method

Preheat oven to 220°C (200°C fan-forced).

Toss tomatoes, onion and garlic cloves with olive oil. Sprinkle with thyme sprigs, sugar and salt.

Place in an oven tray and roast for 20-25 minutes until caramelised.

Once cooked, tip everything in the oven tray into a stock pot, removing woody stalks of thyme.

Add the chicken stock, semi-dried tomatoes and barbecue sauce. Bring to the boil and simmer for 5 minutes.

Use a stick blender to puree the soup then push through a sieve to remove tomato skins.

Reheat if necessary before serving.

Notes

  • You can make this recipe vegetarian by using vegetable stock instead of chicken.
  • You can skip the sieving step, but some kids might find the bits of tomato skin that escape the stick blender challenging.
  • This recipe was created by Alana House from Housegoeshome. You can follow Alana on Twitter.

Find related soup recipes

Serving Suggestions

Note

Chicken BLT’s

Chicken BLTs

Serves:

Ingredients

  • 4 soft torpedo rolls
  • 2 cups BBQ chicken, shredded
  • 4 rashers bacon, cooked until crisp
  • 2 tomatoes, thickly sliced
  • 2 handfuls cos or iceberg lettuce, washed and dried
  • 4 tablespoons good quality egg mayonnaise

Method

Cut along each roll twice.

For each roll, spread one pocket with mayonnaise and top with some chicken.

Fill the remaining pocket with bacon, tomato and lettuce.

Serving Suggestions

Note

  • Even before changing to a gluten free diet, I struggled with baguettes. Yes, they have a lovely dense texture and are wonderfully crusty, but I always ended up with a lacerated mouth. My kids also have an aversion to foodie-preferred crusty bread, so these are ‰a baguette-style‰ rolls with supermarket-special soft torpedo rolls.
  • Great for picnics: make in advance and keep cool or resealable bag everything and assemble at your destination.
  • Recipe created by Melissa Hughes for Kidspot.

.

Traffic light cake pops

Traffic light cake pops

Serves:

Makes approximately 12 pops

Ingredients

  • 450g pre-prepared madiera cake or chocolate slab cake
  • 250g chocolate melts
  • Smarties or chocolate buttons in red, orange and green
  • Lollipop sticks (11.5cm)

Method

Cut your cake into rectangles approximately 9cm x 3cm x 3cm with a bread knife.

Slide onto the lollipop sticks until the sticks are approximately half way through the length of the cake (i.e. 4.5cms)

Put on a baking tray and place into the freezer for 1 hour (This prevents crumbling of the cake for the next site).

Melt your chocolate in the microwave by placing in a microwave-proof bowl and heating on 50% power for 1 minute. Remove from the microwave and stir with a metal spoon Return to the microwave for a further minute on 50% power after this time stir until all the chocolate is melted completely.

Elevate a cake cooling rack between two containers or even cookbooks until the middle of the tray is clear of obstructions and is approximately 6cm off the benchtop (this will be used to stand the cake-pops in whilst the chocolate coating sets).

Using a spoon, cover the cake in chocolate. Place three smarties on the cake as per picture and place on the elevated cooling rack for about 30 minutes or until chocolate is completely set.

Store in a container in layers separated by greaseproof paper or use cellophane bags to cover with twist ties.

You can store in the refrigerator for up to 2 days.

Notes:

  • These an be made ahead and frozen without the smarties (the smarties can discolour with moisture). When ready to serve, use a knife that has been run under hot water and rub over one side to slightly melt the chocolate and add the smarties.
  • You can buy lollipop sticks from online chocolatier supply shops and large craft stores.
  • The share smartie packs (with many individual packs) have ample amounts of the colours required.
  • This is a perfect substitute for a lolly bag at a birthday party.
  • Children can assist with the covering of the pops with chocolate and decorating.
  • This recipe was created by Melissa Klemke for Kidspot, New Zealand’s best recipe finder.


Homemade Doner Kebabs

These homemade doner kebabs have the same delicious lamb that you get from your Middle Eastern takeaway. Make it at home to share with your whole family.

Makes 8

Ingredients

  • 1kg lamb mince
  • 2 tsp oregano
  • 1 tsp mixed herbs
  • 2 tsp garlic powder
  • 1/2 tsp cayenne pepper
  • 2 tsp salt
  • 1 tsp pepper

To make the kebab:

  • 2 cups iceberg lettuce, shredded
  • 2 tomatoes, sliced
  • 1/2 cup garlic sauce
  • 1 cup hummus
  • 2 cups tabouleh
  • 8 pieces Lebanese bread or any flat breads

Method

Step 1. Preheat oven to 200C (180C fan-forced). Place the lamb, herbs and spices all into a food processor and mix until just combined. Alternatively, you can knead it together with your hands, but you will need to do it for 5 minutes so it is well combined.

Step 2. Lay out two large pieces of foil and place half of the lamb mixture on each. Wrap into a tight loaf (about 20cm long) and tuck in ends. Place into a baking dish and bake for 35-40 minutes.

Step 3. When done, leave to stand for 10 minutes while you prepare salads and sauces.

Step 4. Just before you serve, remove doner kebab meat from the foil packs and slice thinly. Serve slices in flat bread with salads and sauces.

Notes

Serving Suggestions

Note

  • We made this into two loaves so it didn’t take too long to cook. But you can make one large loaf and increase the cooking time by 10-15 minutes.
  • You can also make this dish in the slow cooker. Just place the wrapped meat into the base of your slow cooker and cook on low for 5-6 hours or high for 3-4 hours.
  • You can halve the portions in this recipe to serve 4.
  • There is quite a lot of salt in this dish so if you are serving it to babies I would reduce the salt by half.
  • This recipe was created by Jennifer Cheung for Kidspot.

Profiteroles with hot chocolate

Profiteroles with hot chocolate

Serves:

serves 4 – 6

Ingredients

For the choux pastry:
Butter 40g
A pinch of salt
Water or milk 120ml
Plain flour 80g
Eggs (lightly beaten) 120g

For the filling:
Chocolate Ganache
Pastry cream


Method

These delicious choux pastry balls can be filled with whipped cream, pastry cream or even ice cream. The puffs may be left plain or garnished with chocolate sauce, caramel or a dusting of powdered sugar

Put the butter, salt and water (or milk) into a saucepan and heat, stirring, until boiling. Add the flours to the bowl. Turn the temperature off and continue to mix for 3 minutes.

When the temperature reaches 80ºC add the egg and beat until fully incorporated.

Pour the mixture into a piping bag and pipe 3cm diameter buns onto the baking tray.

Press down the tops with a wetted fork . Allow to stand at room temperature for 20 minutes, then bake in a preheated oven at 220ºC for 10 minutes, then at 180ºC for 15 minutes.

Remove from the oven and make a small hole in the base of each bun. Return to the oven for 10 minutes to dry.


Make the filling:

Once cooled fill with pastry cream and serve with chocolate sauce/ganache.

Check the custard has thickened, put in the fridge.

Serving Suggestions

Note

Chicken, cheese and vegetable patties

Chicken, cheese and vegetable patties

Serves:

Ingredients

  • 2 large potatoes, peeled and roughly chopped
  • 1 medium sweet potato, peeled and roughly chopped
  • 1 tbsp butter
  • 2 tbsp milk
  • 1/2 medium brown onion, finely diced
  • 1 medium zucchini, grated
  • 1 medium carrot, grated
  • 1 tbsp olive oil
  • 1 tbsp soy sauce
  • 3/4 cup cooked brown rice
  • 1/2 cup drained tin lentils (optional).
  • 2 eggs, beaten
  • 1/2 cup (40g) tasty cheese, grated
  • 500g chicken mince
  • 1/4 cup (25g) breadcrumbs to thicken pattie mixture (if necessary)

Crumbing

  • 1 cup (90g) breadcrumbs
  • 2 eggs, beaten
  • 1 cup (150g) plain flour

Method

Preheat oven to 180C (160C fan-forced). Line a baking tray with foil and set aside.

Cook potato and sweet potato in some boiling water until soft. Mash with butter and milk and set aside to cool a little.

Fry the onion, zucchini, carrot in olive oil and the soy sauce. Season with salt and set aside.

In a large bowl, combine the pre-made mash, fried veggies, rice, lentils, eggs, cheese and chicken mince. Mix thoroughly until all ingredients are well combined. If you feel the mix is too wet just add 1/4 cup of breadcrumbs to bind the mix a little better.

Scoop up a tablespoon of mixture and shape into patties or whatever shape your toddler prefers to eat. Dip in flour, then through beaten egg then into the breadcrumbs and onto  the baking tray.

Bake for 20 minutes, turning once, or until golden brown.

Serving Suggestions

Note

  • Extra breadcrumbs can be used to help thicken the pattie mixture if necessary.
  • If you prefer to make a pattie that is a little crispier, you can shallow fry them in a large frypan instead.
  • These patties are great for freezing. Once cooled, freeze them flat on a baking tray and once frozen transfer to a resealable bag.

Swedish meatballs

Swedish meatballs

Serves:

Ingredients

Meatballs

  • 500g beef mince
  • 500g pork mince
  • 3 potatoes, peeled, boiled and mashed
  • 1 medium onion, finely diced
  • 1 cup breadcrumbs, lightly toasted (or make breadcrumbs from toast!)
  • 2 eggs
  • 3/4 cup cream
  • salt and pepper


Sauce/gravy

  • 1 tsp beef stock powder
  • 200ml water
  • 100ml cream
  • splash of soy sauce
  • pepper
  • 2 tbsp cornflour

Method

Mix all meatball ingredients together in bowl. Mix thoroughly at first with a spoon. When the liquid is evenly distributed, mix it up with your hands.

Heat about 3 tbsp butter in a frypan, when hot, add walnut-sized meatballs and fry for about 2-3 minutes and turn over gently. Transfer to baking tray, add butter to frypan as required, and repeat until all done!

To make the sauce, combine water, cream, stock powder, soy sauce and pepper, sprinkle cornflour on top and whisk over medium heat until smooth.

Allow to simmer and thicken.

Pour over meatballs, or in bowl to dip if serving as canapes.

Notes.

  • The meatball mix I made create us two meals – roughly 60 meatballs. These freeze well so I figured why not make two lots… I’d also use this quantity if serving them as canapes.
  • You could serve it with the sauce as a dipping sauce.
  • This recipe was created by Melissa Klemke for Kidspot, New Zealand’s best recipe finder.

Serving Suggestions

Note

Teriyaki Chicken Wrap

Teriyaki Chicken Wrap

Serves:

Makes 3 wraps

Ingredients

  • 1 x single chicken breast, cut into strips
  • 2 tablespoons soy sauce
  • 2 tablespoons mirin
  • 1 teaspoon sugar
  • 3 Tip Top Supersoft or Oatiliicious wraps
  • ¼ small telegraph cucumber cut into long strips
  • 1/3 red capsicum, cut into thin strips
  • ½ avocado, cut into strips

Method

Place the chicken breast in a frying pan with a film of oil cook over a medium heat until completely cooked through.

Mix the soy, mirin and sugar together and then pour over the chicken and allow to bubble and reduce a little before removing from the heat and allowing to cool.

Arrange the chicken, cucumber, capsicum and avocado in a strip along one end of each wrap.

Roll up tightly and hold in place with lunch wrap and string.

Serving Suggestions

Note

Sweet chilli rolls

Sweet chilli rolls

Serves:

Ingredients

  • 2 frozen puff pastry sheets
  • 500g pork mince
  • 1 lge carrot, grated (approx. 1 cup)
  • 1 small brown onion, finely diced
  • 1 tablespoon basil, finely chopped (optional)
  • 1 teaspoon fish sauce
  • 1 ½ tablespoon sweet chilli sauce
  • 2 eggs

Method

Place frozen pastry sheets on kitchen bench to defrost and preheat oven to 200° C.

In a large bowl add pork mince, grated carrot, diced onion, basil (if using), fish sauce, sweet chilli and one egg. Combine ingredients until well mixed.

In a small dish, make an egg wash by cracking the second egg and lightly whisking with a fork.

Place pastry sheets in front of you and cut through the middle horizontally creating two equal halves.

Take about ¾ cup of pork mixture and form it into a sausage shape and place it along the top of the pastry sheet. With a pastry brush (or finger), wipe egg wash below the meat to secure the ends.

Roll the pastry and mix into a firm log shape making sure the pastry at the bottom overlaps each other at the egg wash. Repeat until you have 4 logs.

Once they’re all rolled, remove the plastic wrap backing the pastry, wipe over the top with egg wash and cut each log into 5 equal pieces.

Place on a tray lined with a baking mat or baking paper and bake in preheated oven for 35 minutes or until golden brown. Remove from oven, cool on wire rack and serve as is or with the kid’s favourite- tomato sauce.

Notes

  • I like to keep the plastic of the pastry on when rolling these up. It keeps the pastry firm and neat. You just need to lift it at the end when you are sticking the ends together.
  • While you’re waiting for the remaining logs to be rolled, place the existing ones in the freezer. They will firm up and be easier to handle.
  • These freeze very well once cooked, so if you need to make them ahead of time, just reheat at 180° C for 20 minutes.
  • If you don’t like basil, parsley works very well or they can be made without any green for kids who aren’t interested in the colour green!
  • Recipe created by Camilla Baker for Kidspot, New Zealand’s best recipe finder.

Serving Suggestions

Note

Easy Teriyaki Beef

Teriyaki beef

Serves:

Ingredients

  • 500g rump steak, thinly sliced and fat removed
  • 1 tablespoon ginger, minced
  • 1 teaspoon garlic, minced
  • 2 teaspoons soy sauce
  • 3 teaspoons mirin seasoning (available in the international section of supermarkets)
  • 2 teaspoons sesame oil
  • 2 teaspoons brown sugar
  • 1 tablespoon oil
  • 1 medium brown onion, sliced
  • 1 cup capsicum, chopped
  • 2 cups Chinese broccoli (regular broccoli will be fine it just needs to be cooked a little longer)

Serve with:

  • Boiled rice

Method

In a small bowl combine the ginger, garlic, soy sauce, mirin, sesame oil and brown sugar, stir to combine then put to one side.

Heat wok on high heat until very hot.

In two batches, add onions and beef strips to the wok together with oil. Sprinkle with salt and pepper, toss to combine then sear in wok until meat is brown.

Once all the meat is browned, reheat wok until very hot and add vegetables, saute with lid on until wilted, tossing occasionally.

Add meat and onions followed by the sauce mixture. Stir to combine, pop the lid back on and simmer for 2-3 minutes over a medium heat, tossing to combine.

Remove from heat and serve with boiled rice.

Notes

  • There is something about greens and ginger that make me feel good inside.
  • This is a fast and tasty recipe you can whip up on a cool evening. Its even better if you follow it up with the Lemon delicious pudding!
  • Recipe created by Camilla Baker for Kidspot, New Zealands best recipe finder.

Serving Suggestions

Note

Sausage kebabs

Sausage kebabs

Serves:

Makes 8

Ingredients

  • 1 small red onion
  • 1 medium zucchini
  • 500g chipolata sausages (approx. 16)
  • 8 cherry tomatoes
  • 2 tsp olive oil

Method

Preheat oven to 200å¡C (180å¡C fan-forced).

Peel onion and slice into 8 wedges. Cut zucchini into 8 thick rounds. Thread a wedge of onion and a round of zucchini onto 8 bamboo skewers. Next, thread 2 chipolatas, bending them so the skewer pierces both ends of each sausage. Finally, top with a cherry tomato.

Lay the kebabs on an oven tray lined with baking paper. Brush or drizzle over olive oil and season well. Bake for 20 minutes, turning halfway through to ensure they are browned all over.

Serve with salad and some tomato sauce or chutney on the side.

Find related sausage recipes

Serving Suggestions

Note

  • Choose whatever veggies you like for these kebabs. Capsicum, eggplant or sweet corn on the cob would all be great.
  • You could cook these on the barbecue if you prefer. It would be best to soak the skewers for 20 minutes in water if you are going to cook these on the barbecue so the skewers don’t catch alight.
  • This recipe was created for Kidspot, New Zealand‰ÛªsåÊbest recipe finderåÊby Greer Worsley, who blogs atåÊTypically Red.

Chicken and snow pea stir-fry

Chicken and snow pea stir-fry

Serves:

Ingredients

  • 2 teaspoons oil
  • 500g chicken tenderloins
  • 1 medium onion, halved and sliced
  • 125g snow peas, sliced
  • half a  cup cashews (100g)
  • 2 tablespoons hoisin sauce

Method

Heat oil in a wok, add half the chicken. Stir fry until brown on all sides, then transfer to a plate. Cook the remaining chicken and transfer to the plate.

Stir-fry the onion for about 2 minutes until translucent, then add chicken, snowpeas and hoisin sauce. Stir until snow peas are bright green.

Serve with steamed rice and garnished with cashews.

Notes:

  • Chicken is relatively expensive, I bought tenderloins on special, but you could use thigh fillets for a cheaper option.
  • Add some carrots or capsicum to increase the vegetable content.
  • A combination of soy sauce, hoisin and sweet chilli sauce is also tasty.

Serving Suggestions

Note

Three-days-to-payday spicy mince pasties

Three-days-to-payday spicy mince pasties

Serves:


Ingredients

  • 1 small onion, finely chopped
  • 500 beef mince
  • 1pkt taco seasoning
  • 1 cup of tomato puree
  • 2 sheets frozen puff pastry
  • 1 egg, beaten with a splash of milk

Method

Set the sheets of pastry aside to defrost.

Heat a non-stick frying pan and add the onion. Cook over medium heat until transluscent, about 5 mins. Add the mince and cook until browned.

Add the packet of taco seasoning and mix through the mince and onions until thoroughly combined.

Add the tomato puree and mix through. Turn down heat and allow to simmer, occasionally stirring, for 20 minutes.

Preheat oven to 180C.

Take out two baking trays and line with baking paper. Lie a sheet of pasty across each tray and remove the plastic backing sheet.

Remove the mince from the heat and even divide it between the two pasty sheets. Spoon the mince in a long thick sausage shape down the middle of the pasty sheet.

Take up the edges of the pasty and bring them together on top of the cooked mince to make a large sausage roll shape. Pinch together the ends of the roll and where the pasty meets in the middle.

Slash three air vents into the pastry and, using a pastry brush, paint with the egg wash.

Put in the oven to cook for approx. 20 mins or until the pastry has browned and puffed up. Remove from the oven, slice and serve immediately.

Notes:

  • I made this recipe up when I was first married and my teen-aged step-son was living with us. We were super-poor and I think I just couldn’t face another taco dinner. I looked at what I had in the pantry and came up with this. And it was delicious!
  • The tomato puree transforms this from being simply a large taco in pastry!
  • The spice in the taco mix in enough to give a little tang without being overwhelming. My kids have never had any trouble eating this dish and they aren’t much into spicy food.
  • The mince mixture shouldn’t be too wet when you add it to the pastry – if you have a lot of liquid in your mince, drain it off or you’ll end up with very soggy pastry!
  • This recipe was created by Ella Walsh for Kidspot, New Zealand’s best recipe finder.


Serving Suggestions

Note

Satay sauce

Satay sauce

Serves:

Ingredients

  • 2 teaspoons vegetable oil
  • half a brown onion, grated
  • 1 garlic clove, minced
  • 2 teaspoons ginger, minced
  • Good pinch of turmeric
  • Pinch of ground cloves
  • Pinch of cinnamon, ground
  • half a cup coconut milk
  • half a cup peanut butter (crunchy or smooth)
  • 2 kaffir lime leaves (optional)
  • 2 tablespoons warm water
  • 1 teaspoon fish sauce

Method

On a low heat in a small saucepan, heat oil and fry grated onion, garlic and ginger until onion for about 2 minutes, until it is transparent.

Add spices and cook for a further 2 minutes to let the flavours release.

Remove from heat and add coconut milk, crushed lime leaves (optional) and peanut butter. Stir until well combined then bring back to the heat to warm through. Do not let it come to a boil.

Once hot take from the heat and add fish sauce and warm water. Stir to combine then serve.

Notes

  • This sauce is very versatile. It can be stored in the fridge for 5 days and then reheated in the microwave.
  • It will set firm, so just add a little extra warm water to thin it out.
  • To help save time just before a party, make this 1-2 days ahead for ease and extra flavour.
  • You can also add chilli flakes to this recipe if you would like an added boost of heat.
  • Recipe created by Camilla Baker for Kidspot, New Zealand’s best recipe finder.

Serving Suggestions

Note

White Christmas fudge

White Christmas fudge

This delicious white Christmas fudge is flavoured with rosewater and packed full of delicious dried fruit. It’s the perfect homemade gift.

Serves:

18 pieces

Ingredients

  • 250g white chocolate
  • 3 tbsp low fat milk
  • 1 tbsp rosewater
  • 2 tbsp glace cherries, roughly chopped
  • 2 tbsp dried cranberries
  • 2 tbsp dried blueberries

Method

Line a lamington tin with baking paper.

Place chocolate, milk and rosewater in a heatproof bowl over a boiling saucepan of water. Stir gently to melt. Once chocolate has melted stir in fruit.

Pour into paper lined pan and put in fridge to set for 1 hour. Slice into small squares and serve with coffee.

  • You can wrap this in cellophane and twist the ends. it makes a lovely hand-made Christmas gift.
  • I prefer to use red and green glace cherries for colour.

Chicken and sugar snap pea stir fry

Chicken and sugar snap pea stir fry

Serves:


Ingredients

  • 2 teaspoons olive oil (sesame oil if you have it)
  • 500g chicken breast fillet, sliced
  • 1 onion, thinly sliced
  • 150g sugar snap peas, trimmed
  • ½ cup slivered almonds
  • 2 tablespoons hoisin sauce

Method

Heat 1 teaspoon of oil in a wok, add half the chicken.

Stir fry until brown on all sides, then transfer to a plate.

Cook the remaining chicken and transfer to the plate.

Wipe out the wok with some paper towel and add the remaining teaspoon of oil.

Stir-fry the onion for about 2 minutes until translucent, then add peas and almonds.

Keep stirring so the almonds don’t burn, then add chicken and hoisin sauce and heat through.

Serve with steamed rice.

Notes:

  • I sneak extra veggies into this stir fry—whatever you can get away with! I usually add zucchini or capsicum sticks. Add just before the sugar snap peas.
  • My kids are currently fascinated with chopsticks and are trying things they would not normally eat so they can use them.Mostly.
  • And then there is nothing wrong with eating chicken schnitzel with chopsticks.
  • Recipe created by Melissa Hughes for Kidspot.


Serving Suggestions

Note

Halloween skeleton cupcakes

Halloween skeleton cupcakes

Serves:

12 cupcakes

Ingredients

Method

Spread each cupcake with chocolate buttercream icing.

Now slice a thin round sliver off the top of a marshmallow to create the skeleton’s face.

Pop the round sliver onto the edge of the cupcake, leave room for the body.

Use the white writing icing to draw the skeleton’s body.

Use black writing icing to draw on a face.

Notes:

  • Thanks to our sister company Kidspot Australia for creating the instructional video.
  • If you find making a quantity of buttercream icing just one step too far on a busy day, buy a can of Betty Crocker buttercream icing at the supermarket instead.
  • If you use a palate knife, you will get a nice even coating of icing.
  • These Halloween witches hats are filled with a cute surprise.
  • Keep the dentist AND the kids happy with these chompy Halloween teeth.
  • These Fairy wands are for the GOOD witch in your house unless you switch the colours to black and orange.
  • These Halloween Band aid biscuits just look icky and will have your guests grossed out in no time.
  • Looking for something to make you squirm? How about a cupcake that is looking right back at you like these Halloween eyeball cupcakes.
  • They are creepy and crawly and a little bit scary but these Red back spider biscuits are also delicious.
  • These scary Watermelon fangs will have you shaking in your boots with watermelon juice dripping from your vampire grin.
  • These Halloween severed finger biscuits are creep and kooky and best of all they taste delicious.
  • If you have carved your pumpkin and have lots of leftover pulp then these Halloween pumpkin cupcakes are for you.
  • You can have these delicious Halloween fangs on the party table in no times and they are deliciously filled with peanut butter.
  • Want some icky worms in dirt for your party table? These Halloween jelly worms are perfect.
  • Get some ghoulish party fare on the table with these Tombstone cupcakes.
  • A health Halloween snack could not be easier than this bright Veggie skeleton dip platter.
  • Get out the fake spider webs and spread them around these delicious Oreo spider cupcakes.
  • This recipe was created by Penny Flanagan for Kidspot, New Zealand’s best recipe finder.

Serving Suggestions

Note

Toasted Hawaiian Wrap Melts

Toasted Hawaiian Wrap Melts

Serves:

Makes 6 wedges

Ingredients

  • ½ cup pineapple pieces
  • 1 slice champagne ham, roughly chopped
  • ½ cup grated Tasty cheddar cheese
  • 2 x Tip Top Supersoft or Oatilicious wraps

Method

Arrange the pineapple, ham and cheese evenly over a wrap.

Cover with the remaining wrap.

Carefully lift and place in a toasted sandwich maker, close the lid and toast until golden and the cheese is bubbling.

Cut into wedges and serve.

Find more Tip Top Wrap recipe ideas:

Serving Suggestions

Note

Chicken and corn chowder

Chicken and corn chowder

Serves:

Ingredients

  • large chicken breast (diced)
  • 2 potatoes (peeled and diced)
  • 1 – 2 cups water
  • 1 chicken stock cube (optional)
  • 1 can creamed corn (440g)

Method

Place all ingredients in a large saucepan.

Bring to boil and then simmer until chicken cooked through and potatoes tender.

Blend. Suitable to freeze small portions.

Serving Suggestions

Note

White chocolate and cranberry biscuits

White chocolate and cranberry biscuits

Serves:


Ingredients

  • 1 cup caster sugar
  • 125g butter, melted
  • 1 cup plain flour (gluten-free, see notes below)
  • 1 cup self-raising flour
  • 1 egg, lightly beaten
  • half a cup white chocolate, roughly chopped
  • half a cup dried sweet cranberries

Method

Preheat oven to 190C. Line two baking trays with baking paper. Place sugar in a large bowl, melt butter and pour over sugar. Stir well, add remaining ingredients and stir to combine. Roll 2 tablespoonfuls of mixture into balls and place 3-4cm apart on trays, press down slightly.

Bake 15 minutes until golden brown. Remove from oven, cool slightly before removing to a wire rack to cool completely .

Notes:

  • This is a fabulous basic biscuit recipe, add whatever you like to the mix, but keep the same quantities. I used up my Christmas leftover ingredients of white chocolate and cranberries‰ makes that festive spirit (over eating!) last just a bit longer.
  • I used gluten-free plain flour and 2 teaspoons baking powder to make these biscuits gluten-free.
  • Recipe created by Melissa Hughes for Kidspot.


Babys rice pudding

Babys rice pudding

Serves:

Ingredients

  • 1 cup cooked rice
  • 1 cup warmed breastmilk or formula
  • A couple drops of vanilla extract

Method

Combine all ingredients.

Cook very gently for 10 minutes until the rice is heated through.

Check the temperature before serving.

Serving Suggestions

Note

Meringue baskets

Meringue baskets

Serves:

Ingredients

  • 4 meringue nests
  • 4 tablespoons thick cream, icecream or yoghurt
  • ½ cup raspberries, fresh or frozen
  • ½ cup blueberries, fresh or frozen
  • Grated chocolate (or Flake) to decorate

Method

If you are using frozen berries, defrost in a single layer on paper towel.

Place a nest on each plate, put a tablespoon of cream/icecream/yoghurt in the centre, scatter berries over the top and sprinkle with grated chocolate.

A very simple, very delicious entertaining idea.

Notes:

  • Supermarkets all have their own brand of meringue nests.
  • Normally in a box of 10 near the packaged cakes, vol au vents etc.
  • Use whatever fruit you have in the house (strawberries and mango also look and taste great), but raspberries and chocolate are my favourites.
  • Recipe created by Melissa Hughes for Kidspot.

Serving Suggestions

Note

Golden syrup slice

Golden syrup slice

Serves:


Ingredients

  • 1 packet plain biscuits
  • 2 tablespoons golden syrup
  • 1 x 400g can condensed milk
  • 1 teaspoon vanilla extract
  • 80g unsalted butter, melted
  • 125g milk or dark chocolate

Method

Grease a 16cm x 26cm slice tray and line with non-stick baking paper. Place Marie biscuits in a food processor and whiz. Melt the butter with the golden syrup and vanilla. Place the biscuit crumbs, butter mixture and condensed milk in a large bowl, stir well to combine.

Transfer mixture to tray and press down with the back of a metal spoon. Refrigerate for at least 30 minutes or overnight.

Melt chocolate in microwave on medium-high for 1 minute. Stir and repeat until melted. Spread melted chocolate over the top of slice. When the chocolate is set, cut into small squares.

Serving Suggestions

Note

Notes:

  • Refrigerate the base overnight, then the cold base helps set the chocolate quickly. All the quicker for eating!

Caramello Egg Brownies

Caramello egg brownies

Serves:

Ingredients

  • half a cup butter
  • 1 and a half cups sugar
  • 2 tspn vanilla
  • 3 eggs
  • 1 and a half cups self raising flour
  • half a cup cocoa powder
  • Pinch of salt (optional)
  • 12 Cadbury Caramello eggs

Method

Preheat oven to 180C

Lightly grease a slice tin (33 x 23 cm) with butter and line it with baking paper.

Melt the butter on the stove or in the microwave.

Using a mixer, beat the eggs and sugar together, add vanilla, flour, cocoa, salt (optional) and the melted butter next. Mix this together and gently pour the mixture into the tin.

Unwrap the foil from the Caramello eggs and place them at even intervals into the mixture.

Bake for approximately 20-30 minutes at 180C. You can test if the brownies are cooked through by inserting a wooden skewer into the centre of the tin. If it comes out clean, they’re ready to be taken out of the oven.

Let the brownies cool and dust with sifted icing sugar.

Notes:

  • If you like a denser, gooier brownie, remove from the oven a little earlier.
  • This is a great one to make with kids – they love unwrapping the foiled eggs and adding them to the mixture!
  • Be sure to let the brownies cool completely before eating as the hot mixture can burn little tongues.
  • This is a fantastic Easter recipe. Serve each brownie with a shiny wrapped Caramello egg on top.
  • This recipe was created by Jennifer Cheung for Kidspot, New Zealand’s best recipe finder.

Serving Suggestions

Note

White chocolate and raspberry mousse

White chocolate and raspberry mousse


Serves:


Ingredients

  • 200g white chocolate
  • 4 egg whites
  • 1/3 cup caster sugar
  • 2/3 cup thickened cream
  • 1 punnet raspberries

Method

Break the chocolate into pieces and place in a heatproof bowl over simmering water. Don’t let the water touch the bottom of the bowl. Stir until the chocolate is smooth and set aside.

Beat the egg whites with an electric mixer in a clean, dry bowl until they form firm peaks.

Beat in half of the sugar until it dissolves and then beat in the rest until the mixture is thick and glossy.

Add cream and beat until the mixture thickens.

Fold in the chocolate with a metal spoon until just combined.

Reserve 16 raspberries for a garnish and divide the half the remaining fruit between the serving glasses. Top with mousse and repeat. Finish with reserved berries for garnish.

Place in the freezer for 20 mins to set and serve immediately.

Notes

  • This White chocolate and raspberry mousse in this is quite sweet but the berries cut the sweetness and compliment the flavour.
  • Make sure you use a very clean, dry bowl for those egg whites otherwise they won’t firm up.
  • This recipe was created by Jennifer Cheung for Kidspot, New Zealand’s best recipe finder.


Cherry ripe cheesecake

Cherry ripe cheesecake

Serves:

Ingredients

  • 250g chocolate biscuits (I used chocolate covered teddy bears)
  • 125g butter, melted
  • 85g raspberry jelly crystals
  • 1/3 cup boiling water
  • 500g cream cheese
  • 2 cups thickened cream
  • 170g cherry Ripe candy bars, diced

Method

Grease a springform tin liberally with canola spray.

Crush the biscuits in a food processor until they resemble fine crumbs. Add the melted butter and blend until combined. Press into the prepared springform pan.

Dissolve jelly crystals in boiling water. Soften the cream cheese with an electric beater then gradually add the jelly, beat until smooth.

Fold through thickened cream and Cherry Ripe pieces. Pour onto crust, cover with cling wrap and chill until set.


Notes:

  • This cheesecake recipe will set in about 2 hours but it tastes better if it’s left overnight.
  • If you can‰t get your hands on Cherry Ripe bar ‰you may be able to find some other type of cherry-chocolate bar that will do the job.
  • I have been having a love affair recently with cheesecakes. They‰ are just so easy to make and the results always look like you really care!
  • This recipe was created by Melissa Klemke for Kidspot, New Zealand’s best recipe finder.


Serving Suggestions

Note

Pizza pockets

Pizza pockets

Serves:

Makes 4

Ingredients

  • 1 sheet puff pastry, defrosted
  • 1 egg, beaten
  • 1/3 cup pasta sauce
  • 2/3 cups (70g) mozzarella cheese, grated
  • 80g ham, sliced
  • 8 cherry tomatoes, halved

Method

Preheat oven to 230°C (210°C fan-forced).

Cut pastry into four even squares and place them on an oven tray lined with baking paper.

Brush the edges of one square with beaten egg. Spoon some pasta sauce into the centre, and top with some cheese, ham and tomatoes.

Fold over a corner diagonally to form a triangle and use a fork to seal the edges. Repeat with remaining ingredients.

Brush beaten egg over the tops of the pockets. Bake for 12 minutes until puffed and golden.

Related pizza recipes

Serving Suggestions

Note

  • These pizza pockets are delicious either hot or cold.
  • Be creative with your ingredients. You could add diced capsicum, grated carrot or mushrooms.
  • Recipe by Greer Worsley, who blogs at Typically Red.

Join the Catch Up

Join our community of parents and let the Kidspot Catchup be your guide to creating unforgetable family moments.