Pasta bolognaise pie

Ingredients

500g penne pasta, cooked al dente
4 cups bolognaise sauce
1 ½ cup pizza cheese, grated
1 cup parmesan cheese, grated
2 eggs, lightly beaten
1 cup parsley, roughly chopped

Recipe

Preheat oven to 160° C fan-forced. Spray a 33cm springform pan with cooking spray and set aside.

In a frying pan, heat cooked pasta and bolognaise sauce until hot. Remove from heat and stir in half of the pizza cheese, half of the parmesan cheese, eggs and parsley until well combined.

Pour into the springform pan and smooth top with a spoon. Sprinkle remaining cheeses over the top and bake for 20 minutes or until the top is golden. Serve hot or cold.

Notes

  • Everyone has their own way of making bolognaise and this recipe takes that into account – so make your bolognaise sauce the way you like it.
  • Serve with a crisp garden salad.
  • This pie can be frozen. I like to cut it into portions and wrap each one individually first.
  • This recipe was created by Jennifer Cheung for Kidspot, New Zealand’s best recipe finder.

Spaghetti Carbonara with Asparagus

An easy Italian family favourite spaghetti, no need for meat just fresh blanched asparagus and a squeeze of lemon for the perfect pasta dish.

Serves 4-6

Ingredients:

  • 250g LeaderBrand Asparagus
  • 500g spaghetti, dried
  • 2 Tbsp olive oil
  • 2 Tbsp butter
  • 1 onion, peeled, diced
  • 2 cloves garlic, minced
  • 3 eggs, beaten
  • 200g Pecorino or Parmesan cheese, freshly grated, plus extra to serve
  • 2 Tbsp finely chopped flat leaf parsley, plus extra to serve
  • 1 lemon, juice of

Directions:

  • Trim the woody ends from the LeaderBrand Asparagus. Use a sharp knife or potato peeler to thinly slice the spears. Bring a pot of water to the boil. Quickly blanch the LeaderBrand Asparagus for 20 seconds, then refresh in ice cold water. Set aside.
  • Bring a large, separate pot of water to the boil. Season well with salt. Add the spaghetti and cook for 12 minutes until tender to the bite. Drain well.
  • Heat a large sauté pan with the olive oil and butter. Fry the onion for 2-3 minutes until soft, but not brown, on a low heat. Add the garlic and cook for a further 2 minutes. Add the spaghetti and heat through tossing the onion and pasta together. When hot, pour over the beaten eggs and half of the cheese, and toss through until well combined. Season to taste with salt and freshly ground black pepper.
  • Finally toss through the asparagus slices and chopped parsley. Sprinkle over lemon juice, before serving and garnish with the reserved cheese and extra flat leaf parsley.
  • Serve hot in individual bowls, or in one large bowl for family meal time.

Find more:

Ginger oat cakes

Serves:

Make 10-20 oat cakes depending on size

Ingredients:

  • 275g rolled oats
  • Pinch of salt
  • 2 tbsp raw or demerara sugar (optional)
  • 75mls oil (e.g. light olive (so it’s light in flavour), canola (ideally cold pressed), rice bran oil)
  •  75mls boiling water
  • 1 tsp ground ginger
  • 75g stem ginger
  • Flour for rolling out

Method:

Pre-heat oven to 190 deg. fan, 200 deg. if not fan.

When the oven is at temperature, pour the oats onto a lined baking tray and bake in the oven for around 10 minutes until golden. Stir occasionally during this time to make sure the oats don’t burn.When the oats are golden, remove from the oven and allow to cool slightly.

Put about 3/4 of the oats into food processor along with the crystalized ginger (use the chopping blade) and blitz until they resemble course oatmeal (don’t blend into a flour, you don’t want it too fine).

Add the rest of the oats to the food processor along with the remainder of the ingredients and blend together until the mixture sticks together becomes a dough. Avoid over blending.

Turn the mixture out onto a board sprinkled with a little flour and roll out to a 5mm thickness (alternatively you can roll between 2 sheets of baking paper if you don’t want to use flour)

Cut into whatever shapes you like then place onto a lined and greased baking tray.

Bake in the oven for around 15-20 minutes until golden brown, if you like a really crispy oat cake (and you are making shapes which are easy to flip over!) you can bake 10 minutes one side then flip over for the remaining baking time.

Remove from the oven, allow to cool for a couple of minutes on the tray, then gently transfer to a wire rack to cool completely.

Store in an airtight tin.

Tips: Great on their own or served with cheese/grapes as part of a platter.

This recipe was created by Claire Turnbull for Kenwood New Zealand .

Pumpkin, potato and rocket salad

Ingredients:

  • 8 chat potatoes, quartered
  • 1.5kg Kent pumpkin, peeled and cut into pieces
  • 2 tbsp olive oil
  • Salt and pepper
  • 4 tbsp honey mustard dressing
  • 3 cups baby rocket leaves

Recipe:

Preheat oven to 180°C. Line baking tray with baking paper and place the potatoes and pumpkin on the tray. Drizzle with olive oil and toss to coat.

Season with salt and pepper and roast for 45 minutes, turning the vegetables halfway through the cooking period.

Place in a serving dish and drizzle with the dressing. Toss the rocket through right before serving.

Notes:

  • This a great barbeque dish and tastes great whether it is hot or cold.
  • The dressing and rocket need to be held back until serving, otherwise they just make the salad look limp.
  • This recipe was created by Jennifer Cheung for Kidspot, New Zealand’s best recipe finder.

Chicken rissoles with sweet chilli mango salad

Try this gorgeous chicken and coriander rissoles served with a sweet, spicy mango salad. So fresh and easy, you’ll be asked to make this again and again.

Rissoles:

  • 500gm lean chicken mince
  • ¼ cup chopped coriander
  • 3 spring onions, finely chopped
  • 1 large garlic clove, minced
  • 1 tsp freshly ground ginger
  • 2 tbsp soy sauce
  • 1 egg
  • 1/3 cup panko breadcrumbs (you can use normal breadcrumbs but these have a lovely texture and flavour)
  • Dot’s Canola Oil Cooking spray

Salad:

  • 4 cups butter lettuce
  • ¼ cup coriander leaves
  • 1 large mango, peeled/deseeded and cut into cubes
  • 2 tbsp cashews, chopped (optional)
  • 2 tbsp sweet chilli sauce
  • 2 tsp rice wine vinegar
  • 1 tsp sesame oil
  • 2 tsp vegetable oil (peanut or canola)

Recipe:

Mix rissole ingredients together, and then make 8 balls and flatten slightly. Cover and pop in the fridge for 15-20 minutes.

Heat large frying pan to medium-high, spray lightly with Dot’s Canola Oil Cooking spray.

Remove the rissoles from fridge and cook for 3 minutes on each side or until cooked through. If you don’t have a pan large enough, cook in batches in a smaller pan. Allow to rest for a couple of minutes.

Make the salad by combining lettuce, coriander and mango together.

Mix sweet chilli sauce, rice wine vinegar, sesame and vegetable oils together in a jar and pour over salad.

Top with cashews and serve with rissoles.

Notes:

  • We recommend Dot’s Canola Oil Cooking Spray as it has no artificial flavours, added salt, colours or animal fats.
  • If you or someone in your family doesn’t like coriander, you can leave it out or replace it with a little fresh lemon zest.
  • You can find Panko breadcrumbs in the Asian food aisle of your supermarket.
  • These rissoles are also fantastic with pork mince or even fish pulsed in the food processor.
  • Recipe written by Jay Rogers from The Moodie Foodie. You can follow The Moodie Foodie on Facebook.


  • Directions for use for Dot’s Canola Oil Cooking Spray:
  • Hold can as upright as possible and spray surface of unheated cookware coating cooking area completely.
  • Do not spray product onto naked flame or lighted BBQs.
  • Do not spray into gas ovens, even when not lit.

Onion rings

Ingredients:

  • 1 large onion, cut into 1 cm slices
  • 1 1/4 cups plain flour
  • 1 tsp baking powder
  • 1 tsp salt
  • 1 egg
  • 1 cup milk
  • 3/4 cup bread crumbs
  • Salt to taste
  • Vegetable oil for frying

Recipe:

Separate onion slices into rings and set aside.

In a small mixing bowl, combine the flour, baking powder and salt.

Dip the onion rings into the flour mixture so they are completely coated.

Whisk the egg and the milk, and add into the flour mixture.

Dredge the floured rings through the batter mixture. Drain the excess of the batter off the onion rings by leaving them on a wire rack for a couple of minutes.

Place the breadcrumbs on a plate and cover the onion rings well one by one with the crumbs.

Heat oil in a small saucepan until very hot. Add the onion rings to the oil in batches of 3 or 4. Fry for 2 – 3 minutes.

Remove and drain on kitchen paper.

Season with salt. Serve immediately.

Notes:

  • These onion rings are absolutely divine! Crunchy and golden brown, they are everything onion rings should be – just make sure that you are ready to serve them immediately because cold onion rings are not a pleasant thing to eat!
  • If you don’t want to deep fry your onion rings, you can shallow fry them instead. Just make sure that you really keep an eye on them as they cook. You’ll need cook them for a little longer too so that the onion inside the batter gets a change to cook though.
  • This recipe was created by Ella Walsh for Kidspot, New Zealand’s best recipe finder.

Spinach cobb dip

Ingredients:

  • 1 white Cobb loaf, unsliced
  • 250g spinach, frozen chopped
  • ½ white onion, diced finely
  • 300ml sour cream
  • 2/3 cup mayonnaise
  • 1 pkt Continental spring vegetable soup mix

Method:

Defrost spinach and squeeze out excess water.

Combine onion, spinach, sour cream, mayonnaise and soup mix in a bowl. Refrigerate for 4 hours or overnight.

Preheat oven to 180°C. Take a lid off the Cobb loaf and scoop out bread in bite size pieces and put aside.

Spray all the bread with non stick cooking spray and bake for 10 minutes on an oven tray to crisp up.

Leave to cool and fill with spinach mixture.

Serve with lid and reserved bread.

Broccoslaw and Shredded Lamb Pita Pockets

These easy lamb pita pockets are great for using up leftover lamb for lunch or dinner the next night. They’re so easy to chuck together and the additional mint dressing gives them an added zing.

Serves 4-6.

Ingredients:

  • 1 bag LeaderBrand Broccoslaw
  • 2-3 cups shredded cooked lamb, e.g. leftovers from roast
  • 4 large pita pockets
  • 1 red onion, thinly sliced

FRESH MINT DRESSING (makes 1 cup)

  • 1 lemon, juice of
  • 1/4 cup white wine vinegar
  • 1 ½ tsp brown sugar
  • 1 clove garlic, crushed
  • ½ cup fresh mint leaves, finely chopped
  • 1 Tbsp wholegrain mustard
  • ½ cup olive oil

Method:

Toss the contents of the LeaderBrand Broccoslaw bag with the enclosed Lemmonaise Dressing sachet. Leave to chill while preparing the pita pockets.

Preheat the oven grill to 200°C. Place the lamb in a baking dish, cover with foil and heat through in oven. At the same time lay the pita pockets on a baking tray and toast for 3-4 minutes.

Prepare the dressing; in a small jug combine together the lemon juice, vinegar, sugar, garlic, mint and mustard. Season to taste. Whisk together while adding the oil last, to emulsify.

Cut the pita pockets in half and spoon in some of the prepared LeaderBrand Broccoslaw salad and slices of red onion. Top with the warmed lamb and spoon over the fresh mint dressing. Serve immediately garnished with fresh mint leaves.

Veal, speck ragu’ and napoletana spaghetti


Brought to you by 

Serves: 4 | Prep: 15min | Cooking Time: 15min

Ingredients:

  • 350g Barilla Whole Grain Spaghetti
  • 1 jar Barilla Napoletana Sauce
  • 250g veal or chicken mince
  • 80g Italian speck, finely diced
  • 80g Grana Padano cheese, grated
  • ½ cup of chicken stock
  • 1 sprig of thyme
  • 1 garlic clove, crushed
  • ½ onion, thinly diced
  • ½ carrot, thinly sliced
  • ½ celery stick, thinly sliced
  • ½ cup of white wine
  • Extra Virgin Olive oil
  • Rock salt, for pasta water
  • Sea salt and pepper, to taste

Method:

In a large saucepan, bring plenty of water to the boil. When the water is boiling, add rock salt (7g to a litre of water).

Drop the Barilla Whole Grain Spaghetti into the water and stir. Cook according to the instructions on the pack.

Meanwhile, in a large fry pan, heat a little oil. When hot, add the onion, carrot, celery, garlic, thyme and cook for 3 minutes on a gentle heat.

Add the speck and cook for 3 minutes. Add veal (or chicken) mince and cook until browned. Add salt and pepper, to taste. Add wine and allow it to evaporate.

Add stock and simmer for 5 minutes, then add Barilla Napoletana Sauce and bring back to a simmer.

Drain the pasta 1 minute before the suggested time and toss it into the saucepan with ½ cup of cooking water to allow the pasta to finish cooking in the pan.

Serve with a sprinkle of Grana Padano cheese and a drizzle of Extra Virgin Olive oil.

Scallop, asparagus and pesto spaghetti


Brought to you by 

Serves 4 people | Prep. 20 min. | Cooking time: 15 min

Ingredients:

  • 375g Whole Grain Spaghetti
  • 1 jar Barilla Pesto Genovese
  • 2 garlic cloves, finely chopped
  • 1 tbsp dry chilli
  • 100 ml Extra Virgin Olive oil
  • 12 fresh scallops, quartered
  • 1 glass of dry white wine
  • 1 bunch asparagus, thinly sliced
  • 1 punnet cherry tomatoes, quartered
  • Rock salt, for pasta water
  • Sea salt

Method:

Bring plenty of water to the boil in a large saucepan. When boiling, add rock salt (7g to a litre of water).

Heat oil in a large fry pan, add garlic, chilli and cook until golden.

Add the scallops and cook for 2 minutes with the asparagus.

Add the wine and allow it to evaporate. Cook for a further few minutes and add one small ladle of boiling water.

Drop the pasta into the water and stir. Cook according to the instructions on the pack.

Drain pasta 1 minute before the suggested cooking time and toss it with cherry tomatoes for another 1 minute.  Add the scallops and asparagus. Remove from heat and add the Pesto Genovese, stirring to combine.

Chef’s Tip: For a vegetarian option, just replace the scallops with a classic combination of potatoes and string beans.

Lamb, pumpkin & red wine pappardelle


Brought to you by 

Serves 4 People | Prep. 10 min. | Cooking time 25 min.

Ingredients:

  • 250g Barilla Pappardelle
  • 1 jar Barilla Red Wine & Garlic Sauce
  • 80ml Extra Virgin Olive oil
  • ½ onion, finely chopped
  • 1 garlic clove, crushed
  • 300g lamb meat (leg or shoulder), cut into 1.5 cm cubes
  • 1 bay leaf
  • 1 sprig rosemary
  • 250g pumpkin, skin removed and sliced
  • Salt and pepper, for seasoning
  • 1 bunch parsley, chopped
  • Rock salt, for pasta water
  • 120g Parmigiano Reggiano cheese

Method:

In a large fry pan, gently cook onions and garlic in a little oil.

Once golden, add the herbs and meat. Brown the meat then add Barilla’s Red Wine & Garlic sauce and bring to a simmer for 10 minutes. Season to taste.

Season the pumpkin with salt and olive oil on a plate. Cover with plastic wrap and cook in a microwave for 2 minutes. Being careful as you take the plastic off, cut the pumpkin in cubes.

Meanwhile, bring plenty of salted water to the boil, (7g to 1L of water), and when boiling add the Pappardelle and stir.

Drain pasta al dente and toss it together in the sauce for a further 2 minutes.

Remove from the heat and add the cheese, stirring in the pumpkin and a drizzle of olive oil.

Chef Tip: You can change the vegetables, according to the season, using green peas, broccoli etc.

Beyblade birthday cake

Ingredients:

Chocolate cake:
This can be made up to a month in advance and kept in the freezer.

  • 400g butter
  • 400g chocolate
  • 400g caster sugar
  • 8 eggs
  • 400g plain flour, sifted

Decorations:

  • 50cm square cake board
  • 1.5kg ready made white icing (also called fondant icing, you can find Orchard White Icing at all major supermarkets)
  • Icing sugar, extra to prevent white icing from sticking to the bench when rolling
  • Food colouring – orange, yellow, blue, red and black
  • Small silver balls, optional
  • 9 icy pole sticks
  • Candles

Royal icing to glue fondant walls:

  • 1 egg white
  • 1 tsp lemon juice
  • 150g icing sugar
  • Orange food colour

Equipment and other items needed:

  • Greaseproof paper to line tin and use with rolling out of the icing
  • Piping bag and small nozzle to create writing or letter cutters

Approximate timings:

  • To make the cake: 15 minutes preparation time, approximately 30-40 minutes baking time
  • Preparing the cake: allow 2 hours
  • Covering sponge with fondant icing: 2 hours
  • Stadium walls and writing: allow 3 hours if you are piping the lettering, or 2 hours if you are cutting letters
  • Beyblade decorations: allow 2 hours

Method:

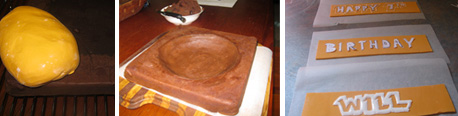
1. Colour the fondant icing before rolling out 2. Gently scope out a disc of cake to create the beyblade stadium 3. Roll out and cut fondant into rectangles and allow to dry before stenciling letters

Chocolate cakePreheat oven to 180°C.

Line tin with greaseproof paper.

Melt the butter and chocolate in the microwave, on high, for one minute or until chocolate is melted.

Beat eggs and sugar in a mixing bowl until pale. Mix in the butter/chocolate mix before folding in flour.

Pour into tin and bake in oven until the mix springs back when gently pressed.

Keep the cake in the tin for approx 5 minutes before turning onto a wire rack – keep the bottom side up at all times to avoid making lines as this will be the presentation side up.

When the cake is completely cooled (best if you can keep it in the fridge to chill right down before going any further) you will need to flatten the ‘bottom’ (which was the top.) Place a sheet of greaseproof paper on the presentation side and turn over. Use a serrated knife and cut the top of the cake so it’s as flat as possible. I usually cut a little at a time so that I don’t accidentally cut away too much cake! These bits of cake can be used as fillers for any holes in the sponge or to adjust the cake if it’s not evenly cut.

Turn back over onto greaseproof paper and cut a circle in the centre to create the dome shape. Go slowly and steady to avoid cutting through to the bottom.

Keep aside any large pieces of sponge to be used for the main pieces of the beyblades. Mix the sponge off cuts with a little water until it becomes a putty consistency. Use this to create a smooth surface over the entire sponge. It is now ready to cover with fondant icing.

Readymade white icingThis is also known as ‘fondant icing’ and can be found in larger quantities in cake specialty shops – they also sell them already coloured if you don’t wish to do that yourself. It will keep for a long time if stored in a cool place and if wrapped very well – I usually use a few layers of cling film before placing in an airtight container.

Usually the icing is quite firm to touch when you open the packet. Break it into small pieces with your fingers and begin to ‘work’ or ‘massage’ it until you notice is becomes smoother and softer. At this point, bring the icing together and knead as you would a dough until it is soft and smooth (the smoothness reminds me of my kids’ baby bottoms!). Once it’s smooth and soft you are ready to add the colour. Set aside a small amount (around 50g) for the yellow parts of the beyblades, 100g for the grey icing and 50g for the blue pieces.

Flatten a little, press some ‘creators’ into the dough and add a few drops of orange colour. Again, going slowly but steady is better than adding too much at once (unless you are after a very bright colour!) until you have achieved the strength of colour you are after. To work the colour into the icing, continue kneading as you would a dough. If the icing starts to stick to the bench use icing sugar, as you would flour to dough.

Once the orange is mixed evenly throughout, roll out to approximately 1/2cm thickness. It can be easier to roll it out on greaseproof paper – don’t forget to use icing sugar if it starts to stick. Use your rolling pin gently and turn the icing regularly so that the bottom won’t stick.

Using your rolling pin, and starting closest to your body, loosely roll the icing into the rolling pin. ‘Unravel’ the icing over the larger cake, making sure you allow enough icing to fall over the edges. This is the trickiest part of the whole process so the less kiddies around at this stage will probably make things easier. Use the natural curves of your hand and fingers to manipulate the icing so that it sits smoothly on the cake or use a ball of fondant dusted with icing.

Using kitchen scissors or a sharp knife, cut around any excess icing from the bottom and gently tuck in to hide the ends.

Carefully transfer the cake onto your serving plate or cake board.

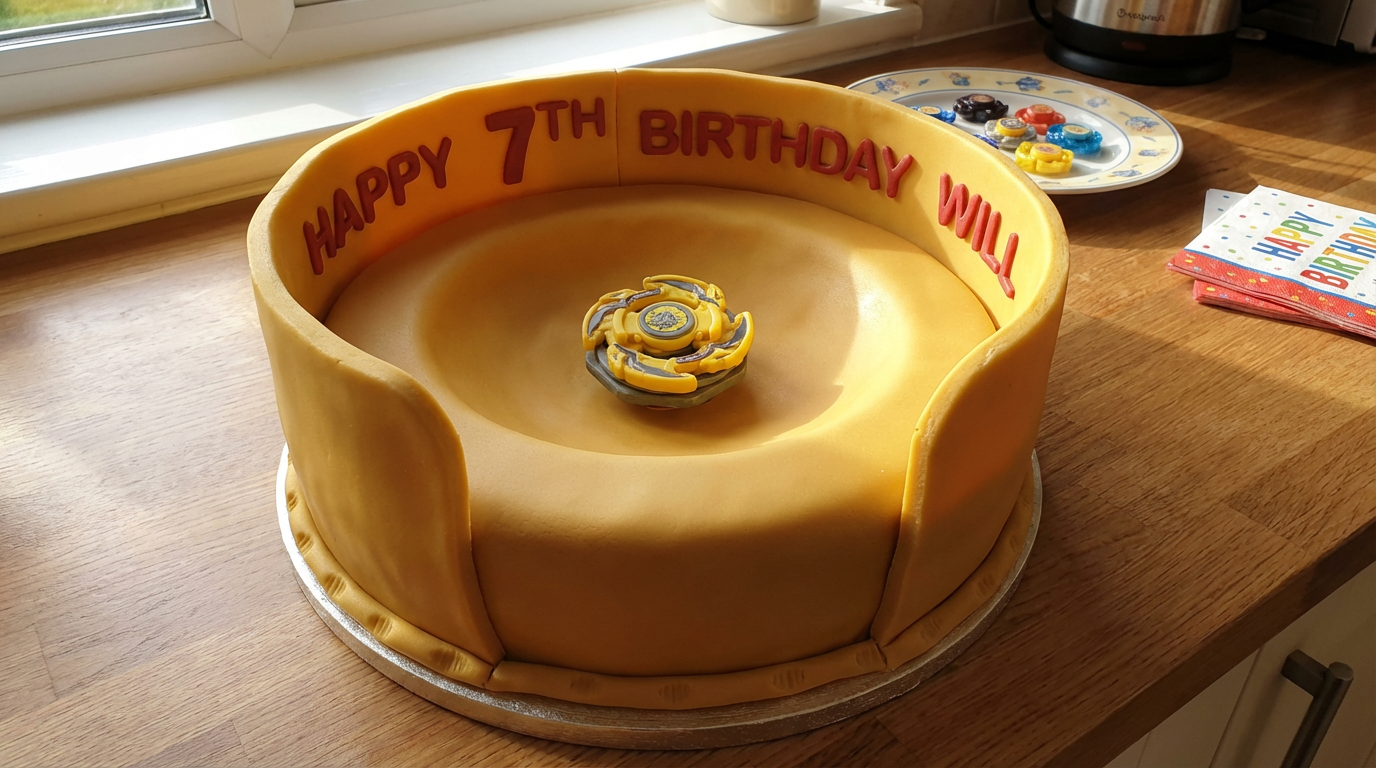
To make the side wallsYou will need to make these at least seven days before you put them on the cake to allow them to dry and go hard. Make at least one extra wall just in case you have any disasters!

Roll out a strip of orange icing to the length of each side and approximately 5-8cm in height.

Cut out squares and allow to dry for at least seven days, more is better to prevent decoration disaster!

Once they are dry, use a stencil to pipe on wording or use letter cutters and stick on with a little water.

Also cover each icy pole stick with fondant icing, trim ends with a sharp knife and allow to dry.

Glue the poles to the walls at least 2-3 days before hand using royal icing. Allow to set until hard.

Making the glueCombine the egg white, lemon juice, food colour and icing sugar into a bowl and mix until the egg white is stiff. Place in a piping bag ready to glue.

To finish the cakeGlue the walls to the cake at least one day prior to the party – use props to help keep them upright and in the right position.

Notes:

  • To make life easier, break down each stage of the cake making. For example:
  • Make the sponge at least a month beforehand, cut out the dome stadium, fill holes with sponge putty and freeze.
  • Defrost the sponge 8 days prior to the party and cover with fondant. Prepare the decorations and sit in your kitchen pantry to set and go hard.
  • The cake recipe is denser than a lighter sponge as this makes it easier to cut out the stadium base and smooth it out.
  • I have also defied cake-making law by omitting buttercream as a crumb coating and instead preparing the sponge using ‘cake putty’ which is made using leftover sponge and water.
  • Icing the cake is the trickiest part – I would recommend a time when it’s quiet and you don’t need to rush (I know that doesn’t happen very often with us mums!) but once the cake has been iced all around with fondant icing, this acts as cling film and stops the cake from drying out. You can do this stage ahead of time by at least one to two weeks – depending on the weather. The icing decorations can be made well in advance (if they are kept uncovered in a cool and dry spot they will last for months).
  • This recipe was created by Sonia Anthony.

From Chef Sonia

Although I am a qualified chef, I’ve had no formal cake making training. What I have learned is through trial and many errors. I hope that by sharing my knowledge, you can become as confident and as excited about cake making as I am! (without the mistakes!) I think the most important thing is to ‘give it a go,’ you’ll be producing amazing cakes before you know it!

Please feel free to contact me for any questions at info@chefsoniaandyou.com or at Chef Sonia & You .

Berry chocolate crackle parfait

Serving Size:

Makes 4

Ingredients:

  • 1 cup chocolate buttons
  • 1 cup desiccated coconut
  • 2 cup Rice Bubbles
  • 200 g mascarpone
  • 200 g mixed berries (fresh, chopped)

Method:

Melt the chocolate buttons in the microwave (be careful not to burn it). Fold in the coconut and rice bubbles while the chocolate is still warm.

Set the crackle mixture on a tray or plate covered with baking paper and pop in the fridge. Leave for at least two hours.

Once set, place another sheet of baking paper on top and smash the crackle with a wooden spoon until coarse and crumbly.

Soften the mascarpone gently with a spatula. Take a glass and layer the crackle mixture, mascarpone, berries, mascarpone, crackles, etc, until your glasses are full or you run out of ingredients. Return your glasses to the fridge to settle for 30 minutes before devouring with a spoon.

Notes:

  • It is easiest to use a piping bag to dispense the mascarpone into the glasses.
  • If you’re making chocolate crackles for the kids, make a little extra so you can prepare a few of these desserts for the grown-ups too!
  • This recipe was created by Adam Clements for Kidspot.

Beginner’s sushi

Ingredients:

  • 1 cup sushi rice, uncooked
  • 3 cups water
  • 2 tbsp mirin
  • 3 nori seaweed papers

Equipment:

  • 1 bamboo rolling mat
  • glass water on standby

Fillings:

  • Peeled cucumber cut into batons
  • Cold BBQ chicken thighs, sliced into strips
  • Peeled cooked prawns
  • Sushi grade salmon
  • Butter lettuce

Method:

Place uncooked rice in 3 cups of cold water, bring to the boil and simmer until cooked.

Rinse rice thoroughly, but delicately as you want to keep the form of the rice, I rinsed the cooked rice three times in cold water.
Put the rice into the refrigerator to cool completely before using.

Prepare all the ingredients and have them ready to use.

Add 2 tbsp of mirin to the cool rice; thoroughly mix through with a spoon.

Lie a seaweed sheet over the bamboo mat and position the two lengthways away from you. Place a little of the rice (about ¼ of a cup) on the near side of the seaweed sheet and flatten into a rectangle shape into a sausage shape, leaving about 3cm of the seaweed sheet clear of rice nearest to you.

Place a little of the filling across the centre of the rice and then gently pick up the end of the bamboo mat closest to you and start rolling away from your body as tightly as possible.

Make sure you leave about 3cm at the far end of your roll without rice/filling. When you have finished rolling, dip your fingers into the water and wet the strip of seaweed on the end to close and seal the sushi.

With a sharp knife, chop the sushi into bite-sized pieces.

Notes:

  • Rolling sushi is definitely one of those techniques that gets easier and better with practice. By the time I had finished all the rice I had made, my sushi was looking a whole lot better than when I first began!
  • We’ll definitely make again! I highly recommend it – it would be great thing to do with teens as an activity too. I’m now eager to try making some of my faves from the sushi bar – tempura prawn, cooked tuna with corn…
  • Mirin is Japanese vinegar. You can find it most good sized supermarkets these days.
  • A lot of sushi that you buy includes Japanese mayonnaise. Rather than buy it, I cheated and watered down some regular mayonnaise so it was the consistency of tomato sauce.
  • I have listed the fillings I used to make sushi this time, but obviously the sky is the limit when it comes to choosing sushi fillings. Avocado, carrot sticks and tuna (tinned or fresh) are others that I could have used but didn’t this time around.
  • This recipe was created by Melissa Klemke for Kidspot, New Zealand’s best recipe finder.

Beef tortellini soup

Ingredients:

  • 2 tbsp olive oil
  • 2 onions, thinly sliced
  • 2 cloves garlic, crushed
  • 4 carrots peeled and sliced
  • 1 punnet grape tomatoes, halved
  • 1 zuchini, quartered and thinly sliced
  • 1 cup tomato paste
  • 6 tsp beef stock
  • 6 cups boiling water
  • 625g fresh beef tortellini
  • 4 tbsp fresh oregano, chopped
  • 2 bay leaves, dried
  • 2 cups baby spinach leaves

Method:

In a large soup pot, heat the oil and fry the onion until translucent.

Add the garlic, carrots, zucchini and tomatoes and cook for 3 minutes.

Add the boiling water, stock, bay leaves and oregano.

Return to the boil and pour in the tortellini.

Cook for 15 mins or until the tortellini is cooked.

Stir in the spinach leaves just before serving.

Notes:

  • This tastes great with a big grating of parmesan cheese just before serving.
  • This is a soup as a meal dish and it’s really hearty.
  • You can use your favourite type of tortellini or filled pasta.
  • This recipe was created by Jennifer Cheung for Kidspot, New Zealand’s best recipe finder.

1

Beef stand n stuff taco with four bean salad

Kids love being able to stuff their own taco and this recipe makes it not only a yummy choice but a healthy one too.

Ingredients:

  • 1 packet Old El Paso™ Stand ’n Stuff™ Taco Shells
  • 1 sachet Salt Reduced Old El Paso™ Taco Seasoning
  • Old El Paso™ Taco Sauce
  • 1 tablespoon plain flour
  • 600g trimmed, lean rump steak, cut into 1.5cm cubes
  • 125g can 4 bean mix, drained
  • ½ punnet (100g) cherry tomatoes, halved
  • ½ small yellow capsicum, finely chopped
  • 1 tablespoon chopped fresh coriander
  • Juice of ½ lime
  • ¼ iceberg lettuce, shredded

Method:

  • Combine Taco Seasoning and flour and toss meat to coat. Add a little oil to a pan and cook meat in 2 batches for 3 minutes or until golden brown.
  • Remove Tacos from plastic, keep wedge inside shells. Fan Tacos slightly apart on tray and heat in an oven at 180ºC for 5 minutes.
  • Four Bean Salad: Combine beans, tomatoes, capsicum, coriander and lime juice to make the Four Bean Salad.
  • Fill Taco Shells with beef, lettuce and Four Bean Salad and drizzle with Old El Paso™ Taco Sauce.

Old El Paso and associated words and designs are trademarks of Pet Incorporated. © 2011

Find more:

Beef casserole

Ingredients:

  • 2 teaspoons vegetable oil
  • 2 tablespoons flour
  • 1 teaspoon paprika
  • 1/2 teaspoon salt and pepper
  • 700g chuck steak, cubed
  • 2 red capsicums (approx 250g), sliced into 5 cm strips
  • 2 medium brown onions, thinly sliced
  • 2 cloves garlic, crushed and chopped
  • 2 tablespoons tomato paste
  • 400ml warm water
  • 1/2 cup chopped parsley
  • Zest of one lemon
  • 1 cup frozen peas
  • 1/2cup button mushrooms, sliced (optional)

Method:

Preheat oven to 180C.

Add oil to a large earthenware dish or ovenproof dish with a lid.

Combine flour, paprika, salt and pepper together and roll beef cubes in the mixture until well covered. Put beef and remaining flour in the oven dish.

Add capsicum, onion and garlic.

Combine water and tomato paste in a small bowl and mix well then pour over meat and vegetables until just covering.

Cook for 2 hours covered.

20 minutes before serving, add the peas and mushrooms and check seasoning. Just before serving, mix parsley and lemon zest together and sprinkle over beef.

Notes:

  • My husband came up with this recipe when we were living on peanuts in Edinbrough. It is quick, easy on the pocket and very tasty. If I play with it a little I change the parsley to a basil and tomato salsa to give it a twist and serve with mashed potatoes.
  • Depending on the size of your dish you might need less water, make sure it only just covers ingredients for best results.
  • This recipe will also work in a slow cooker on medium heat for about 7-8 hours.
  • Recipe created by Camilla Baker for Kidspot, New Zealand’s best recipe finder.

Beef Burger Fajitas

Serving Size:

8 sizzling Fajitas

Ingredients:

  • Old El Paso™ Fajita Kit
  • In this kit – 8 Tortillas, Fajita Seasoning, Mild Mexican Salsa
  • 2 tablespoons olive oil
  • 700g lean beef mince
  • 1 egg, lightly beaten
  • 1 tablespoon chopped fresh oregano
  • 1 brown onion, cut into rings
  • 2 tomatoes finely diced
  • 1 ripe avocado, finely diced
  • ¾ cup fresh coriander leaves
  • Juice of 1 lime
  • ½ iceberg lettuce, washed and shredded

Method:

  • Remove 1 tablespoon of Fajita Seasoning from sachet & reserve remaining seasoning. Combine remaining Fajita Seasoning with mince beef, egg & oregano. Shape heaped tablespoons of mixture into 36 mini burgers.
  • Heat a little oil and cook burgers in frying pan or on BBQ for 15 minutes. Toss onion in remaining Fajita Seasoning & cook until soft. Combine tomato, avocado, coriander & lime juice.
  • Warm to separate tortillas. Open tortilla pouch, discard freshness sachet. Microwave tortillas in pouch on HIGH/1100 watts/100% power for 35 seconds or remove from pouch, wrap in foil & heat in oven at 180°C for 10 minutes.
  • Top warm Tortillas with lettuce, beef burgers, onion, tomato, avocado & coriander salsa and Mild Mexican Salsa. Wrap and enjoy.


Tip:  Add some Old El Paso™ Fajita seasoning to sliced onions and cook on the BBQ or pan. Great, with Steak, sausages and hamburgers.

Beef and Capsicum Fajita

Ingredients:

500g rump steak
2 tablespoons Old El Paso™ Fajita Seasoning
1 tablespoon olive oil
200g baby spinach
240g packet Old El Paso™ Wholegrain Tortillas

Yellow Capsicum Salsa

½ yellow capsicum (or red),
½ red onion, finely chopped
1 cucumber, finely chopped
2 tablespoons fresh coriander, finely chopped
2 teaspoons lime juice

Method:

  • Combine Fajita Seasoning and oil in a bowl. Add Steak and toss to coat. Preheated a BBQ or frying pan and cook steak for 4 minutes each side or until cooked to liking. Rest beef for 5 minutes & thinly slice.
  • Warm to separate tortillas. Open tortilla pouch, discard freshness sachet. Microwave tortillas in pouch on HIGH/1100 watts/100% power for 30 seconds or remove from pouch, wrap in foil & heat in oven at 180°C for 10 minutes.
  • Combine yellow capsicum, onion, cucumber, coriander and lime juice to form Yellow Capsicum Salsa.
  • Top warmed Tortillas with baby spinach, beef and Yellow Capsicum salsa & roll to form a Fajita.

TIP: Yellow or red capsicum can be used in the Capsicum Salsa.

Old El Paso and associated words and designs are trademarks of Pet Incorporated. © 2011

Beetroot, prawn and farro salad

Ingredients

  • 2 x packs LeaderBrand Pure’n Ezy Baby Beets
  • 1 pack LeaderBrand Super Kale
  • 20 large prawns, peeled with tails intact
  • 1 Tbsp olive oil
  • 2 cloves garlic, peeled, crushed
  • ½ lemon, juice of
  • ½ cup farro
  • 80g feta, crumbled
  • 1-2 tsp sumac, to serve


Dressing:

  • 1 lemon, juice and zest of
  • 2 tsp wholegrain mustard
  • 1 clove garlic, peeled, crushed
  • 2 tsp extra virgin olive oil


Directions

Combine prawns with the oil, garlic and lemon juice. Marinate for 30 minutes.

Meanwhile, soak farro in water for 20 minutes. Drain and rinse. Cook farro in boiling water for 15 minutes until tender. Drain and cool.

Heat a heavy-based frying pan on a high heat. Cook prawns for 2 minutes, turning until cooked through.

In a screw-top jar, combine all the dressing ingredients and shake vigorously to combine.

Toss farro and kale with dressing in a large bowl. Add beetroot, prawns and feta. Sprinkle with sumac to serve.


Find more:

*Source: Euromonitor International Limited; NIVEA in the category Sun Care,incl. Sun Protection, Aftersun & Self Tanning; in retail value terms, 2017. Always read the label. Use only as directed.

Chicken and Broccoli Pasta Bake with Cheesy Almond Crust

Ingredients

  • 1 head LeaderBrand broccoli
  • 400g pasta, such as penne
  • 1 Tbsp oil
  • 4 boneless skinless chicken thighs, cut into strips
  • 1 red onion, peeled, finely sliced
  • 1 garlic clove, finely chopped
  • 2 cups milk, warmed
  • 2 Tbsp plain flour
  • 2 Tbsp butter
  • 1 Tbsp whole grain mustard
  • 150g mozzarella, grated
  • ¼ tsp freshly grated nutmeg
  • ½ cup ground almonds
  • 2 Tbsp chopped parsley
  • Salt and pepper to season


Directions

Preheat the oven to 180°C.

Trim the broccoli and cut into florets. Cook the pasta in a large pan of boiling salted water for 10-12 minutes. Drain well.

While the pasta is cooking, heat the oil in a wok or large pan, add the chicken strips, onion and garlic and stir fry for 3-4 minutes until the meat is well browned and cooked through. Add the broccoli florets and toss until just starting to turn tender. Remove from the pan and set aside.

Melt butter in a heated saucepan. Add the flour and mix to a paste. Add the milk to the pan and whisk over a medium heat until thickened and smooth. Stir in the mustard and about half of the cheese and season with salt, pepper and nutmeg.

Add the chicken and vegetables, with the sauce, to the drained pasta and mix together. Spoon into an ovenproof dish.

Mix together the ground almonds, remaining cheese and chopped parsley. Sprinkle over the pasta and bake in the oven for 20 minutes until golden and bubbling.


Find more:

Bread rolls

Ingredients:

  • 2 cups wholemeal plain flour
  • 2 cups plain flour
  • 1 cup unprocessed bran
  • 1/2 cup linseed
  • 2 x 7g satchets of yeast
  • 2 1/2 cups warm water
  • 3 tbsp vegetable oil
  • 2 tsp honey

Method:

Mix all of the dry ingredients in a large bowl.

Mix all of the wet ingredients in a jug.

Mix wet and dry ingredients together and when well combined, cover the bowl with cling film and leave the bowl in warm place for the dough to prove (double in size) for an hour.

Dust some flour on your bench and turn out the dough. Knead until your dough is pliable and elastic.

Cover a baking tray with baking paper. Shape your bread rolls and place on the tray.

Cover with a tea towel and leave to rise again for 45mins.

Preheat oven to 200°C.

Bake rolls in oven for 20 minutes.

Notes:

  • You can brush these with a little milk before baking if you like them to look really golden.
  • I made some round rolls, a plait and some knot rolls with mine.
  • These are neither fast nor easy but they are still worthy of giving a go. The end result is some deliciously healthy rolls with linseeds dotted through them.
  • This recipe was created by Jennifer Cheung for Kidspot, New Zealand’s best recipe finder.

Banana pudding

Ingredients:

  • 2 very ripe bananas, mashed
  • 1/2 cup stewed apple puree
  • 2 tsp wheatgerm
  • Cinnamon to sprinkle

Method:

Mix all ingredients together.

Sprinkle with cinnamon and wheatgerm.

Notes

  • This is simple and tasty and you can add a little honey if your baby is old enough to have honey however I thought it was sweet enough without.
  • This recipe was created by Jennifer cheung for Kidspot, New Zealand’s best recipe finder.


Banana-oat biscuits

Ingredients:

  • 170g butter, softened
  • 1 cup mashed ripe bananas
  • 1 cup brown sugar
  • 1 cup sugar
  • 2 eggs, beaten
  • 1 teaspoon vanilla
  • 1 teaspoon bicarbonate soda
  • ½ teaspoon salt
  • 1 ½ cup sifted flour
  • 3 cups rolled oats

Method:

Preheat oven to 180°C.   Butter a baking sheet and set aside.

In a large mixing bowl, mix butter and sugars until creamy, then stir in the eggs, vanilla and banana. Stir in flour, bicarbonate soda, and salt. Add rolled oats and stir through until well combined.

Form small balls and allow enough room around each ball on baking sheet for it to expand while baking.

Bake for 12-15 minutes and cool. Store in an airtight container for up to a week.

Notes:

  • You can make this recipes even healthier by leaving out the sugars and replacing them with one cup of demerara (or raw) sugar or honey – they will be slightly less sweet using these options.
  • If you want to be creative, you can add extras to this recipe – try chocolate bits, dried fruit, or crushed nuts.
  • These biscuits are perfect for lunch boxes.

This recipe was created by Kristine Duran-Thiessen for Kidspot, New Zealand’s best recipe finder.

Banana nut bread

Ingredients:

  • 90g butter or margarine
  • 1/2 cup castor sugar
  • 1 egg
  • 1 teaspoon vanilla essence
  • 1 1/2 cups mashed ripe banana
  • 2 cups Kellogg’s Rice Bubbles
  • 1 1/2 cups plain flour
  • 2 teaspoons baking powder
  • 1/2 teaspoon bicarbonate of soda
  • salt, to taste
  • 1/4 cup chopped nuts

Method:

Preheat oven to 180°C.

Cream butter and sugar until light and fluffy.

Add egg and vanilla essence.

Beat well.

Stir in banana and Kellogg’s Rice Bubbles.

Sift dry ingredients together.

Add to mixture with nuts, stirring only until combined.

Spread into a greased 23 x 14cm loaf tin.

Bake in a moderate oven (180°C) for 40-50 minutes or until cooked.

Cool thoroughly before slicing.

Spread with butter and serve.


Notes:

  • Tested by The Australian Women’s Weekly TEST KITCHEN.
  • This loaf makes a great breakfast when served lightly toasted
  • This recipe was created by Kellogg’s nutritionists

Banana damper

Ingredients:

  • 3 cups self-raising flour
  • 1/4 cup brown sugar
  • 70g butter, cubed
  • 2 bananas, mashed
  • 1/2 cup milk
  • 1/2 cup walnuts

Method:

Preheat oven to 180°C. Line a tray wth baking paper and set aside.

In a bowl, place the flour and brown sugar and mix.

Rub the butter through the flour until it resembles crumbs.

Pour the milk into the mashed banana and mix.

Add the banana and milk mix to the crumbs and using a flat bladed knife, cut the mix together until just combined.

Turn out onto baking tray and pat into a large round. It will be sticky and soft.

Press the walnuts into the top of the damper and bake for 40 minutes.

Notes:

  • This recipe is so easy and gives a great moist result. Serve it with butter and golden syrup.
  • Banana damper keeps very well and stays moist like cake.
  • This recipe was created by Jennifer Cheung for Kidspot, New Zealand’s best recipe finder.

Banana butterscotch pudding

Ingredients:

  • 1 cup plain flour, sifted
  • 1 pinch salt
  • 1/2 cup castor sugar
  • 3 tsp baking powder
  • 1 ripe banana, mashed
  • 1 cup milk
  • 100g unsalted butter, melted
  • 1 egg, lightly beaten
  • 1 tsp vanilla extract

Topping

  • 140g brown sugar
  • 1/4 cup golden syrup
  • 1 cup boiling water

Method:

Preheat the oven to 180°C. Grease a 2.5L baking dish with butter and set aside.

In a bowl, mix the flour, sugar, baking powder and salt together.

Mix the banana, egg, milk, butter and vanilla into the flour mixtur until well combined.

Pour into baking dish.

In a small saucepan add all of the topping ingredients and bring to the boil.

Pour the boiling topping mix over the pudding mix and bake for 40-45 minutes or until a skewer pushed into the centre comes out clean.

Notes:

  • You MUST serve this with vanilla ice cream.
  • This is great for dinner parties in winter as you can pop it into the oven and it’s ready when the main course is over.
  • This recipe was created by Jennifer Cheung for Kidspot, New Zealand’s best recipe finder.

Banana biscuits

Ingredients:

  • 3 large ripe bananas, mashed
  • 125g butter
  • 1 cup sugar
  • 1 1/2 cups self-raising flour
  • 1/2 cup coconut
  • 1/2 cup rolled oats

Method:

Preheat oven to 230°C. Line baking tray with baking paper and set aside.

Using an electric mixer, cream the butter and sugar.

Stir in the bananas until combined.

Add the flour, oats and coconut and stir until thoroughly combined.

Place teaspoons of the mixture on the baking tray, leaving room for the biscuits to spread.

Place in the oven and turn it down to 200°C.

Bake for 10 minutes.

Notes:

  • These find their way into lunchboxes often at my house.
  • These are nice if you add half a cup of chopped dates or pecans to change it up.
  • This recipe was created by Jennifer Cheung for Kidspot, New Zealand’s best recipe finder.

Banana and chocolate parcels

Ingredients:

  • 2 sheets puff pastry, thawed
  • 2 bananas, mashed
  • 2 tsp brown sugar
  • 2 tbsp flaked almonds
  • 2 tbsp chocolate chips
  • 1 tbsp milk

Method:

Preheat oven to 180°C. Place a sheet of baking paper on tray and set aside.

In a bowl, mash bananas and stir in brown sugar, almond flakes and chocolate chips.

Cut pastry sheet into 4 and place a tablespoonful of the mixture in the centre of a square and bring in the opposite corners to the centre and press them together, then repeat with the other two corners.

Brush with milk and place on baking tray. Continue with each parcel until all 8 are done.

Bake for 25-30 mins.

Notes:

  • This recipe was one of the winners of a Kidspot Social Big Banana Competition and created by Pally.
  • This recipe was tested by Jennifer Cheung for Kidspot, New Zealand’s best recipe finder.

Baked potatoes

Ingredients:

  • 2 tbsp olive oil
  • 1 clove garlic, finely chopped (optional)
  • 1/2 cup pine nuts
  • 2 cups Kellogg’s Sultana Bran
  • 4 cups baby spinach leaves
  • 1 cup parmesan cheese, grated
  • 1kg potatoes, boiled or roasted

Method:

Pre-heat oven to 190°C.

Heat olive oil in a wok or large fry pan. Add the garlic and cook 1-2 minutes until golden.

Add the pine nuts to the pan and allow to cook for a further 2 minutes.

Add the Kellogg’s Sultana Bran and spinach and combine well.

When spinach is wilted add the parmesan and combine well.

Place cooked potatoes into a 20cm x 30cm roasting pan and cover with cooked mixture.

Place in the oven for 18-20 minutes until mixture is slightly brown and potatoes are hot.

Serve immediately as a side dish or on its own for lunch.

Notes

  • This recipe is a tasty way to ensure your children get the fibre and vitamins they need.
  • This recipe was supplied by Kellogg’s nutritionists.

Join the Catch Up

Join our community of parents and let the Kidspot Catchup be your guide to creating unforgetable family moments.