Mini frittata
Serves:
Ingredients
- vegetable oil spray
- 1-2 large zucchini, sliced into 5mm ribbons
- 8 large eggs, lightly beaten
- 60ml low fat milk
- 1/2 cup finely sliced basil leaves
- 50g feta, crumbled
Method
Heat oven to 200ºC conventional (180ºC fan-forced).
Spray a 12 cavity muffin tray with oil spray and line the sides of each one with zucchini ribbons.
Mix eggs, milk and basil leaves together and season well.
Spoon egg mixture into each cavity, top with feta and place in oven.
Bake for 15-18 minutes or until cooked.
Remove from oven and allow to sit for a couple of minutes before carefully removing each one.
Related vegetarian recipes
Serving Suggestions
Note
- To slice zucchini, you can use a mandolin, potato slicer or a sharp knife.
- Make sure you grease the muffin cavities well so the frittatas are easy to remove.
- I’ve used zucchini wraps for these frittata but you could just as easily use bacon, ham, prosciutto or even some smoked salmon. You could also leave out the wraps altogether and just have frittata – so versatile!
- This recipe was created by Jay Rogers for Kidspot, New Zealand's best recipe finder. You can follow Jay at The Moodie Foodie and on Facebook, Twitter or Pinterest.

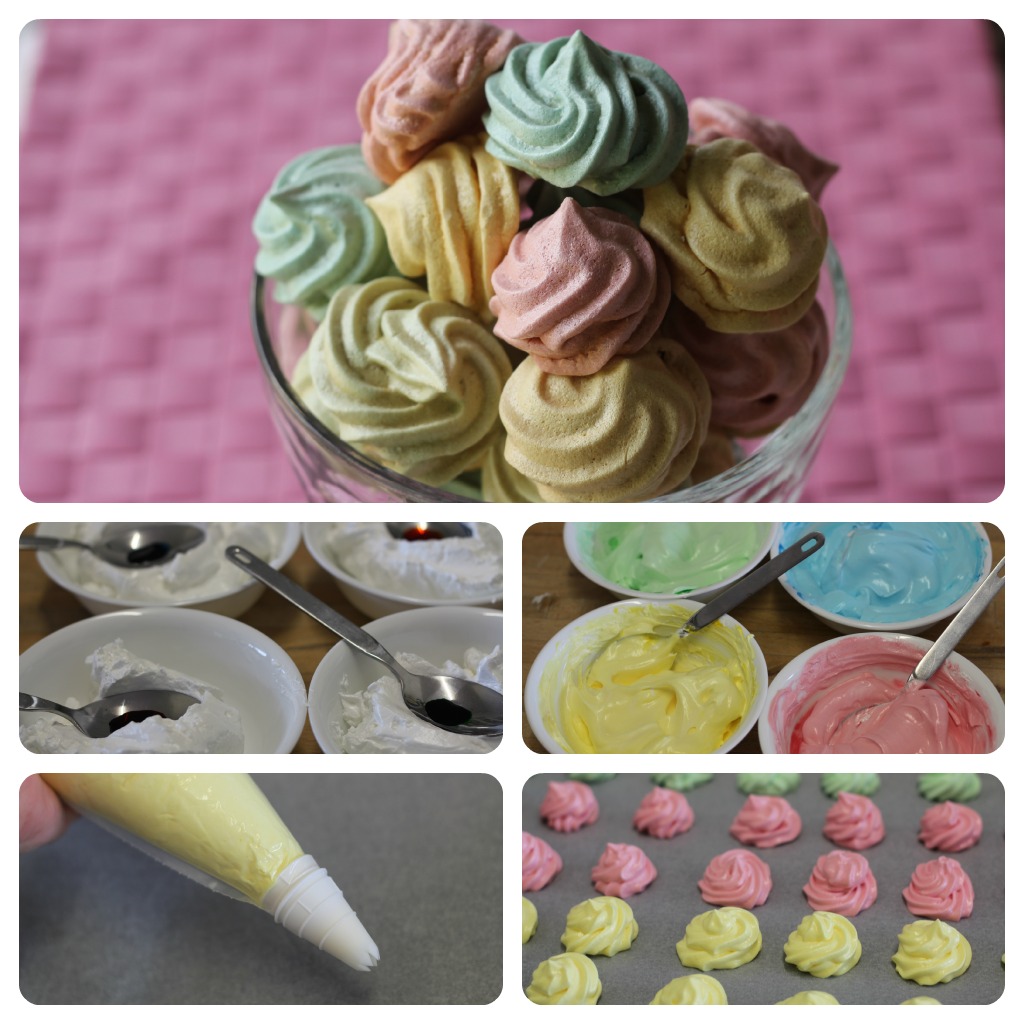
Rainbow meringues
Serves:
Ingredients
- 4 large egg whites
- 1 cup sugar
- 1/4 tsp salt
- 1 tsp vanilla extract
- 4 x food colouring
Method
1. Preheat the oven to 175°C conventional or 155°C fan-forced. Line two baking trays with baking paper and set aside. Using a mixer, beat the egg whites until fluffy and then add 2 tbsp of sugar at a time while the mixer is running until the entire cup is incorporated. Add the salt and vanilla extract. Keep beating the mixture until it forms very stiff peaks.
2. Divide the mixture into 4 bowls and add a couple of drops of food colouring to each. Mix using a metal spoon until the colour is even.
3. Place the mixture into a piping bag and pipe small mounds onto the baking paper.
4. Bake for 60 minutes and then turn the oven off and leave the meringues to cool inside.
Find more meringue recipes
Serving Suggestions
Note
- I cheated and used disposable piping bags for this recipe. They make for an easy clean-up.
- The sugar needs to be entirely dissolved in this mixture and a good way to test this is to rub a drop or two between your fingers to make sure it isn’t grainy.
- You can also use gel paste colouring and powdered food colouring for this recipe.
- This recipe was created by Jennifer Cheung for Kidspot, New Zealand’s best recipe finder.
Healthy chocolate brownie
Serves:
Makes 9
Ingredients
- 350-400g pumpkin, skin on and roughly chopped
- 2/3 cup (100g) plain flour
- 1 tsp baking powder
- pinch salt
- 1/3 cup Dutch cocoa
- 1 tbsp butter
- 1/4 cup (55g) dark chocolate chips
- 2 large eggs
- 2/3 cup (160ml) agave nectar
- 2 tsp vanilla extract
Method
Pre-heat oven to 180°C (160°C fan-forced). Line a 20cm x 20cm baking pan with baking paper an set aside.
Place pumpkin into a steamer and steam for about 20 minutes until soft. Remove pumpkin from steamer and cool slightly. Scoop out pumpkin flesh and puree using a stick blender or food processor – you should have 1/2 cup of puree.
Sift flour, baking powder, salt and cocoa together in a bowl. Place butter and chocolate into a small non-stick saucepan and melt gently on a low heat. Remove from heat.
Whisk eggs well and add agave nectar and vanilla. Add pumpkin puree and chocolate mixture. Stir to combine and fold through dry ingredients until just combined and pour into baking pan.
Bake for about 25 minutes – until cake skewer comes out with slightly moist crumbs. The outside should be firm and the inside shouldn’t be wobbly but still soft.
Remove from oven and allow to sit for 2-3 minutes before transferring brownies to a wire rack to cool completely.
Find more healthier sweet treats
Serving Suggestions
Note
- Adding a little pumpkin puree to your baking gives mucho moisture and fabulous fibre without the pumpkin taste. It’s a baking tip that’s popular in America and one I was dying to try. Trust me, it works! So not only do you get a beautifully moist brownie, it’s packed with fibre, too.
- If you want to use sugar, use 1 cup white sugar.
- Brownies will keep for about 2-3 days in an airtight container and freeze well too.
- This recipe was created by Jay Rogers for Kidspot, New Zealand's best recipe finder. You can follow Jay at The Moodie Foodie and on Facebook, Twitter or Pinterest.
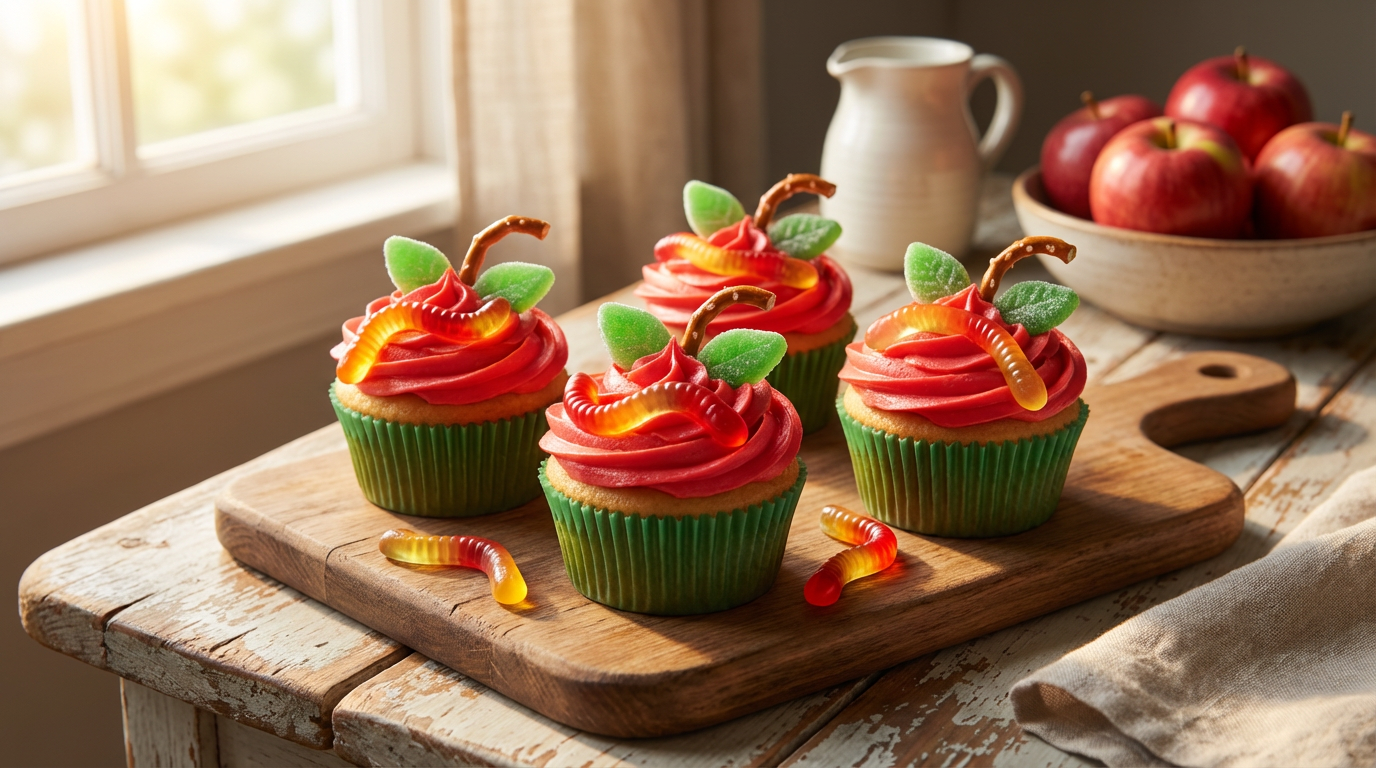
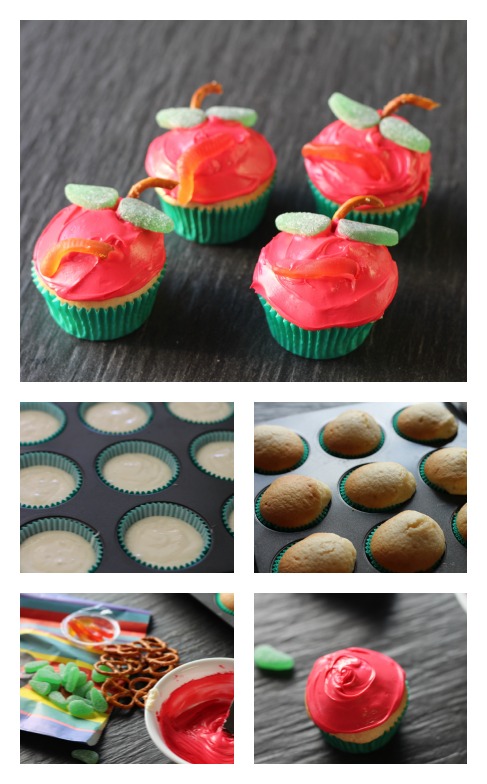
Apple and worm cupcakes
Serves:
Ingredients
Method
Step 1. Make up the vanilla cupcakes as per the recipe.
Step 2. Bake as directed.
Step 3. Make your buttercream icing and add a few drops of colouring at a time until you have a rosy, apple red colour. Spread buttercream icing on cooled cupcakes.
Step 4. Push a piece of broken pretzel into the cupcake to resemble a stalk. Push the plastic straw in to make a hole and poke one end of the Gummi Worm inside so it looks like it is emerging from the apple. Add a mint leaf either side of the pretzel to create leaves.
Find more cupcake recipes:
Serving Suggestions
Note
- If you want to make this these cupcakes but need a quick shortcut then you can use a packet mix of vanilla cupcakes with icing included and then tint the included icing.
- If red apples aren’t your favourite you can use green food colouring to make green apples.
- This recipe was created by Jennifer Cheung for Kidspot,New Zealand's best recipe finder.
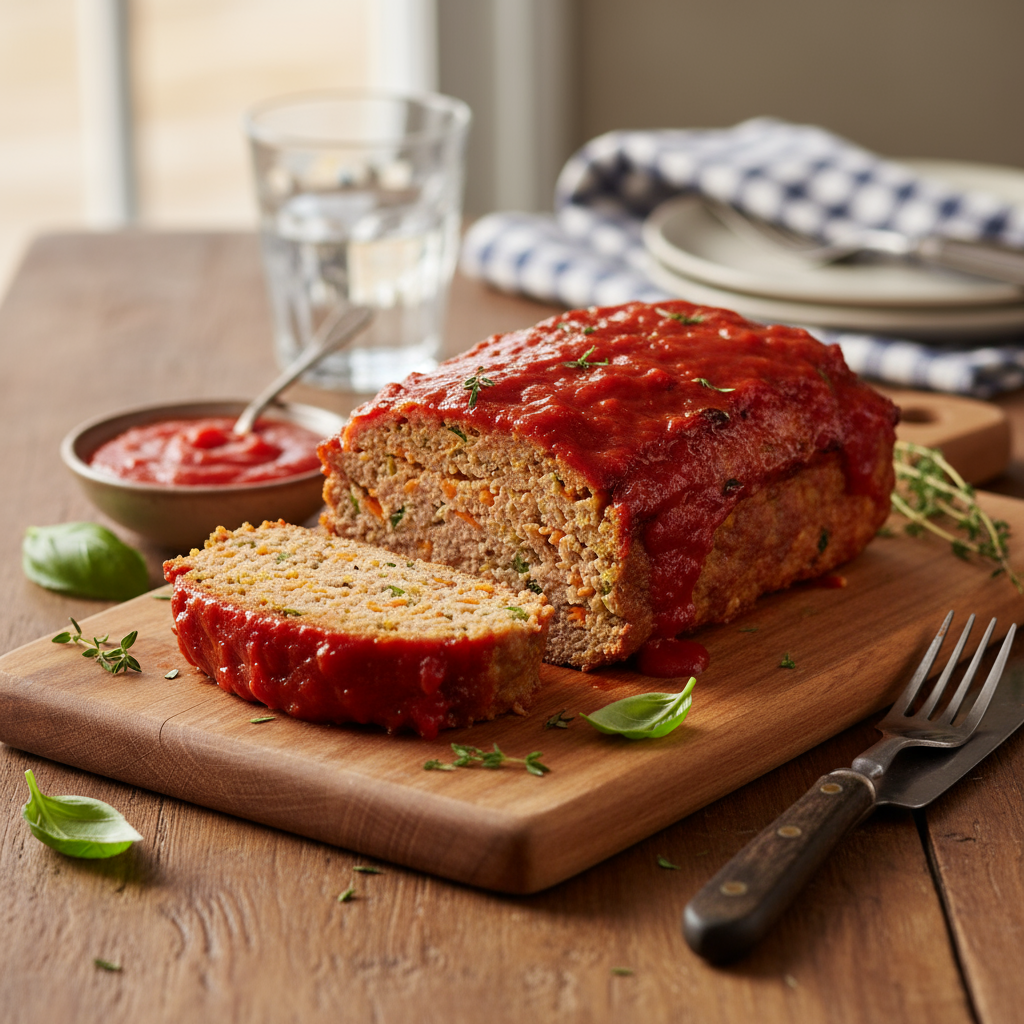
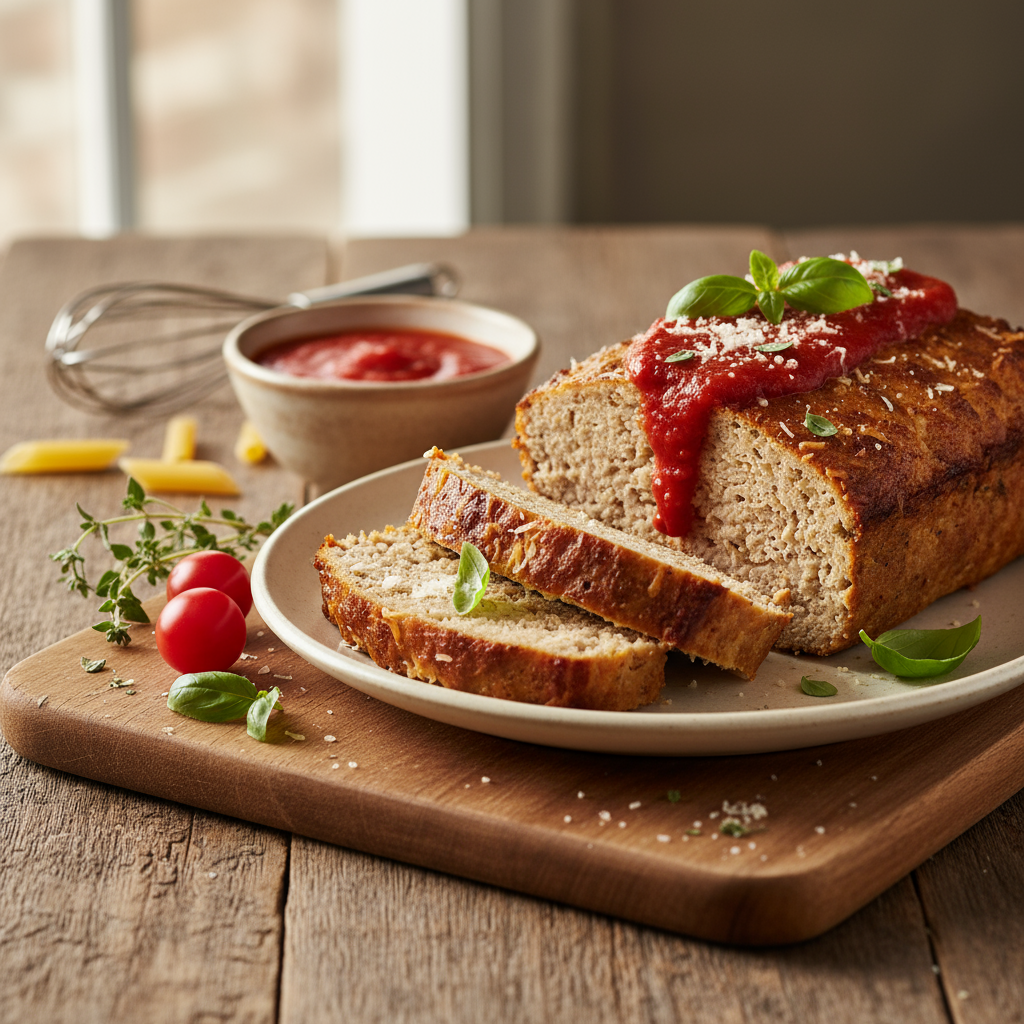
Tomato glazed meatloaf
Serves:
Ingredients
- 500g sausage mince
- 1 cup breadcrumbs
- 1 small onion, diced
- 1 carrot, grated
- 1 cup zucchini, grated
- 2 tbsp tomato sauce
- 2 tbsp Italian herbs
- 1 egg lightly beaten
Tomato glaze
- ½ cup tomato sauce
- 1/2 cup Worcestershire sauce
Method
Preheat oven to 180ºC. Line a tray with baking paper.
Mix all ingredients except for the glaze.
Form a loaf and bake for 30 mins. Drain excess fat.
Mix glaze ingredients together and spoon sauce mix over top and return to oven.
Cook further 10 minutes until top is glazed.
Stand for 10 mins. Slice and serve with creamy mashed potatoes and seasonal vegetables.
Notes
- I love to make a double batch of this as it is so nice cold on sandwiches the next day.
- It’s packed full of veges and the children won’t even know they are in there.
- This recipe was created by Jennifer Cheung for Kidspot, New Zealand’s best recipe finder.
Serving Suggestions
Note
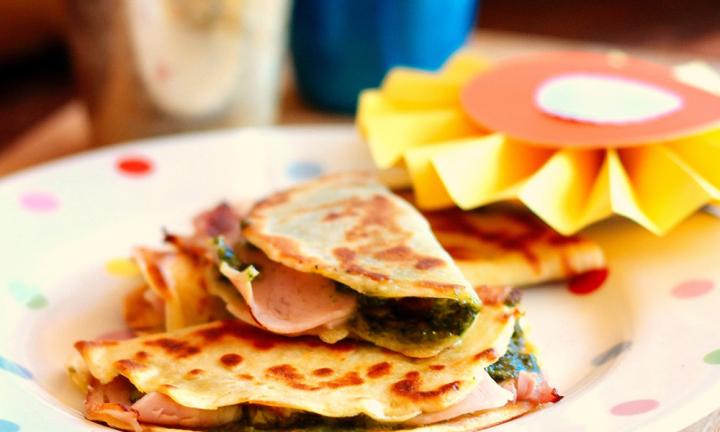
Ham and pesto crepes
Serves:
Ingredients
- 1 x packet ready made frozen crepes or you can make your own
- 1 cup (around 190g) good quality pesto
- 10 slices ham
- 1/2 cup (40g) parmesan cheese, finely grated
- 1 tsp canola oil
Method
Spread the crepes with pesto, place a slice of ham on each and sprinkle with the cheese. Fold in half.
Heat the oil in a frying pan on medium-high heat and lightly pan-fry the filled/folded crepes for a minute or so on each side until golden. The idea is to just heat through the fillings.
Serving Suggestions
Note
- You don’t really need to heat the crepes up, it just makes them that little bit more yummy!
- Spread crepes with honey-sweetened ricotta and stuff with fresh berries.
- Spread with creme cheese and fill with shredded barbecue chicken, grated carrot and some butter lettuce.
- Or go with the classic and spread with Nutella and top with thinly sliced banana or poached peaches or other fruit before folding.
- This recipe was created by Sophie Hansen for Kidspot, New Zealand’s best recipe finder:
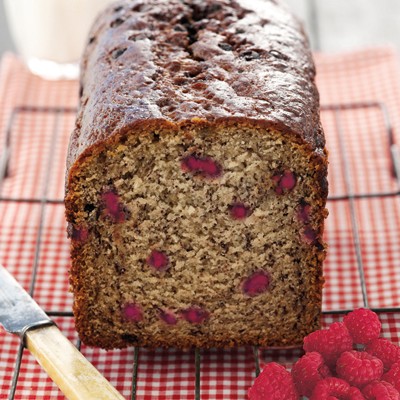
Apple and raspberry bread
Serves:
Ingredients
- 2 cups plain flour
- 2 teaspoons baking powder
- 1 teaspoon ground cinnamon
- ½ cup caster sugar
- ½ cup brown sugar
- 2 eggs, lightly beaten
- 1/3 cup (80mL) oil
- 1 teaspoon vanilla extract
- 2 red apples, grated
- 1 cup fresh or frozen raspberries
Method
Preheat the oven to 180°C. Grease and line the base of a loaf pan (mine is 11cm x 21cm).
Sift the flour, baking powder and cinnamon into a large bowl. Stir in the sugars. In a separate bowl, combine the eggs, oil and vanilla. Add to the dry ingredients with grated apple and mix until just combined. Gently stir in the raspberries, the mixture will be quite thick.
Spoon into the loaf pan and bake for 1 hour or until a skewer inserted into the middle of the loaf comes out clean. Allow to cool for 10 minutes, then remove to a wire rack and slice thickly. Serve spread with butter or raspberry jam.
Notes:
- After my whole family was very taken with toasted Banana bread, I decided to venture further into the cake-for-breakfast options – apple and raspberry bread is a delicious combination.
- Make the bread gluten-free using gluten-free plain flour and baking powder
Serving Suggestions
Note
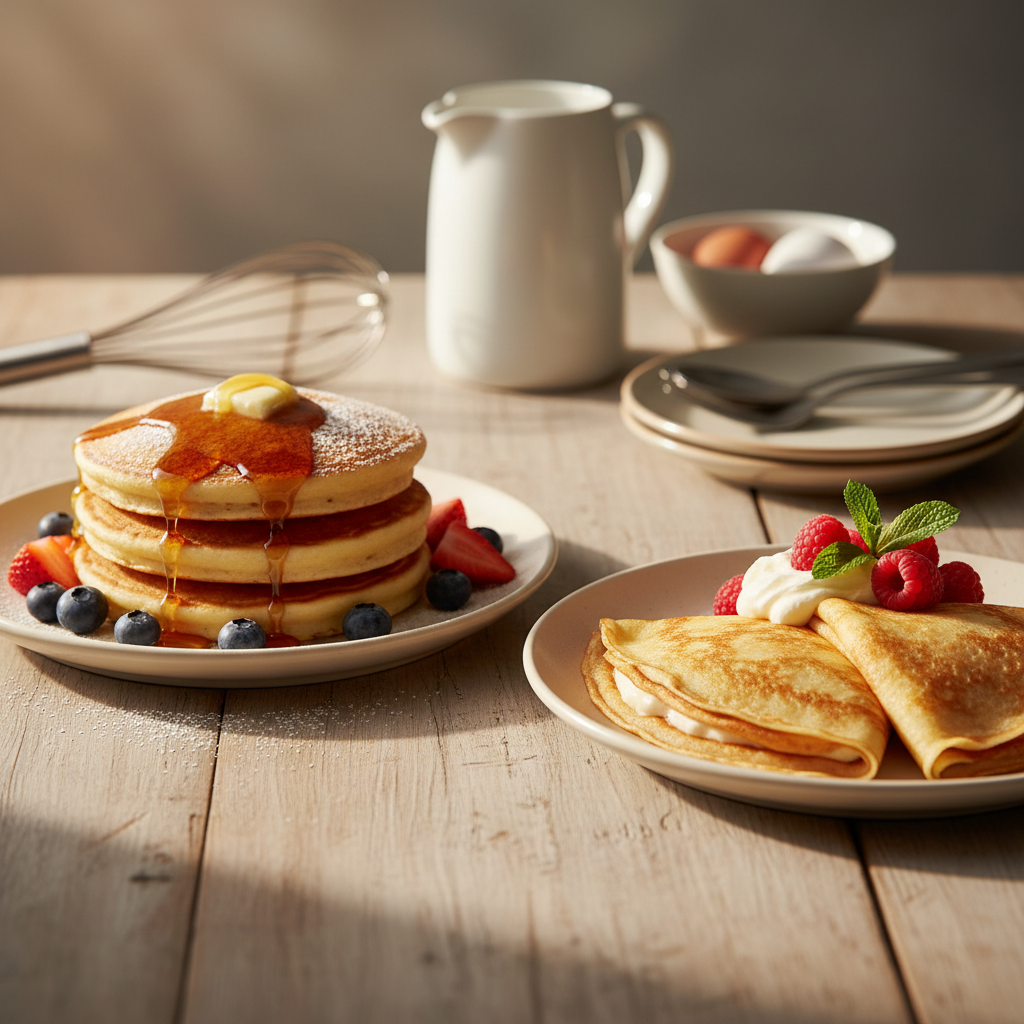
Pancakes and Crepes
Serves:
8 pancakes or crepes
Ingredients
115g (4oz) plain flour
pinch of salt
1 egg
280ml (. pint) milk
a little oil, for frying
Method
Tools: Kenwood Kitchen Machine
Place the flour and salt in the Kenwood Bowl.
Add the egg and a quarter of the milk. Using the whisk at speed 1, mix until smooth.
Gradually whisk in the remaining milk to make a smooth batter.
Pour into a jug, cover and leave to stand for 30 minutes to allow the starch grains time to swell and soften and produce a lighter batter.
Heat the minimum of oil in a 20cm (8 inch) heavy based frying pan or pancake pan.
Pour in just enough batter to thinly coat the base of the pan. Swirl the batter around to coat the pan.
Cook over a moderately high heat for about 1 minute, until light golden.
Turn or toss the pancake, cook for 30 seconds, or until golden. Transfer to a plate.
Repeat with the remaining batter to make 8 pancakes, stacking them on top of each other with greaseproof paper in between. Keep the pancakes warm in the oven whilst cooking the remainder if serving immediately.
Serving Suggestions
Serve sprinkled with sugar and lemon juice.
Note
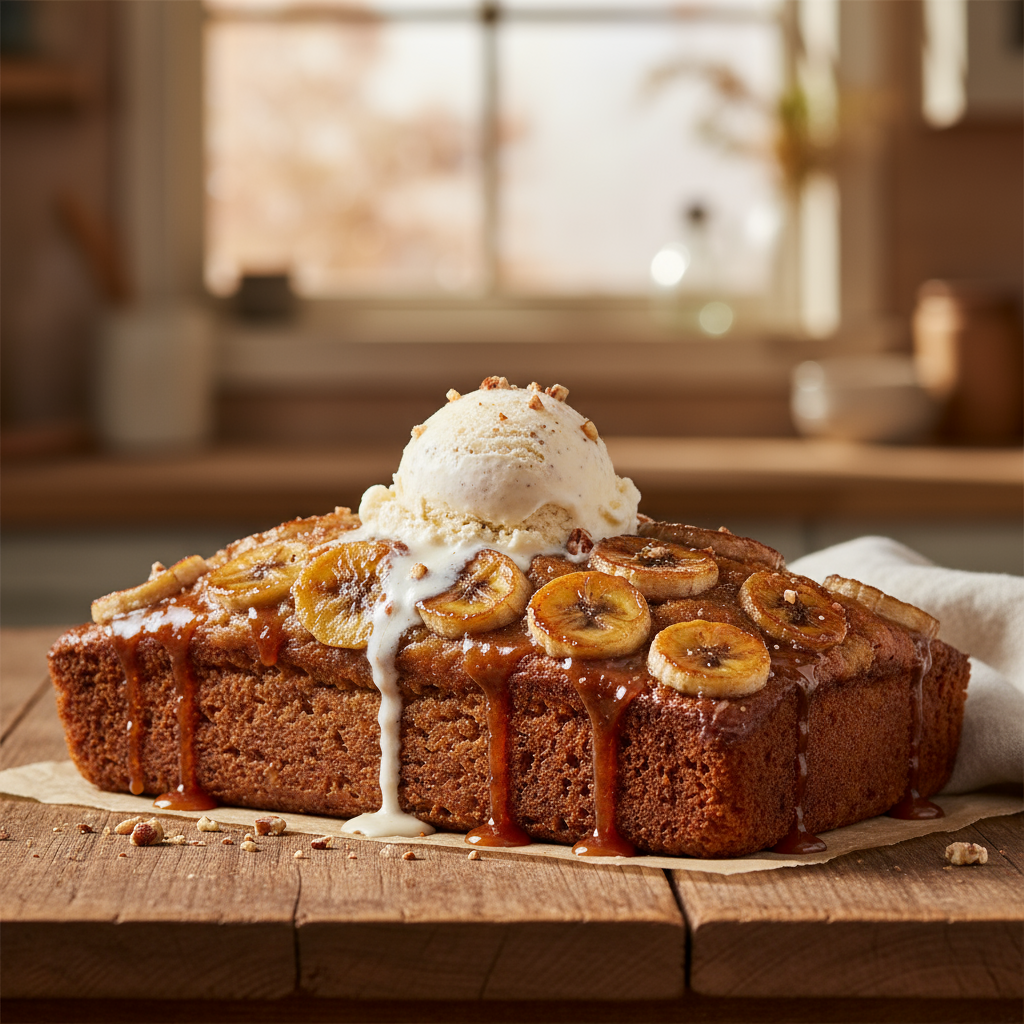
Upside-down banana bread
Serves:
10
Ingredients
- 1/2 cup (100g) brown sugar
- 3 tbsp butter, cut into small pieces
- 2-3 bananas, sliced into 1cm rounds
- 1 1/2 cup (225g) wholemeal flour
- 3/4 (180g) cup white sugar
- 1 tsp baking powder
- 1 tsp bicarbonate soda
- 1/2 tsp salt
- 1/2 tsp ground cinnamon
- 1 cup mashed bananas
- 2 large eggs, lightly beaten
- 1/3 cup (80ml) vegetable oil
- 1/3 cup (80ml) buttermilk
- 1 tsp vanilla extract
For the caramel glaze:
- 2 tbsp butter
- 2 tbsp brown sugar
- 2 tbsp cream
Method
Step 1. Preheat oven to 180å¡C (160å¡C fan-forced). Line a loaf pan with baking paper and set aside. In a small saucepan, heat the butter and sugar together until melted and pour into loaf pan.
Step 2. Place sliced bananas, cut side down, into the pan on top of the caramel mixture.
Step 3. In a mixing bowl, combine all dry ingredients and add wet ingredients. Stir with a wooden spoon until the mixture is entirely wet and then pour into baking pan.
Step 4. Bake loaf for 45-50 minutes or until a skewer placed into the centre comes out clean. Leave in the pan to cool for 20 minutes before turning out onto a serving plate. Place all ingredients for the caramel glaze into a small saucepan. Heat over a medium heat, stirring continuously until all of the ingredients are melted and combined. Pour over the cake gently.
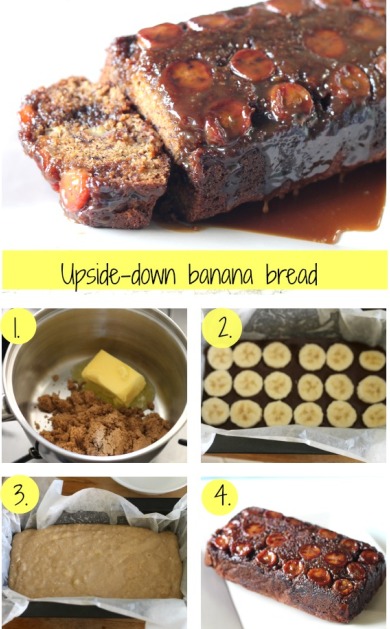
Notes:
- This upside-down banana bread is the most decadent version of banana bread that I have ever seen. It has all of that caramel glaze from the last step soaked into the actual bread. The end result is sticky and delicious and oh so good with ice cream.
- I made the glaze right after I made the first layer. The glaze is fine to stand until the bread is baked and cooled.
- It is best to use over-ripe bananas for the cup of mashed banana. A cup takes about two large bananas mashed.
- This recipe was created by Jennifer Cheung for Kidspot, New Zealand’s best recipe finder.

Orange meringue
Serves:
Ingredients
- 4 egg whites
- 1 cup sugar
- 1/2 teaspoon vinegar
- 1/2 teaspoon vanilla
- 90g roasted hazelnuts, finely chopped
- 1 cup Dark CHOC BITS
- 2 oranges
- 1/2 cup orange juice
- 300ml cream
- 100g Cooking Chocolate
- 3/4 cup extra cream
Method
MERINGUE
Beat egg whites until peaks form, add sugar gradually, beat until thick and glossy and sugar has dissolved.
Beat in vinegar and vanilla, fold in hazelnuts and Dark Choc Bits.
Grease two oven trays, dust with cornflour.
Make a 20cm circle on each tray, spreading meringue mixture evenly into each circle.
Bake in 180°C oven 35 – 40 minutes until crisp. Remove from oven, cool.
CREAM
Peel oranges thinly, place orange peel in pan, cover with water. Bring to boil, drain.
Chop orange peel thinly and return to pan with orange juice, bring to boil, simmer until liquid has nearly absorbed, remove from heat.
Combine cream with cooled melted Cooking Chocolate, beat until thick.
Fold orange mixture through half of the chocolate cream.
Sandwich meringue layers together with chocolate orange cream.
If desired, spread remaining cream around sides of torte and spread top of torte with extra whipped cream.
Serving Suggestions
Note
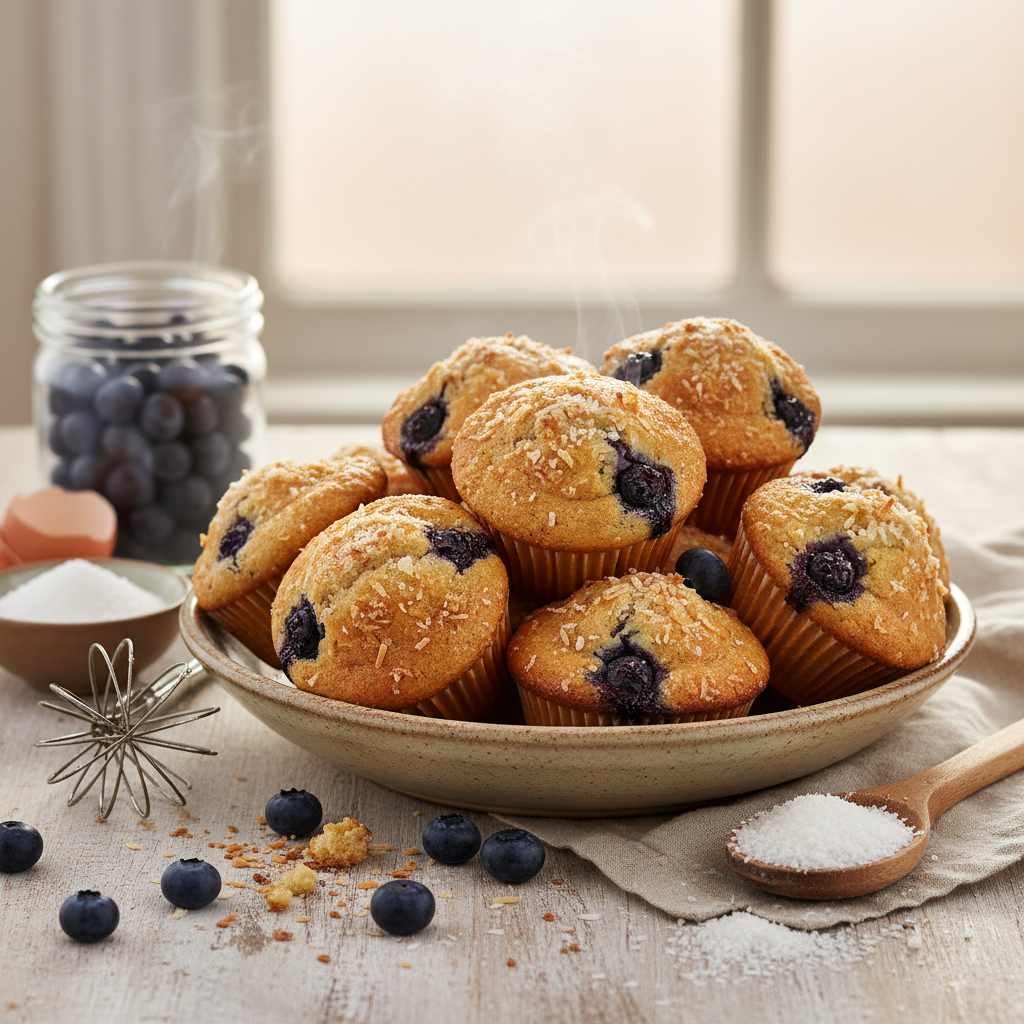
One bowl blueberry and coconut muffins
Serves:
Ingredients
- 1 1/2 cup plain flour
- 1 cup brown sugar
- 1/2 cup rolled oats
- 2 tsp baking powder
- 1 pinch salt
- 2 eggs
- 1 1/2 cup milk
- 1/4 cup vegetable oil
- 1 tsp vanilla bean paste
- 1 cup frozen blueberries
- 1/2 cup coconut flakes
- 1 tbs demerara sugar (for dusting)
Method
Preheat the oven to 180°C (160°C fan-forced), and line a 12 hole muffin tin with paper cases. Place the flour, sugar, oats, baking powder and salt into a large mixing bowl.
Whisk together the eggs, milk, oil and vanilla in a small jug, and add to the bowl of dry ingredients.
Stir together until the mixture is almost combined, then add the blueberries and coconut and stir again, just until they are distributed – do not over-mix.
Divide the batter evenly between the muffin cases, and sprinkle with Demerara sugar, if desired.
Bake for 25-30 minutes, or until the muffins are golden brown and spring back when touched lightly. Remove from the tin and let cool on a wire rack.
Find more muffin recipes:
Serving Suggestions
Note
- These keep well for about 2 days, but wrapped well and individually they'll keep in the freezer for up to a month.
- Swap up to half the flour in this recipe for wholemeal flour, if desired.
- Replace the blueberries with frozen raspberries, chunks of raw pear, or any dried fruit of your choice to change up the flavours.

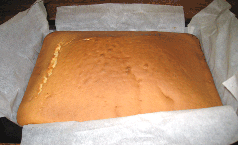
Hot milk cake
Serves:
Serves 12
Ingredients
- 1 1/4 cups (210ml) milk
- 1/4 cup (120g) butter
- 4 eggs
- 1 1/2 cups (330g) caster sugar
- 1 tsp vanilla
- 2 1/4 cups (340g) plain flour
- 2 tsp baking powder
Method
Preheat oven to 180°C (160°C fan-forced). Grease and line a large square cake tin.
Place milk and butter in a small saucepan and heat until just boiling and butter has melted. Set aside.
Beat eggs for 5 minutes until fluffy. With beaters running, gradually add sugar and continue beating until pale. Add vanilla, flour and baking powder and mix well. Pour in hot milk mixture and mix until smooth.
Pour into prepared tin and bake for 40-50 minutes until a skewer inserted in the centre comes out clean.
Serve with cream or custard and fresh fruit.
Find related cake recipes
Serving Suggestions
Note
- You could use a large rectangular baking dish to make a slab cake with this recipe. Note that it will take less time to cook as it won't be as thick.
- This recipe creates a firm cake, so it would be a good choice if you need to shape and carve a themed birthday cake.
- Recipe by Greer Worsley, who blogs at Typically Red.
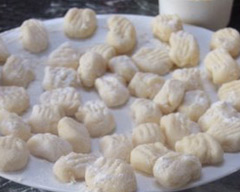
Homemade gnocchi
Serves:
Ingredients
- 900g starchy potatoes, peeled
- 2 egg yolks
- 11/2 cups of tipo 00 flour, approximately
- 2 pinches salt
- Good lashing of pepper
Method
Wash potatoes then pat them dry. Steam the potatoes until soft.
Mash the potato finely then turn out onto floured surface.
Add 1 egg yolk and 3/4 cup of flour. Combine using your hands.
Add remaining egg and enough of the remaining flour that you create a smooth, silky dough.
Cut the dough into 6 even-ish pieces.
Roll each piece of dough on a floured surface into a long snake and then slice into gnocchi size portions (roughly 1 inch).
Give each cut piece a little roll and then press with the back of fork. Put onto floured plate, ensuring none of the gnocchi touch each other.
Bring a large saucepan of water to the boil.
Drop half the prepared gnocchi in piece by piece. When they rise to the top, remove each piece from the boiling water with a slotted spoon. Drain and drop into your simmering sauce.
Repeat with the second half of the gnocchi.
Notes:
- I serve my gnocchi with Napolitana sauce (1 finely diced onion, sliced garlic, 1 tb olive oil, basil, oregano, 2 x 420g tins crushed tomatoes, slosh of red wine, 11/2 cups of water and a tablespoon of tomato paste) and finely grated parmesan cheese on top.
- I used russet potatoes for this recipe.
- Make sure that you weigh the potatoes after peeling to ensure you have the correct amount of potato for the recipe.
- You could use plain flour if you do not have the tipo 00 flour, but plain flour does not have the same strong glutinous properties and the gnocchi may become soggy during cooking.
- This recipe was created by Melissa Klemke for Kidspot, New Zealands best recipe finder.
Related pasta recipes
Serving Suggestions
Note

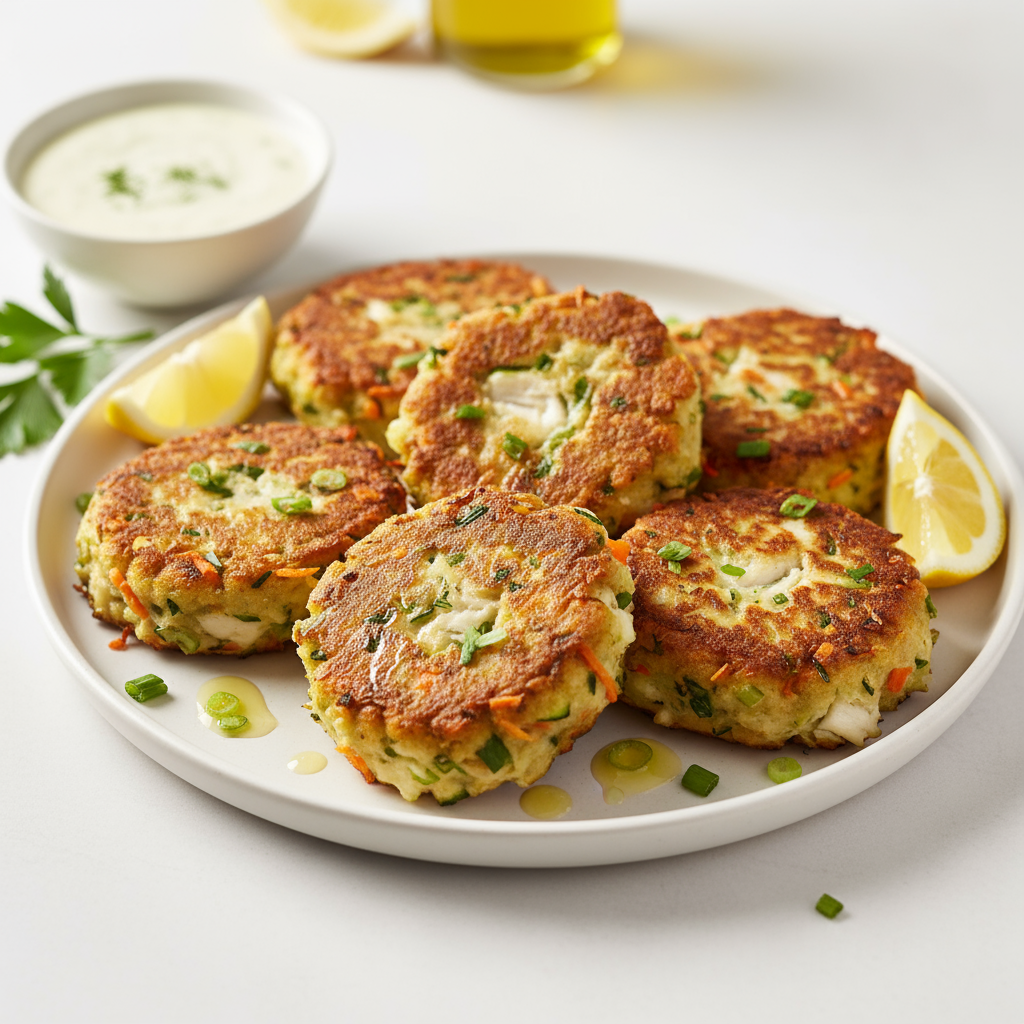
Healthy Thai fishcakes
Serves:
Serves 4, Makes 24 cakes
Ingredients
For the fishcakes:
- 600g firm white fish, finely sliced
- 1 garlic clove, minced
- 2 spring onions, chopped
- 2 tsp lime zest (about 1 lime’s worth)
- 2 tsp freshly grated ginger
- 2 tsp red curry paste
- 1 egg
- 3 tbsp wholemeal flour
- salt
- oil spray
For the salad and dressing:
- 2 cups cooked rice vermicelli (about 75g dry or 1½ little nests)
- 1 red capsicum, finely sliced
- 1/4 cup chopped coriander
- 1/4 cup mint
- 1 cup chopped spinach
- 1 tbsp sesame oil
- 1 tbsp fish sauce
- 2 tbsp lime juice
- 1 tbsp sugar
Healthy Thai fishcakes
Place fish, garlic, spring onions, lemon zest, red curry paste and egg into a food processor and pulse until combined. Don’t over pulse as the mixture will become pasty; you just want the fish to be finely chopped still with some texture.
Stir through flour and season with a little salt.
Heat a non stick frying pan to medium high, spray lightly with oil and place ¼ cups of fish mixture into the pan.
Cook fishcakes in batches for 5 minutes per side or until cooked through.
While cakes are cooking, toss together cooked rice vermicelli, capsicum, coriander, mint and spinach.
Combine the sesame oil, soy sauce, lime juice and sugar in a jar, give a good shake and pour over the noodle salad.
Divide salad among plates or bowls and top with fish cakes.
Find related thai recipes
Serving Suggestions
Note
- Any type of firm white fish will do. If you’re unsure about what to choose, just ask for a firm white fish that’s good for fishcakes.
- Different fish will give you different textures. Softer fish such as basa will give you a smooth, soft texture whereas a firmer fish such as snapper will give you a meatier firmer texture. I prefer the snapper but it’s personal preference.
- This recipe would also work well with salmon.
- My girls don’t like things too spicy so I go light on the curry paste. If you’ve got spicy eaters in your house, up the curry paste.
- I use brown rice vermicelli because it’s higher in protein and fibre, but you can certainly use white.
- Rice vermicelli often comes dried in little nest parcels (about 4 per packet). 75g equals about 1½ nests. I usually cook 2, keeping some noodles for another day.
- Nutritional values per serve: 1355kj (323.6cals); 7.4g total fat (1.4g saturated fat); 2.4g fibre
- This recipe was created by Jay Rogers for Kidspot, New Zealand’s best recipe finder. You can follow Jay at The Moodie Foodie and on Facebook, Twitter or Pinterest.

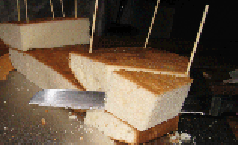
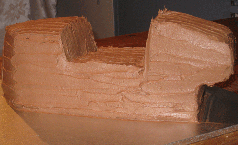
Pirate ship birthday cake
Ingredients
- 4 x 340g packet cakes (any flavour will do)
- 4 eggs
- 4 x cup of milk
- Butter for greasing cake pan
- 1 cup jam
Frosting
- Meadow Lea or 250g softened butter
- 4 cups soft icing mixture
- 1 cup of cocoa
- half a cup milk
Decoration
- Licorice straps
- Chocolate wafer biscuits
- Smarties
- Skewers and paper cut into squares for sails
- Writing icing in red
- Pirates from the toy box and pirate themed candles
Method

Preheat oven to 180C. Grease and line a 35 x 25cm baking tray – this is a tray you use to roast vegetable in NOT a cake tin.
Prepare cake batter as per packet directions preparing two at a time. Pour each cake mix into the prepared tin so that you end up with all four batters in the one tin. Bake at 180C for 40 -45 mins or until a skewer comes out clean.
Cool cake and level the top with a sharp serrated knife. Cut into appropriate building blocks to create the shape of your pirate ship, using skewers and icing (see below) to anchor them together. Brush all cut cake sides with warm jam to seal.
Icing
Using an electric beater, cream butter until light, pale and fluffy. Slowly add sifted icing sugar and cocoa. Add the milk a tablespoon at a time until you reach desired consistency. Cover the entire cake with a generous coating of frosting.
Decorations
Thread paper onto sails and position. Edge all of the deck in wafer biscuits and use licorice to outline the deck. Highlight the deck with writing icing. Add Smarties to back and sides. Position your pirates!
Notes:
- The most important part of creating this cake is getting the right shape and then coating it generously with the frosting. To get a good finish, do a ‘crumb coat’ of icing first – this is where you apply a thin layer of icing over the cake to bind all the cake crumbs to the icing. Then when the icing has set, apply another more generous layer of icing – this will be your final coating and will be crumb-free.
- Another great icing tip is to have a glass of warm water nearby when you ice your cake. Dip your knife into the water as you work – this will ensure the icing is applied to the cake smoothly and you can easily work on getting a lovely finish.
- If you don’t happen to have pirates in your toybox, visit your local $2 shop!
- This recipe was created by Jennifer Cheung for Kidspot, New Zealand’s best recipe finder.

Pork and quinoa balls with sweet chilli sauce
Serves:
Serves 5
Ingredients
- 1/2 cup black quinoa
- 1 cup (250ml) stock
- 500g lean pork mince
- 1 garlic clove, minced
- 2 tsp freshly grated ginger
- 2 spring onions, finely chopped
- 1 egg, lightly beaten
- vegetable oil spray
- 3/4 cup (180ml) sweet chilli sauce
Method
Place quinoa and stock into a small saucepan and bring to a simmer.
Turn the heat down as low as it will go, cover and cook quinoa for 20-25 minutes or until cooked and the liquid has been absorbed. Cool quinoa completely.
Heat oven to 200°C (180°C fan-forced) and line an oven tray with baking paper.
Mix half the cooled quinoa with pork, garlic, ginger, spring onions and egg.
Roll about one tablespoon of mixture in your hands to form a meatball and place on the oven tray. Continue with the rest of the mixture.
Place the tray in the oven and bake for 20 minutes until meatballs are golden and cooked through. Serve either hot or cold with sweet chilli sauce.
Serving Suggestions
Note
- You only need half the amount of cooked quinoa for this recipe but I find that if I try to cook quinoa in quantities smaller than ½ cup I run into trouble and can’t get it right – either too dry or too wet. Keep the rest for a salad or a healthy omelette or anywhere you would use rice.
- I’ve used black quinoa for this recipe but you can certainly use white or red. Cooking times may vary with different colours. White tends to cook quicker than black I’ve found so just keep an eye on it.
- If you’re packing these for lunch make sure you put a freezer block alongside them to keep them cool.
- Why not pack these in a lunchbox with some cherry tomatoes and vegetable sticks for a lovely healthy lunch.
- If you are looking for fresh flavours then this Quinoa tabouleh uses quinoa in place of burgul.
- You can also use quinoa for texture like we have in this Crunchy quinoa salad.
- You can use quinoa as a crumb coating like we have in these Quinoa calamari rings.
- You can even sneak quinoa into a burger like we have in this Quinoa cheeseburger with barbecue onions .
- You can make some Quinoa popcorn chicken instead of going out for fast food.
- You can use quinoa in our Salad in a jar to make your salad more satisfying.
- You can even sneak quinoa into a smothie like we have in this Strawberry quinoa smoothie.
- Quinoa can be used as porridge like in this Quinoa and apple porridge.
- Nutritional value per serve: 1075kj (256cals); 7g total fat (2.5g saturated fat); 0.8g fibre
- This recipe was created by Jay Rogers for Kidspot, New Zealand’s best recipe finder. You can follow Jay at The Moodie Foodie and on Facebook, Twitter or Pinterest.

Apple muffins
Serves:
Ingredients
- 2 cups self raising flour (for Gluten-free see notes below)
- 1 teaspoon cinnamon
- ½ cup caster sugar
- 1/3 cup (80mL) olive or vegetable oil
- 1 cup low fat natural yoghurt
- 2 eggs
- 1 red apple, grated
- ½ cup pecans, chopped (or walnuts or almonds)
- ½ cup dates, chopped
Method
Preheat oven to 180°C and place paper cases in muffin tray (12 large or 18 cupcake size).
Sift flour and cinnamon into large mixing bowl, add caster sugar.
In a glass jug, measure out oil (to 1/3 cup), add yoghurt (to 11/3 cup) and eggs, whisk to combine.
Pour liquid into dry ingredients and mix until just combined.
Stir in apple, pecans and dates.
Spoon mixture into paper cases.
Bake for 20-25 minutes until a skewer inserted into the muffin comes out clean.
Notes:
- If you need to hide the fruit, peel the apple before grating and puree the dates with some hot water to make a paste.
- The pecans add a lovely crunch to these muffins, but omit if you are a nut-free household.
- This is a great way to use up that challenging-tasting natural yoghurt that you bought in a healthy phase, but is now languishing at the back of the fridge!
- Make gluten-free by using gluten-free plain flour (e.g. Orgran) and 3 teaspoons gluten-free baking powder. A smidgeon (about 1/8 teaspoon) of xanthan gum (from health food shops and some supermarkets) gives the ‘gluten-like’ consistency.
- Recipe created by Melissa Hughes for Kidspot.
Find more:
Serving Suggestions
Note

Halloween severed fingers
Serves:
Ingredients
- 100g almond flakes
- 2 tbsp red food colouring
- 125g butter, softened
- 1 whole egg + 1 egg yolk, lightly beaten
- ½ cup icing sugar, sifted
- 5 tbsp caster sugar
- 1 tsp vanilla extract
- 1 pinch salt
- 1 2/3 cups plain flour
Method
Step 1. Place 24 fingernail-shaped almond flakes into a small bowl and pour over the food colouring. Leave to soak while you make the biscuit dough.
Step 2. To make the biscuit dough, using a mixer, cream the butter and eggs until combined. Beat in the icing sugar, caster sugar, vanilla and salt and mix until smooth and creamy (about 2 minutes).
Step 3. Still using the mixer, add the flour and mix until just combined. Form the dough into 2 disks and cover in cling film. Refrigerate for 20 mins.
Step 4.Preheat oven to 180°C or 160°C fan-forced. Line 2 baking trays with baking paper and set aside. Remove dough from refrigerator and roll 12 finger shapes from each disk. Use a sharp knife to cut knuckle ridges into the dough and pinch together for knuckles.
Step 5. Place an almond fingernail on each fingertip. Bake for 12 minutes.
Step 6. Remove from oven and dip each finger end into the food colouring.
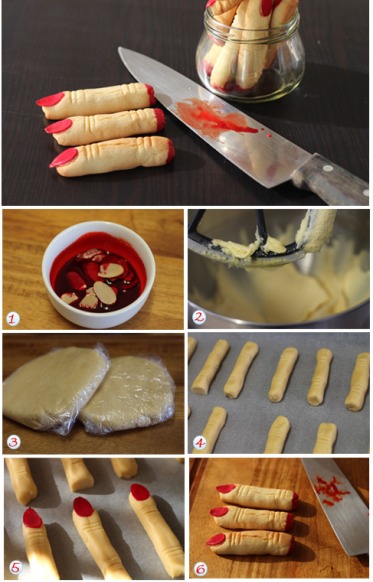
Notes:
- These biscuits are firm on the outside and soft on the inside.
- You can serve these up in a little black pot to resemble a witch’s cauldron or just put them all in a large, clear airtight jar so it looks like you have a big jar of chopped fingers.
- I used tweezers to get the almond flakes out of the food colouring and just applied some pressure to the centre after laying them on top. They became very firmly attached during baking.
- This recipe was created by Jennifer Cheung for Kidspot, New Zealand’ best recipe finder.
Find more Halloween recipes:
Serving Suggestions
Note

Ninjago cupcakes
Serves:
Ingredients
- 1 quantity chocolate cupcakes
- 2 x 500g pkts ready-made white icing
- liquid or gel food colouring – red, blue, yellow and black
- 1 small round cookie cutter
- 1 large round cookie cutter
- icing sugar, sifted
- fine paintbrush
Method
Step 1. Make 18 chocolate cupcakes.
Step 2. Divide one packet of white icing into three portions. Tint one portion red, one blue and leave the third portion white. Take the remaining packet of icing and tint yellow.
Step 3. Roll out the yellow icing and cut disks using the small cookie cutter. Place a disk on each cupcake.
Step 4. Roll out the remaining coloured icings and cut 6 large disks from each colour – one to cover the top of each cupcake. Use a pen lid to stamp out eye slots and neaten edges by trimming with a sharp knife.
Step 5. Place icing disk over the yellow layer on each cupcake and smooth over with your hands.
Step 6. Take a small paintbrush and use the black food colouring to paint eyes on each cupcake.
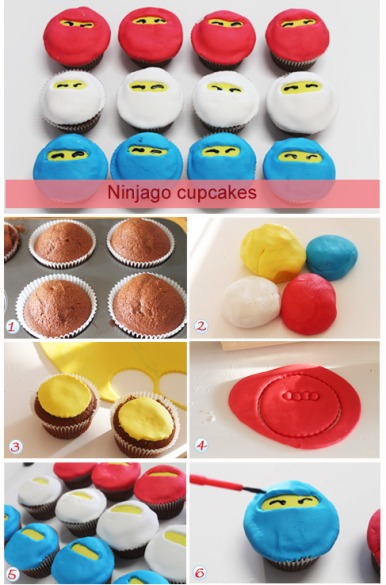
Notes:
- Don’t fear the icing. To add the colouring I just make a dent in the surface and place a few drops in. Then I fold the icing over and over until I have the desired colour evenly spread throughout the icing.
- If the icing gets a bit too sticky you can sprinkle a little icing sugar on the bench and your hands to dry it out.
- If the icing is firm you can place it in the microwave for 30 seconds to soften it before adding the food colouring.
- This recipe was created by Jennifer Cheung for Kidspot, New Zealand’s best recipe finder.
Serving Suggestions
Note

Banana and apple bread
Serves:
Ingredients
- 2 cups plain flour
- 1 cup sugar
- 1 tsp baking soda
- ½ tsp ground cinnamon
- ½ tsp mixed spice
- 120g butter, melted and cooled
- 2 eggs, lightly beaten
- ¼ cup orange juice
- 1 tsp vanilla extract or essence
- 1 ¼ cup bananas, mashed
- 1 x 400g tin pie apples, chopped
Method
Preheat the oven to 180°C /160° fan-forced. Line a loaf tin with baking paper and set aside.
In a large bowl, combine the flour, sugar, baking soda, cinnamon and mixed spice.
In a medium bowl, combine the butter, eggs, orange juice, vanilla, bananas and pie apples.
Pour the wet mixture into the dry mixture and fold until all ingredients are just moist.
Pour into prepared loaf pan and cook for 55-60 minutes or until a skewer inserted comes out clean.
Leave to cool in the pan for 20 minutes before turning out onto a wire rack to further cool.
Notes
- You can cook your own apples if you like, but I used pie apples for convenience.
- If you like it really spicy, you can double the cinnamon and mixed spice in this recipe.
- Ripe bananas have a much better flavour for cakes and breads; the sugar content is lessened and the flavour is better.
Find related banana recipes
This recipe was created by Jennifer Cheung for Kidspot, New Zealand’s best recipe finder.
Serving Suggestions
Note
Lolly slice
Serves:
Ingredients for lolly slice (or lolly cake)
- 1 cup desiccated coconut
- 1 pkt plain biscuits
- half a cup sultanas
- 2 cup mini marshmallows
- 1 cup malteasers
- 3 tablespoons Milo
- 395g tin condensed milk
Method
Tear off two 50 cm pieces of foil, spray with cooking spray and sprinkle each with a light layer of coconut then put to one side.
In a large bowl crush the biscuits. Add remaining ingredients (except coconut) and stir with a wooden spoon until very well combined.
Split mixture in half and place one half of the mixture on the foil in a log shape.
Push mixture together as tightly as you can and repeat with remaining mixture and foil.
When you have two logs, sprinkle the remaining coconut over both and wrap up tightly in foil. Twist the ends shut and refrigerate for at least 5 hours until firm.
Cut off slices as you need them and store in the fridge.
Notes
- I remember making a slice very similar to this then I was 13 and I think I ate most of it before rolling- my boys do the same!
- If you cant find mini marshmallows, cut large ones in half – they will work just as well.
- You can also add 100g of melted butter for a firmer roll but I was thinking of my waistline as I usually eat way too much of this particular slice!
- Recipe created by Camilla Baker for Kidspot, New Zealands best recipe finder.
Serving Suggestions
Note