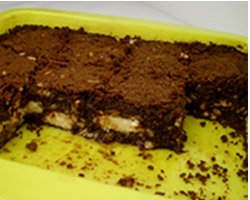
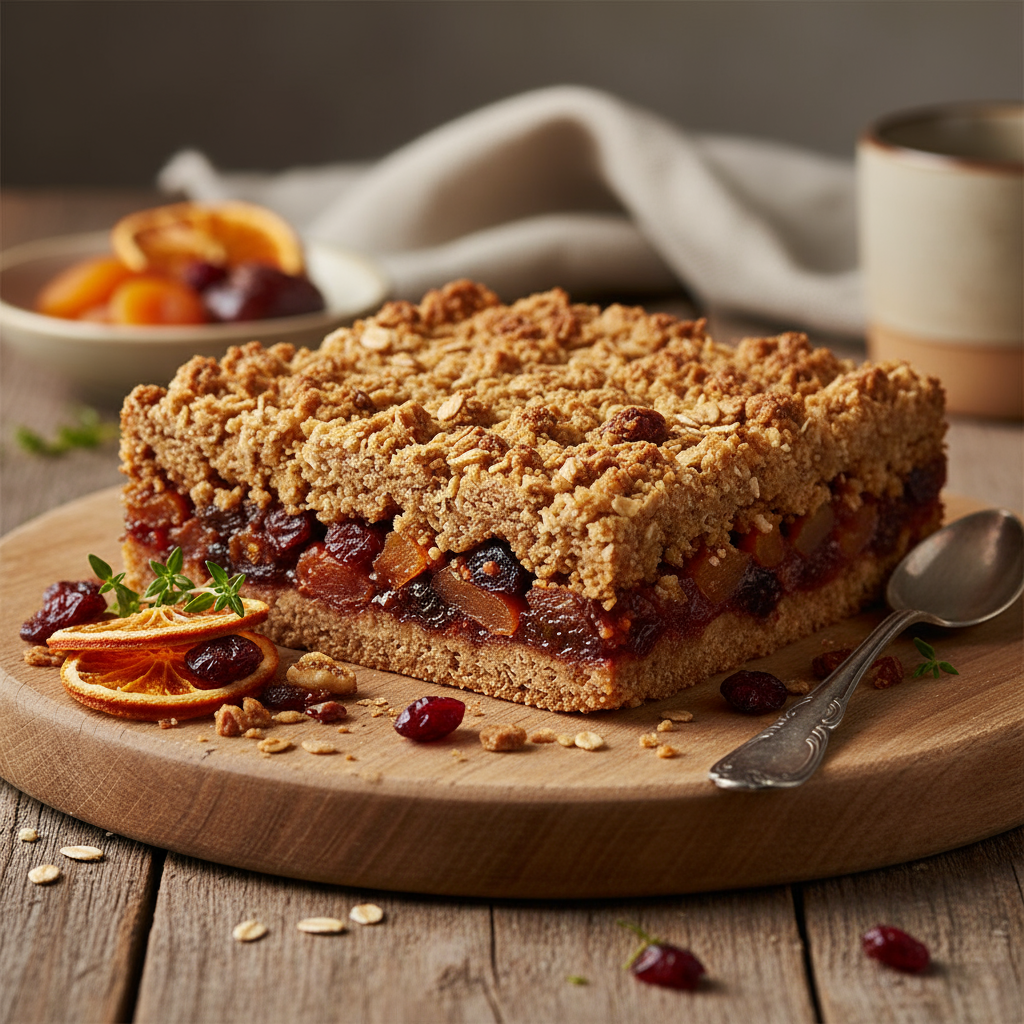
Dried fruit slice

Dried fruit slice

Serves:

Ingredients

  • 2 cups dried fruit, roughly chopped
  • 1 tsp vanilla paste
  • 2 cups (500ml) water
  • 1 1/2 cups (225g) wholemeal flour
  • 1 tsp ground ginger
  • 1 cup (160g) brown sugar
  • 3/4 cup (170g) butter, chilled and diced
  • 1 egg, cold
  • 1/2 cup rolled oats

Method

Preheat the oven to 180°C (160°C fan-forced) and line a 20 x 30cm lamington tin with baking paper.

Place the dried fruit and vanilla in a small saucepan and cover with 2 cups water. Place over a gentle heat and cook for 10-15 minutes or until the fruit has softened completely into a jammy compote. Set aside to cool.

Meanwhile, place the remaining ingredients in the bowl of a food processor and blitz just until the mixture resembles fine breadcrumbs. Place in the fridge until ready to bake.

Press half of the mixture into the tin, cover with the fruit compote and then top with remaining mixture. Bake for 25 minutes or until golden on top. Let cool, then slice into squares.

Related slice recipes:

Serving Suggestions

Note

  • You can use dried peaches, plums or pears for this recipe. On this occasion I used dried peaches.
  • I used a 20 x 20cm cake tin for this slice because I loaned my lamington tin to a friend. If you make it in a laminton tin it will be slightly flatter and less dense.
  • This recipe was created by Sophie Hansen for Kidspot, New Zealand's best recipe finder. You can follow Sophie on  Local is LovelyFacebookTwitter or Pinterest.

Bacon and egg cups

Bacon and egg cups

Serves:

Ingredients

  • 12 slices wholemeal bread
  • 12 rashers middle bacon, rind removed
  • 12 eggs
  • cooking spray

Method

Using a scone cutter, cut out 12 rounds of bread. Spray a muffin tin with cooking spray and place the bread rounds in the bottom of each cup.

Preheat oven to 180°C/160°C fan-forced.

Remove the eye (big round piece) from each rasher of bacon and place back in the fridge to use for another recipe. Spray a frying pan with cooking spray and lightly fry the bacon rashers on each side until just cooked.

Place one rasher inside each muffin cup, lining the edge of the cup and just inside the bread.

Crack one egg into each cup so it is sitting on top of the bread and inside the bacon.

Place the tray in the oven and bake for 15-20 minutes or until the eggs are set.

Remove and serve immediately.

Notes

  • You can add some shredded cheese on the top of each egg or just a little salt and pepper.
  • You can use the leftover bacon for these egg and bacon muffins or even for a Simple fettucine carbonara.

Find more egg recipes

This recipe was created by Jennifer Cheung for Kidspot, New Zealand’s best recipe finder.

Serving Suggestions

Note

Upside down tomato pie

Upside down tomato pie

Serves:

6

Ingredients

  • 2 x 400g cans diced tomatoes
  • 1å_ cups self-raising flour (for Gluten-free, see notes below)
  • 1 teaspoon mustard powder
  • 100g parmesan, freshly grated
  • 50g tasty cheese, grated
  • 125g unsalted butter, chopped
  • 2 eggs
  • 1/3 cup (80mL) milk
  • 4 roma tomatoes, thinly sliced
  • 1/3 cup basil leaves, shredded

Method

Preheat oven to 180å¡C. Butter a 22cm (up to 26cm will work) round cake tin and line with baking paper.

Pour canned tomatoes into a sieve over the sink and leave to drain for 10 minutes.

Use a food processor to mix flour and mustard and cheeses.

Add butter and process until mixture looks like breadcrumbs. Transfer to a large bowl.

Whisk eggs and milk in a jug and pour into cheese mixture, stir well to combine.

Arrange tomatoes in overlapping circles in base of cake tin ‰ÛÒ not too many in the centre as the final product gets a bit soggy.

Spread drained tomatoes over the top and sprinkle with basil.

Carefully drop spoonfuls of batter over the tomatoes; use a knife to help you get the batter off the spoon.

Don‰Ûªt try to spread it; any small gaps will fill in as the pie cooks.

Bake for 30 minutes or until a skewer inserted into the centre comes out clean.

Leave for 10 minutes before turning onto a serving plate.

Notes:

  • A really impressive looking dish that beautifully combines the dense cheesy base with fresh light tomato and basil flavours.
  • Serve as part of a brunch, to go with soup or as scrumptious Sunday leftovers.
  • To make gluten-free, use gluten-free plain flour and 3 teaspoons gluten-free baking powder
  • This recipe is adapted from a Belinda Jeffery recipe.
  • Recipe created by Melissa Hughes for Kidspot.


Roasted baby tomato and olive ricotta tarts

These roasted baby tomato and olive ricotta tarts are the perfect summer lunch or picnic basket filler. Serve them up with a green salad and crunchy bread.

Makes 6

Ingredients

  • 3 sheets frozen shortcrust pastry, partially thawed
  • 400g tomato medley mix (see notes)
  • 400g fresh ricotta (see notes)
  • 1/2 cup (125ml) thickened cream
  • 3/4 cup pitted green olives, quartered lengthways
  • 2 tbsp fresh flat-leaf parsley leaves, finely chopped
  • 1 tbsp fresh lemon thyme leaves
  • 1 tsp finely grated lemon rind
  • 20g baby rocket
  • 2 tsp lemon juice
  • 1 tsp extra virgin olive oil

Method

Preheat oven to 200°C (180°C fan-forced). Place a baking tray on the top shelf in oven. Grease six 3cm-deep, 9cm-round (base) and 11cm (top) loose-based fluted flan tins.

Cut each sheet of pastry in half, diagonally. Line tins with a piece of pastry. Trim edges. Prick bases with a fork. Line pastry with baking paper. Fill with ceramic pie weights or uncooked rice. Place tins on hot baking tray in oven.

Place tomatoes on separate baking paper-lined baking tray. Place on bottom shelf in oven. Bake pastry cases and tomatoes for 10 minutes.

Remove weights or rice and paper. Bake pastry cases and tomato for  5 to 8 minutes or until pastry is golden and cooked and tomato skins have split but not collapsed. Remove from oven. Allow to cool.

Meanwhile, combine ricotta and cream in a bowl. Season with salt and pepper and add olives, parsley and thyme. Fold together until just combined.

Carefully remove pastry cases from tins and place on serving plates. Spoon ricotta filling into pastry cases. Top with tomatoes, sprinkle with lemon rind and season with salt and pepper.

Toss rocket, lemon juice and oil in a bowl. Arrange on top of tarts. Serve immediately.

Find more picnic quiche recipes

Serving Suggestions

Note

  • If the pastry bubbles up in places you can just weigh it down with something heavy when it comes out of the oven.
  • Recipes Tracey Meharg Photography Guy Bailey

Cherry scrolls

Cherry scrolls

Serves:

Ingredients

  • 4 cups (600g) plain flour
  • 1/2 cup (110g) sugar
  • 1/2 tsp salt
  • 1 tbsp dry yeast
  • 100g butter, melted
  • 400ml milk
  • 2 eggs

Filling

  • 1 cup cherries, pitted
  • 1 egg, beaten to glaze
  • 4 tbsp caster sugar
  • 1 1/2 tsp ground cinnamon

Method

Preheat oven to 200°C conventional (180°C fan-forced).

Line a 33cm x 20cm baking tray with baking paper, letting the paper hang over all sides.

Combine the flour, sugar, salt and yeast in a large bowl.  Mix melted butter, milk and eggs together and add this to the flour mixture, mixing to combine. Knead the dough for 8 mins using the dough hook attachment on your standing mixture.  Form into a ball, place in an oiled bowl and cover with a clean tea towel. Leave to rise in a draught-free place for 30 minutes.

Take a third of the dough and, using your fingers press it into and across the prepared baking tray. Then, on a floured work surface and using a lightly floured rolling pin, roll out the remaining dough to a large rectangle (dough should be about 5mm thick).

Blitz the cherries using a stick blender or food processor and, using a pastry brush spread this over the dough rectangle. Gently roll the pastry into a giant sausage. 

Slice into rounds about 4cm thick and place, swirly-side up, on the dough base in the tray. They will swell and rise upon the second proving so don’t worry if there are gaps.

Brush with the egg and set aside for another 30 mins to prove again. Mix together the sugar and cinnamon and sprinkle generously over the top. 

Bake for 20 minutes or until the rolls are golden-brown.

Serving Suggestions

Note

  • The scrolls themselves are easy and fun to make, but the whole process can get a touch messy (rolling the dough, etc.) so give yourselves time to enjoy it and not worry too much if dough gets stuck on the bench top – it won’t take long to wipe away, I promise!
  • The other thing worth noting is that this is a very wet, sticky dough. If you have a mixer with a dough hook then please use it. But the wetter the dough, generally, the lighter and fluffier the result will be so the stickiness is definitely worth it!
  • Sultanas and/or chopped nuts can replace the cherries if you prefer.
  • This recipe was created by Sophie Hansen for Kidspot, New Zealand's best recipe finder.  You can follow Sophie on Local is LovelyFacebookTwitter or Pinterest.

Fried rice Goong Goong style

Fried rice Goong Goong style

Serves:

Ingredients

  • 1kg Char siu (Chinese pork), diced
  • 6 sticks Lup cheong , steamed and sliced
  • 1 bunch shallots, sliced into 1/2cm pieces
  • 12 eggs, lightly beaten
  • 4 cups long grain rice, cooked and cooled
  • 2 tbls dark soy sauce
  • 6 tbls peanut oil

Method

Heat the wok and lightly coat with peanut oil until smoking and add beaten eggs.

Turn and chop them until they are all little tiny pieces and transfer to a bowl.

Add a few more tablespoons of oil to the wok and heat until shimmering.

Add the meat and toss until lightly coloured and heated through.

Add the rice and a few splashes of soy sauce for colour.

Make sure you keep turning it to stop it burning. Add the egg back in and toss through. Add shallots and toss through for a minute.Serve


Notes

  • I have used a barbeque chicken diced up when I don’t have the right sausages or pork and it still tastes great.
  • Lup Cheong is Chinese sausage which must be steamed for 10 minutes before you use it for this recipe.
  • I use the light coloured Lup cheong fresh from the Chinese barbeque shop or you can buy a packaged one in the supermarket in the asian food section.
  • Char Siu is a red barbequed pork fillet. It’s sweet and moist and usually very lean. You can buy it ready-made from a Chinese BBQ shop or if you don’t have one of these handy, you can make it from scratch using pork fillet and a Char Siu sachet from the asian section of your supermarket.
  • Goong Goong is the Cantonese name for grandfather.This recipe was made for me often by my dad.
  • This recipe was created by Jennifer Cheung for Kidspot, New Zealand’s best recipe finder.


Serving Suggestions

Note

Golf balls with pasta and tomato sauce

Golf balls with pasta and tomato sauce

Serves:


Ingredients

  • 500g turkey mince
  • 1 clove garlic, crushed
  • half a cup fresh breadcrumbs (gluten-free)
  • half a cup freshly grated parmesan cheese
  • 2 tablespoons milk
  • 1 egg
  • salt and freshly ground black pepper
  • 1 tablespoon olive oil
  • 400g can diced tomatoes
  • 500g dried pasta (gluten-free)
  • freshly grated parmesan, to serve

Method

In a large bowl combine mince, garlic, breadcrumbs, parmesan, milk, egg, salt and pepper.

Mix until well combined and shape into golf-size balls.

Place on a plate, cover with plastic wrap and refrigerate for at least 30 minutes.

In a large non-stick frypan, heat the oil over medium high heat.

Place meatballs in frypan and allow to brown for about 3 minutes.

Turn meatballs (carefully) and brown other side.

Continue to cook until all sides are golden brown, about 10 minutes total.

Add the diced tomatoes and use about half a cup of water to rinse out the can and add to the frypan.

Lower heat and allow to simmer for 5-10 minutes.

Bring a large pot of water to the boil.

Cook pasta according to packet directions until al dente.

Remove meatballs from sauce and place in a bowl.

Drain pasta and return to pot, pour in tomato sauce and toss pasta to coat well.

Serve pasta in individual bowls, topped with about 5 meatballs and parmesan.

Notes:

  • I made these meatballs the night before and refrigerated them overnight.
  • Makes dinner very easy the next night.
  • A whole packet of pasta is too much for our family to eat in one sitting, pasta isnt great reheated, but whos complaining if it gives you more time to re-enact Sleeping Beauty.
  • I make this meal gluten-free using gluten-free bread in the meatballs and gluten-free pasta.
  • Recipe created by Melissa Hughes for Kidspot.

Serving Suggestions

Note

Black and white chocolate brownie

Black and white chocolate brownie

Serves:

Ingredients

  • 300g dark chocolate, finely chopped
  • 125g butter, chopped
  • 2/3 cup caster sugar
  • 2 eggs, lightly whisked
  • 1 cup plain flour
  • 200g white chocolate, chopped
  • 100g slivered almonds

Method

Preheat oven to 180C. Grease a 20cm square slice tin and line with baking paper, extending paper 5cm over sides. I used my new SiliconWare pan and only needed to grease, not line with paper.

Stir butter and dark chocolate in a saucepan over low heat until smooth. Stir in sugar until dissolved. Remove from heat and stir in eggs and flour. Gently fold in white chocolate and almonds until just combined.

Spread mixture into pan and bake for 25-30 minutes. The trick with brownies is to not over cook them, so the skewer should not come out clean! Allow to cool completely in the tin (it will set as it cools), then use the overhanging baking paper to carefully lift out onto a large chopping board.

With the SiliconWare pan, I loosened the pan from the edges and turned out onto the board. Cut into squares and try very hard not to eat half before the kids get home!

Notes:

  • Pure chocolate evil. Enjoy.
  • Notice in the picture that the slice was not quite set when I cut it, it was fine a few hours later.
  • Store in an airtight container in a cool shady spot for up to 5 days or in the fridge.
  • Recipe created by Melissa Hughes for Kidspot.

Find more cakes and baking recipes:

Serving Suggestions

Note

Egg salad boats

Egg salad boats

Serves:

Ingredients

  • 6 eggs
  • 3 tbsp (60ml) good quality mayonnaise
  • 2 tsp seeded mustard
  • 2 tbsp chives, finely chopped
  • 1 stalk celery, finely chopped
  • 1/4 cup pine nuts, toasted
  • juice and zest of one lemon
  • sourdough bread rolls or a baguette

Method

Arrange eggs in a single layer in a medium pot and cover with cold water.

Bring to the boil and then remove from heat.

Cover and set aside for 10 minutes.

Drain, then cover eggs with cold water, swish them around and then drain, repeating twice.

Set aside to chill while you make the mayonnaise mixture.

To do this, simply combine remaining ingredients and check for seasoning.

Hollow out the rolls or baguette, removing most of the bread interior (reserve for breadcrumbs).

Peel the eggs and roughly chop.

Gently stir through the mayonnaise mixture and then spoon into the rolls.

Serve as is or slice into pieces before serving on a platter.

Find related sandwich recipes

Serving Suggestions

Note

  • Making perfect hard boiled eggs is a bit of an art if you don’t want those grey tinged edges.
  • Check out our Hard boiled egg recipe to find the best way.
  • Good quality mayonnaise is essential to a really great egg salad sandwich.
  • This recipe was created by Sophie Hansen for Kidspot, New Zealand’s best recipe finder: You can follow Sophie on Local is LovelyFacebookTwitter or Pinterest.

Blueberry and orange muffins

Blueberry and orange muffins

Serves:


Ingredients

Gluten-free (see note below)

  • 2 cups self raising flour (or gluten-free flour)
  • 1/2 cup almond meal
  • 1/2 cup caster sugar
  • 1/3 cup (80mL) oil
  • 1 cup milk
  • 2 eggs
  • Zest of one orange, finely chopped
  • 1 cup blueberries

Method

Preheat oven to 180 degrees C and place paper cases in muffin tray. Sift flour into large mixing bowl, add caster sugar. In a glass jug, measure out oil (to 1/3 cup), add milk (to 11/3 cup) and eggs, and whisk to combine.

Pour liquid into dry ingredients and mix until just combined. Stir in orange zest and blueberries. Spoon mixture into paper cases. Bake for 20-25 minutes until a skewer inserted into the muffin comes out clean.

Notes:

  • If you don’t have almond meal, or don’t want to use it, just use more flour.
  • If you have extra mixture, make mini muffins (avoiding the blueberries for the fussy children).
  • Make these muffins gluten free using gluten free plain flour and 3 teaspoons gluten-free baking powder.

Serving Suggestions

Note

Homemade gnocchi with tomato basil sauce

Homemade gnocchi with tomato basil sauce

Serves:


Ingredients

  • 1.5kg potatoes
  • 3 eggs
  • 270g plain flour, plus extra (use Gluten-free flour)
  • 2 tablespoons olive oil
  • 1 onion, finely chopped
  • 1 clove garlic, crushed
  • 680g jar tomato passata or tomato puree
  • sea salt and freshly ground black pepper
  • half a cup basil leaves
  • freshly grated parmesan, to serve

Method

Peel potatoes and cut into large chunks. Place in a large saucepan of water, cover and bring to the boil. Reduce heat and simmer until cooked.

Drain potatoes well and mash until smooth. I have a fabulous Moulineaux that minces the potato into beautiful lump free ribbons. Allow potato to cool for 10 minutes. Add eggs and mix well. Add flour a handful at a time and work in with your hands until the potato mixture is a dough-like consistency.

Turn potato mixture on to a lightly floured bench and knead until smooth. Add more flour if it is too sticky, but dont over do it.

Divide dough into eight pieces. Dust bench with flour and roll each piece into a sausage 1cm diameter. Cut gnocchi into 2cm long (I dipped my knife in flour to reduce the sticking). Leave as is, or press the back of a fork onto each gnocchi (the indentations help the sauce stick to the gnocchi).

To make the tomato sauce, heat the oil in a non-stick frypan over medium high heat. Cook the onion until soft and starting to colour, add garlic and cook another minute. Add tomato passata, reduce heat and simmer for 10 minutes. Add salt and pepper to taste.

Bring a large pot of water to the boil and add a tablespoon of olive oil. Collect all the gnocchi onto a tea towel and carefully tip into the pot (a second adult is handy here).

Once all the gnocchi have floated to the top, cook for another minute, drain and return to pot. Carefully stir through tomato sauce, add freshly torn basil and serve immediately with parmesan.

Notes:

  • I made gluten-free gnocchi using gluten-free flour.
  • This is not a speedy mid-week meal (I tried!), but a fantastic recipe to make on a lazy weekend day with the kids. All that flour, kneading, dividing dough into sausages and cutting into little bits.
  • Recipe created by Melissa Hughes for Kidspot.

.

Serving Suggestions

Note

Beef and potato croquettes

Beef and potato croquettes

Serves:

Serves 4-6

Ingredients

  • 5 large potatoes, peeled and cut into cubes
  • 2 tbsp (40ml) buttermilk
  • 500g beef mince
  • 3 cups parmesan, grated
  • 1 egg, lightly beaten
  • 1 tsp salt
  • 1 tsp pepper
  • 1/2 cup mixed fresh herbs
  • zest of one lemon
  • 1 1/2 cups (135g) wholemeal breadcrumbs
  • 2-3 tbsp olive oil

Method

Preheat oven to 180°C (160°C fan-forced).

Place the potatoes in a saucepan of cold water and bring to the boil. Reduce heat to medium and cook until tender. Drain and mash with the buttermilk.

Add the mince, parmesan, egg, salt and pepper, herbs and lemon zest and using your hands, mix together well. Shape into small balls, about a tablespoon of mixture, and flatten a little (as per the picture).

Coat in the breadcrumbs and arrange on a baking tray. Drizzle with a little olive oil and bake in the oven for 25 minutes or until golden.

Turn over and bake for another 10 minutes. Serve warm with a mild tomato chutney and some greens.

Find related mince recipes

Serving Suggestions

Note

  • Swap the parmesan with crumbled feta for a more intense cheese-y flavour.
  • I like a mix of thyme, oregano and parsley as fresh herbs for this recipe but in a pinch you could always use 2 tbsp of dried mixed herbs.
  • This recipe was created by Sophie Hansen for Kidspot, New Zealand's best recipe finder: You can follow Sophie on Local is LovelyFacebookTwitter or Pinterest.

Lime and raspberry friands

Lime and raspberry friands

Serves:


Ingredients

  • 180g butter, melted
  • 200g icing sugar, sifted
  • 60g plain flour,sifted
  • 120g almond meal
  • 5 egg whites
  • Zest of 1 lime
  • 20 raspberries

Method

Preheat oven to 200°C.

Grease a friand tray with some of the melted butter (use a cupcake tray if you do not have one).

Place icing sugar and flour in a mixing bowl, add almond meal and stir through with a fork.

In a separate small bowl, beat egg whites with a fork, then add the dry ingredients in the other bowl to the mix. Combine using a fork and then add the lime zest. Mix well.

Spoon the mixture into the tin until each mould is 3/4 full. Drop 2 raspberries in each mould.

Place in the oven on the middle shelf and bake for 10 minutes. Rotate the tray 180 degrees (so the part of the tin that faced the front of the oven now faces the back) and bake for a futher 5-10 minutes until golden on top.

Cool, and dust with icing sugar to serve.

Notes:

  • Friands are an almond cake, served mostly at cafes and at high tea houses.
  • If raspberries aren’t in season or very expensive, frozen raspberries work a treat in this recipe, and go a long way!
  • Almond meal can be found in the baking aisle in your supermarket.
  • These friands can be stored in an airtight container in the refrigerator for up to 5 days or frozen for up to 1 month.
  • This recipe was created by Melissa Klemke for Kidspot, New Zealand’s best recipe finder.

Serving Suggestions

Note

Meringue wreaths recipe

Meringue wreaths recipe

Serves:

Ingredients

  • 4 egg whites, at room temperature
  • half a lemon
  • 250g caster sugar
  • 2 tsp cornflour
  • 1 tsp white wine vinegar

Method

Preheat oven to 180C.

Wipe bowl and beater with inner half of a lemon (this ensures there’s no oil or residue left on the bowl and ensures whites beat to their full potential.)

Beat whites until they form soft peaks. Add sugar, cornflour and white wine vinegar and beat until the mixture is white and glossy (and the sugar is absorbed into the egg whites). Add food colouring if you wish and whisk through.

Trace some circles on baking paper and line baking trays.

With a piping bag – or a resealable bag if you don’t have one – fill with the meringue mixture, add your piping bag tip, or cut a corner off the bag. Pipe around the circles as closely as you can… it will need to be at least about 1 inch thickness for it to stay together.

Add cachous, or 100’s and 1000’s if you wish to decorate the wreaths.

Turn down the oven to 150C as you place the wreaths in to cook, they will take about 25 minutes.

Let wreaths completely cool on trays. Decorate with bows or edible glitter if you wish.

Notes

  • This idea actually just popped in my head recently so it was a bit of an experiment, and one that works I think!
  • After making ice-cream I was left with many egg whites, enough for 2 pavlovas… so I made one pavlova and decided with the other half of the mixture I would make these meringues.
  • These meringue wreaths are light and a bit chewy on the inside, and would look great glistening under some fairy lights. I’ve decorated with cachous and chocolate, but you could do it with jelly-tots mini raspberries or even hundreds and thousands.
  • I iced the wreaths with melted dark chocolate (75g) with 1 tbsp of butter mixed through.
  • This recipe was created by Melissa Klemke for Kidspot, New Zealand’s best recipe finder.

Related meringue recipes


Serving Suggestions

Note

Zucchini brownies

Zucchini brownies

Serves:

Ingredients

  • 1 1/2 cups (225g) white sugar
  • 1/2 cup (125ml) vegetable oil
  • 2 tsp vanilla extract
  • 2 cups (300g) self-raising flour
  • 1/4 cup cocoa, sifted
  • 2 eggs, lightly beaten
  • 1 tsp salt
  • 2 cups finely grated zucchini (approx. 2 medium zucchini)
  • 1 cup chocolate chips
  • 3 tbsp pure icing sugar

Method

Step 1.åÊPreheat oven to 180å¡C (160å¡C fan-forced). Line a 20cm x 20cm cake tin with baking paper and set aside. In a bowl, combine sugar, oil, vanilla, flour, cocoa, eggs and salt.

Step 2.Stir in the zucchini and chocolate chips until well combined.

Step 3.åÊPour mixture into prepared tin.

Step 4.åÊBake for 30-35 minutes or until cooked through. Cool and sift icing sugar over the top. Cut into squares.

Zucchini brownies

Note

  • This mixture is really dry before you add the zucchini. Stir in the zucchini and chocolate chips until well combined.
  • You don’t need to squeeze moisture out of the grated zucchinis.
  • If you don’t have chocolate chips, you can add 200g of melted chocolate in its place.
  • This recipe was created by Jennifer Cheung for Kidspot, New Zealand’s best recipe finder.

Homemade Big Mac special sauce

Homemade Big Mac special sauce

Serves:

6

Ingredients

  • 1/2 cup mayonnaise
  • 2 tbsp French dressing
  • 4 tsp sweet mustard pickles (relish)
  • 1 tsp white onion, finely chopped
  • 1 tsp white vinegar
  • 1 tsp caster sugar
  • 1 pinch salt

For the burgers:

  • 6 beef patties
  • 6 cheese slices
  • 6 tbsp white onion, diced
  • iceberg lettuce, shredded
  • pickle slices for the burger (we used sliced Polskie Orgorskie)
  • 6 buns + 3 additional buns to make the centre slice

Method

Step 1. Place all ingredients for the sauce into a bowl.

Step 2. Whisk until combined.

Step 3. Cover and refrigerate overnight. Stir often during refrigeration to infuse flavours.

Step 4. Prepare burger ingredients and lay onto the bun, spreading the sauce generously on your burger patties.

Homemade big mac special sauce

Serving Suggestions

Note

  • The French dressing needs a good shake before pouring from the bottle so you get an even measure of oil and vinegar mixture.
  • You can use this sauce straight away but the flavours really develop overnight for the best flavour.
  • You can also add this sauce to your homemade Cheeseburgers.
  • These Double burgers are just like a Big Mac in size but with the added salad.
  • If you want to make a healthier version you can try these Healthy hamburgers.
  • You can also try one of our other copycat burger recipes, Homemade KFC burgers. They are a delicious alternative to the drive-through.
  • If you like lamb then these Spring lamb burgers are a great treat for party platters.
  • These Tex Mex burgers have a Mexican spin on flavour with all the convenience of a burger.
  • If you love the flavour of peanut Satay then try these Satay chicken burgers. They are perfect in mini form too.
  • These Portuguese chicken burgers taste just like Oporto burgers and you can control the amount of spice that you like.
  • Are you looking for a delicious vegetarian alternative to beef burgers? Try these Mushroom pesto burgers.
  • This recipe was created by Jennifer Cheung for Kidspot, New Zealand’s best recipe finder.

Ricotta pancakes with honeycomb butter

Ricotta pancakes with honeycomb butter

Serves:


Ingredients

  • 250g tub ricotta (I used low fat)
  • 1/2 cup milk
  • 3 eggs, separated
  • 3/4 cup plain flour (use Gluten-free)
  • 1/2 teaspoon baking powder (use Gluten-free)
  • 50g butter

Honeycomb butter

  • 50g honeycomb, chopped
  • 100g butter, softened
  • 1 tablespoon honey

Method

To make honeycomb butter, place honeycomb in a food processor and whiz until finely chopped. Add butter and honey and process until well combined. Place honeycomb butter on a piece of plastic wrap, roll up and shape into a sausage about 2cm diameter. Refrigerate for a few hours to firm, then slice into 5mm rounds.

Combine ricotta, milk and egg yolks, whisk well to combine. Stir in sifted four and baking powder and mix well. Beat egg whites with an electric beater until soft peaks form. Use a metal spoon to stir one spoonful of egg white into ricotta mixture to lighten the mixture, then gently fold in remaining egg white. Heat a non-stick saucepan over low to medium heat.

Melt half a teaspoon of butter and place 1/3 cup (use a measuring cup) of mixture into the frypan. Cook 2-3 at a time depending on the size of your pan. Cook for 3-4 minutes until golden, then turn and cook for a further 2 minutes until the other side is golden and the pancake is cooked through. Repeat with remaining butter and batter. Serve ricotta pancakes with one or two rounds of honeycomb butter on top and drizzled with extra honey.

The butter melts and oozes beautifully over the pancakes. Icecream and cream would make it just perfect.

Notes:

  • Whisking the egg whites is not as much as a hassle as you would think and gives these pancakes their wonderfully light texture. Keep leftover pancakes covered in the fridge and reheat for breakfast.
  • I used honeycomb that came in a jar of honey at the supermarket. You could also get honeycomb at some delis and markets.
  • Honeycomb butter will keep in the fridge for a couple of weeks.
  • Make these gluten-free by using gluten-free plain flour (e.g. Orgran) or rice flour and gluten-free baking powder.
  • If you don’t want to indulge in the butter, just drizzle with honey and maybe some vanilla yoghurt, or lemon and sugar. The pancakes don’t have any sugar in them, so need a little sweetness.
  • Recipe created by Melissa Hughes for Kidspot.

Find related pancake recipes

Serving Suggestions

Note

Something fishy potato salad

Something fishy potato salad

Serves:


Ingredients

  • 1 kg (4-6) medium sized potatoes
  • 415g can salmon
  • 1 apple, peeled, cored and diced
  • ½ cup good quality egg mayonnaise
  • 2 tablespoons capers
  • juice of ½ lemon

Method

Boil the potatoes until tender, drain and cool. When potatoes are cool enough to handle, peel and slice into rounds. Dissect the salmon and remove any bones (try and breathe through your mouth if you don’t like that ‘just out of the can’ smell!).

In a large salad bowl combine potatoes, salmon, apple, mayo, capers and lemon juice. Mix gently to combine. Add more mayonnaise if you like a very creamy salad.

Serve while potatoes are still warm.

Notes:

  • Thanks to my good friend Jacqui S for this great recipe. The apple gives a lovely crunch and the capers a lemony-salty taste. Substitute mini gherkins for the capers if that is more likely to be tolerated by your family.
  • I hate the smell of canned fish (but don’t mind it once it is made into something) and cheap cans of fish are worse because you have to spend time over it removing bones and other yucky bits. May I suggest spending a bit more on your can of salmon (or buy a fresh piece to cook) to speed up the preparation and spare your delicate constitution!

Serving Suggestions

Note

Mini pumpkin cupcakes

Mini pumpkin cupcakes

Serves:

Makes 24 mini cupcakes

Ingredients

  • 1/3 cup extra virgin olive oil
  • 1/3 cup maple syrup
  • 2 eggs
  • 1 cup pumpkin puree
  • ¼ cup milk
  • 1 tsp baking soda
  • 1 tsp vanilla extract
  • 1 tsp cinnamon
  • ½ tsp ground ginger
  • ¼ tsp nutmeg
  • ¼ tsp allspice
  • Salt
  • 2 cups wholemeal plain flour

Icing

  • 60g light creamed cheese
  • 20g butter, softened
  • Orange food colouring
  • 12 Pretzel twigs

Method

Preheat the oven to 170 degrees C. Grease a 24 mini muffin tray with butter.

In a medium bowl, beat together the olive oil and maple syrup with a whisk, then beat in the eggs. Mix in the pumpkin puree, milk, baking soda, vanilla extract, cinnamon, ginger, nutmeg, allspice and a pinch of salt.

Add the flour and stir through until just mixed, don’t over mix.

Distribute the mixture between 24 mini muffin holes. Bake for 20-25 minutes or until the top is golden and when a bamboo skewer inserted into a cupcake comes out clean.

Remove the cupcakes to a wire rack and cool completely.

To make the icing, beat together creamed cheese, butter. Add a few drops of food colour and mix, continue to add drops of colour and mixing until you have a pumpkin orange colour.

Smear a heaped tablespoon of icing onto cooled cupcake with a butter knife and smooth out. Use the back edge of the knife to create 6 grooves from the middle of the cupcake to make the pumpkin look. Stick a pretzel twig into the middle of each cupcake to make the stalk of the pumpkin. 


Serving Suggestions

Note

This article was written by Susie Burrell for Philips Sonicare and Kidspot NZ.

Banana cake with butter frosting

Banana cake with butter frosting

Serves:

Ingredients

  • 125g butter
  • 1/2 cup caster sugar
  • 2 eggs, lightly beaten
  • 1 tsp vanilla essence
  • 1 1/2 cup mashed ripe bananas
  • 1 tsp bi-carb of soda
  • 1/2 cup milk
  • 2 cups self – raising flour
  • Butter Frosting:
  • 125 grams butter
  • 3/4 cup icing sugar
  • 1 tbsp lemon juice

Method

Preheat oven to 180 degrees C

Brush 20cm round cake tin with oil or melted butter, line base with baking paper

Using electric beaters, beat butter and sugar in small mixing bowl until light and creamy

Add eggs gradually, beating thoroughly after each addition

Add essence and mashed banana, beat until combined. Transfer mixture to a large mixing bowl

Dissolve soda in milk

Using a metal spoon, fold in sifted flour, alternately with milk. Stir until all ingredients are just combined and the mixture is smooth. Spoon into prepared tin and smooth the surface

Bake for 1 hour or until a skewer comes out clean when inserted into centre of cake

Leave cake in tin for at least 10 mins before turning on to a wire rack.

Butter Frosting

Using electric beaters, beat butter, icing sugar and lemon juice until smooth and creamy. Spread onto cooked cake.

Serving Suggestions

Note

Eggplant parmigana

Eggplant parmigana

Serves:


Ingredients

  • 1 large eggplant cut into 2cm slices
  • Salt
  • 400g tin whole tomatoes, drained and roughly chopped
  • 3 shallots, diced (or small brown onion)
  • 2 cloves garlic, chopped
  • 1 sprig basil leaves in tack (or 6-8 whole basil leaves)
  • 25g butter (optional)
  • 1/3 cup plain flour
  • 1 egg
  • half a cup milk, lightly beaten
  • 2 cups fresh breadcrumbs
  • 3-4 tablespoons olive oil (for pan frying)
  • 200g mozzarella cheese, sliced or grated

Method

Slice eggplant into 2cm thick slices (approx 5 slices).

Lie on paper towel and sprinkle one side generously with cooking salt- leave for 30 minutes.

After 30 minutes, wipe the salt from the sliced eggplant using paper towel – you may have to give them 3-4 wipes using fresh paper towel to remove excess moisture.

Add flour to a medium bowl, the egg and milk in another bowl and lastly the breadcrumbs in a third bowl.

Dip eggplant slices in flour, brush off any excess and dip in the egg mixture. Once covered, drop in the breadcrumbs and cover slices. Set aside on a plate and continue with remaining slices until all crumbed.

To make the tomato sauce:

Heat 1 tablespoon of olive oil in a small saucepan. Add shallots and garlic then saute for 3-4 minutes, stirring.

Add tomatoes, salt and pepper to taste and then the basil leaves and butter.

Place a lid on the top of the saucepan and simmer for 10 minutes, stirring occasionally.

Turn off heat and place to one side until needed.

Preheat oven to 200C.

Place a large frying pan on medium-high and add 1-2 tablespoons of olive oil. Lightly fry the breaded slices of eggplant until they turn golden brown.

Place slices on an oven tray and pop in the oven for 15 minutes, until eggplant is soft.

Remove from oven, divide the tomato sauce between eggplant slices and top with mozzarella cheese.

Place back in the oven until cheese melts (approx 8 minutes).

Serve straight away with a wedge of lemon.

Notes

  • These were really yummy and quite easy despite the long method above!
  • I state a sprig of basil leaf  because it is easier to remove after cooking if your kids dont like the sight of green; however, if your kids dont mind a bit of green go ahead and just use the leaves.
  • Making the tomato sauce while the eggplant is salting makes this meal a lot faster to prepare.
  • The butter gives the sauce a lovely smoother flavour, however, if you are not keen on the butter, this recipe is fine without it.
  • Recipe created by Camilla Baker for Kidspot, New Zealands best recipe finder.

Serving Suggestions

Note

Baked custard

Baked custard

Serves:


Ingredients

  • 2 whole eggs plus
  • 2 extra yolks
  • 60g caster sugar
  • half a tsp vanilla extract
  • 500mL thin cream
  • 1 tsp ground nutmeg

Method

Preheat oven to 165C. Set four custard cups, or small ramekins, into a baking tray and fill the tray with water to 1/3 of the height of the cups. Set aside.

Heat the cream until scalding. Remove from the heat.

Beat the eggs, egg yolks, sugar and vanilla extract together until foamy. Gradually add the hot cream, stirring constantly.

Divide the mixture between the cups and bake for 50 mins, or until the tip of a knife comes out clean when inserted in the custard.

Sprinkle each cup with a little nutmeg and serve warm or cold.

Notes:

  • I am more of a fan of pouring custard but baked custard does have the benefit of being a dessert all on its own.
  • You could pour this custard recipe into a pastry shell and bake to create an easy custard tart.
  • This recipe was created by Ella Walsh for Kidspot, New Zealands .

Serving Suggestions

Note

Rainbow cake

This rainbow cake is a very easy to make and impressive birthday cake or holiday fun cake. The cake can be made the day before and iced a few hours before serving

Ingredients

  • 1 packet mix cake with icing (I used Basco Gluten-free golden butter cake, 470g)
  • Extra ingredients for cake and icing (eggs, butter, water, milk)
  • 340g packet Smarties
  • 1 bag gold foil chocolate coins

Method

Preheat oven to 180C. Grease a 20cm ring tin and line with baking paper. Prepare cake mix according to directions and spoon into cake tin, smooth top with back of metal spoon. Bake for 40 minutes or until a skewer inserted into the cake comes out clean. Turn onto a wire rack to cool.

Prepare icing according to directions. Sort smarties into colours (the kids will LOVE helping with this).

Trim the top of the cake so it is flat and cut in half to make two rainbows. Transfer cakes to serving plates. Spread with icing and decorate with smarties rainbow-style. Divide gold coins between two small bowls at the end of the rainbows.

Notes:

  • This is a very easy to make and impressive birthday cake or holiday fun cake. My 3yo daughter had a ball sorting the smarties into colours (I allowed her to eat the brown ones!) and helping me make the rainbow. My 6yo son was most miffed when he realised he had missed out.
  • The 340g pack should give you enough smarties of each colour to do one cake in the  proper colours.
  • I used a gluten-free cake mix for this cake, although the smarties are not strictly gluten-free.
  • The cake can be made the day before and iced a few hours before serving. Don‰t ice more than 4 hours before serving because the smarties go soggy but the kids might not mind, but I did!
  • Recipe created by Melissa Hughes for Kidspot.

Cheese twists

Cheese twists

Serves:

Ingredients

  • puff pastry
  • toppings such as tomato sauce, vegemite, pesto, chutney
  • grated parmesan cheese

Method

Preheat oven to 180¼C.

Place one sheet of puff pastry on bench, slightly thawed. Spread your topping of choice over the whole sheet. Sprinkle the cheese over the top of the sheet of pastry and very gently press. Cut the pastry sheet in half. Cut each half into approx 2 cm wide strips, pick each strip up, twist carefully, place on a baking tray lined then into the oven for 10-12mins, or until puffed and brown.

Find more

Serving Suggestions

Note

Homemade sausage rolls

Homemade sausage rolls

Serves:


Ingredients

  • 4 sheets frozen puff pastry
  • 2 carrots, peeled and cut into chunks
  • 1 medium onion, peeled and quartered
  • ½ cup fresh flat-leaf parsley
  • 500g chicken mince
  • 500g pork mince
  • ½ teaspoon salt
  • ¼ teaspoon white pepper
  • 1 egg, lightly beaten

Method

Preheat oven to 180°C. Line two baking trays with baking paper.

Place pastry sheets on bench to defrost. Place carrots, onion and parsley in a food processor and pulse until finely chopped.

Add mince, salt and pepper and puree until smooth. I did this in batches, combined all ingredients in a large bowl and did the final mixing with (clean) hands.

Divide the mince mixture into eight equal portions.

Slice each sheet of pastry in half. Place a portion of mince on the middle of the long-edge of the pastry and pat the mince into a long sausage shape.

Brush the sides of the pastry with egg, peel the pastry away from the plastic backing and fold the bottom edge over the mince and then roll it over to seal. Do this as firmly as possible so the pastry is tight and neat — makes for better presentation.

Brush the top of the pastry with egg and then cut each roll cross-ways into about 8 small rolls.

Place rolls on prepared trays about 2cm apart. Bake for 20 minutes until pastry is puffy and golden and the mince is cooked through.


Notes:

  • These are really quick and easy to make and you know what is in them!
  • Great for parties, make them the day before, cool, store overnight in the fridge and then reheat before serving.
  • They were a big hit at my nephew’s recent birthday (with both the kids and adults!) … can’t believe he’s seven!
  • Recipe created by Melissa Hughes for Kidspot.

Read more:

Sweet chilli rolls

Mince pasties

Cheats sausage rolls

Turkey sausage rolls


Serving Suggestions

Note

Strawberry ice cream recipe

Strawberry ice cream recipe

Serves:


Ingredients

  • 700 g strawberries, diced into small pieces
  • 1tbsp lemon juice
  • 2 cups double cream
  • 1 cup milk
  • 2 eggs
  • 1 cup sugar
  • 1 tsp vanilla extract or essence

Method

In a bowl, combine strawberries, lemon juice and 1/4 cup of sugar. Place in the fridge for 1 hour.

After an hour, beat eggs for about 2 minutes until they become light and fluffy.

Add the remaining sugar slowly, then add milk and vanilla essence the same way whilst beating slowly.

Add bowl of strawberries and beat slowly for 1 more minute.

Stir in cream by hand, and chill the mixture for another 30 minutes.

Place the chilled mixture into an ice cream maker and follow manufacturer’s instructions. Pour into an airtight container and freeze.

If you don’t have an icecream maker, place the chilled mixture into the freezer for 1 hour 30 minutes. Spoon the mixture into a food processor and whip for 3 minutes. Return the mixture to the freezer. Repeat this process 3 times.

Notes

  • Obviously, you could use other fruit in this recipe – I just think you can’t go past the classic strawberry ice cream!
  • Before you begin, ensure your ice cream maker is frozen, frozen FROZEN.. (I was too impatient when I made this recipe the first time and had to repeat the making process!)
  • This recipe was created by Melissa Klemke for Kidspot, New Zealand’s best recipe finder.

Related ice cream recipes


Serving Suggestions

Note

Bulk pancake mix

Bulk pancake mix

Serves:

Ingredients

  • 6 cups plain flour
  • 2 tbsp baking powder
  • 1 cup milk powder
  • 1/3 cup caster sugar
  • 1 tsp salt

When you want to make the pancakes:

  • 1½ cups bulk pancake mix
  • ¾ cup water
  • 1 egg, lightly beaten
  • 2 tbsp vegetable oilTo make up the bulk mix: Combine all the ingredients and store them in an airtight container for up to three months.

    To make up the batter: Whisk the pancake mix in a bowl with the water, egg and oil. Pour 1/3 cup measures into a greased frying pan over medium heat. Cook for 2 mins, or when lots of bubbles appear on the surface, then flip and cook the other side for 1 min.

    Notes:

    • If you like making savoury pancakes or pikelets, leave the sugar out when making the bulk pancake mix.
    • To make savoury pikelets, add vegetables such as corn and zucchini.
    • Make a batch of this pancake mix as a gift; put it into a lovely jar with the instructions and tie it up with some ribbon and measuring cups.
    • This recipe was created by Jennifer Cheung for Kidspot NZ

Method

To make up the bulk mix: Combine all the ingredients and store them in an airtight container for up to three months.

To make up the batter: Whisk the pancake mix in a bowl with the water, egg and oil. Pour 1/3 cup measures into a greased frying pan over medium heat. Cook for 2 mins, or when lots of bubbles appear on the surface, then flip and cook the other side for 1 min.

Notes:

  • If you like making savoury pancakes or pikelets, leave the sugar out when making the bulk pancake mix.
  • To make savoury pikelets, add vegetables such as corn and zucchini.
  • Make a batch of this pancake mix as a gift; put it into a lovely jar with the instructions and tie it up with some ribbon and measuring cups.
  • This recipe was created by Jennifer Cheung for Kidspot, New Zealand’s best recipe finder.

Find related pancake recipes

Serving Suggestions

Note

Little raspberry bread and butter puddings

Little raspberry bread and butter puddings

Serves:

Serves 6

Ingredients

  • 2 eggs
  • 1 cup (250ml) milk
  • 3/4 cup (180ml) cream
  • 2 tbsp caster sugar
  • 1/2 tsp vanilla essence
  • butter, for greasing
  • 8 mini croissants
  • 1 1/2 cups frozen raspberries

Method

Preheat oven to 190°C (170°C fan-forced).

Whisk together eggs, milk, cream, sugar and vanilla. Place mixture into a jug.

Grease 6, three-quarter cup ramekins with butter. Cut croissants roughly into 1.5cm cubes and place into ramekins, layering with raspberries as you go.

Pour custard mixture into ramekins, ensuring all of the croissant pieces become soaked in the liquid. Place the ramekins onto a tray lined with baking paper and bake for 20-25 minutes until golden.

Dust with icing sugar and serve with good quality vanilla ice cream.

Find more dessert recipes

Serving Suggestions

Note

  • Day-old croissants are best for the this recipe. You could use a couple of large croissants instead.
  • You could bake these ahead of time and reheat them prior to serving.
  • This recipe was created for Kidspot, New Zealand’s best recipe finder by Greer Worsley, who blogs at Typically Red.

Cauliflower pizza base

Cauliflower pizza base

Serves:

This cauliflower pizza base is a great low-carb way to have your pizza and eat it too. You can also use this pizza to sneak vegetables into your kid’s diet.

Ingredients

  • 4 cups riced cauliflower
  • 4 eggs, lightly beaten
  • 4 cups pizza blend grated cheese
  • 4 tsp dried oregano
  • 4 garlic cloves, crushed
  • 1 pinch salt

Method

Step 1. To rice cauliflower, roughly chop 1 head cauliflower.

Step 2. Place in the food processor and pulse 8-10 times. Repeat with the rest of the cauliflower.

Step 3. Place in a lidded dish and microwave for 10 minutes. Now you have riced cauliflower. Preheat oven to 220°C conventional (200°C fan-forced). Cover two pizza trays with baking paper and set aside.

Step 4. In a big bowl, mix four cups of riced cauliflower, egg and cheese until combined. Add the oregano, garlic and salt and mix until combined.

Step 5. Place half of the mixture on each tray and pat into a round shape that is around 1cm thick.

Step 6. Bake for around 15-20 minutes until the base is golden. Add your favourite toppings and return to the oven just until the cheese is melted.

Cauliflower pizza base

Related pizza recipes

Serving Suggestions

Note

  • You can refrigerate or freeze any remaining riced cauliflower for next time you make these pizzas or use it in any dish like rice.
  • You can make these bases as thick or thin as you like.
  • I didn’t tell my kids that this was a cauliflower base and they ate it ALL.
  • This recipe was created by Jennifer Cheung for Kidspot, New Zealand’s best recipe finder.

Join the Catch Up

Join our community of parents and let the Kidspot Catchup be your guide to creating unforgetable family moments.